Asp.net MVC Course content
Document by Vairavan – enquiry@softwaretraininginchennai.com – + 919042710472
- MVC Architecture
- Benefits of Asp.net MVC
- Explanation on Model, View and Controller.
- Filters in MVC
- View models
- JQuery and JavaScript
- Entity Framework with Asp.net
- Code First Approach
- Database First Approach
- POCO Generator
- Data Annotation in MVC
- Custom Data Annotation
- Textbox, Option button ,List box ,Dropdown controls in MVC
- Ajax call in MVC
- Dependency Injection
- MVC with Bootstrap controls
- Layered Architecture in MVC
- Working with Areas
- Partial Views
- Working with Web api
- WCF Consumption in ASP.net MVC
- Convert Asp.net web application to MVC application
- MVC with Angular JS
- Sample Project on MVC
Consume Web api Http service in MVC solution
Document by Vairavan – ganesanva@hotmail.com – + 919042710472
Create a MVC solution using Code First Approach MVC Entity framework.
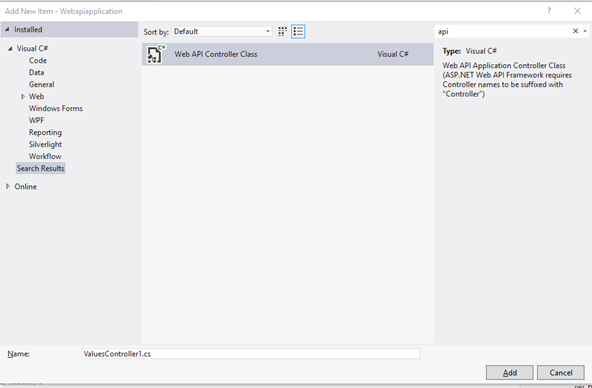
Add a Web Api Controller Class as below,
Look on the WebApiConfig.cs how the Routes are made.
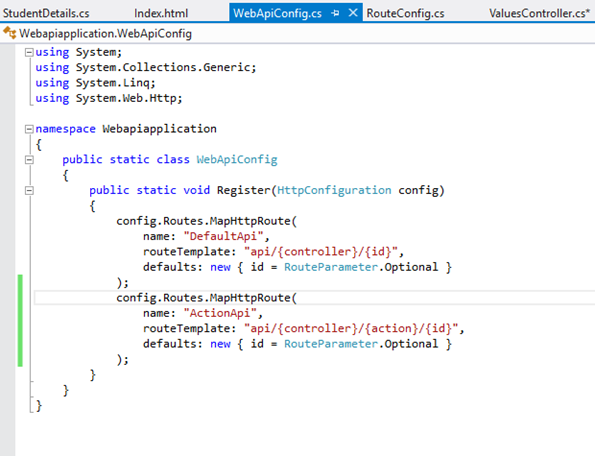
The API URL can be routed as both API/Controller/Id and Api/Controller/Action/Id by registering the Routes in Web api config.
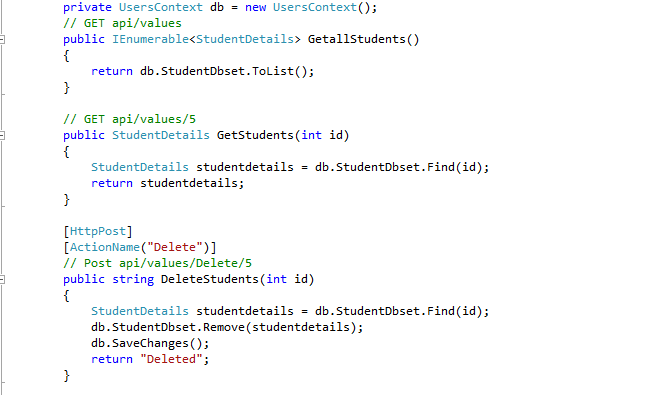
Add the Below code in Api Controller(Used for CRUD),
| private UsersContext db = new UsersContext(); // GET api/values public IEnumerable<StudentDetails> GetallStudents() { return db.StudentDbset.ToList(); } // GET api/values/5 public StudentDetails GetStudents(int id) { StudentDetails studentdetails = db.StudentDbset.Find(id); return studentdetails; } [HttpPost] [ActionName(“Delete”)] // Post api/values/Delete/5 public string DeleteStudents(int id) { StudentDetails studentdetails = db.StudentDbset.Find(id); db.StudentDbset.Remove(studentdetails); db.SaveChanges(); return “Deleted”; } // POST api/values [HttpPost] [ActionName(“Post”)] public void Post([FromBody]string value) { } // PUT api/values/5 public void Put(int id, [FromBody]string value) { } // DELETE api/values/5 public void Delete(int id) { } |
Screen clipping taken: 02-09-2016 18:44
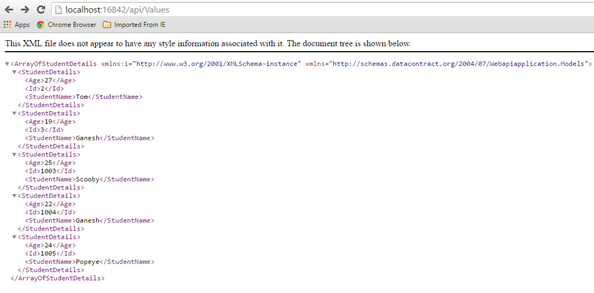
The Above Api methods can be accessed using below URL,
http://localhost:16842/api/Values
http://localhost:16842/api/Values/5
http://localhost:16842/api/Values/Delete/5
The data can be returned as JSON,Xml or any other format depends on the attribute.
Create a new HTML page in the Solution as index.html
Put below code in Index.html,
| <!DOCTYPE html> <html xmlns=”http://www.w3.org/1999/xhtml”> <head> <title>Product App</title> </head> <body> <div> <h2>All Products</h2> <ul id=”products” /> </div> <div> <h2>Search by ID</h2> <input type=”text” id=”prodId” size=”5″ /> <input type=”button” value=”Search” onclick=”find();” /> <p id=”product” /> </div> <script src=”http://ajax.aspnetcdn.com/ajax/jQuery/jquery-2.0.3.min.js”></script> <script> var uri = ‘/api/values’; $(document).ready(function () { // Send an AJAX request $.getJSON(uri) .done(function (data) { // On success, ‘data’ contains a list of products. $.each(data, function (key, item) { // Add a list item for the product. $(‘<li>’, { text: formatItem(item) }).appendTo($(‘#products’)); }); }); }); function formatItem(item) { return item.studentName + ‘: $’ + item.Age; } function find() { var id = $(‘#prodId’).val(); $.getJSON(uri + ‘/’ + id) .done(function (data) { $(‘#product’).text(formatItem(data)); }) .fail(function (jqXHR, textStatus, err) { $(‘#product’).text(‘Error: ‘ + err); }); } </script> </body> </html> |
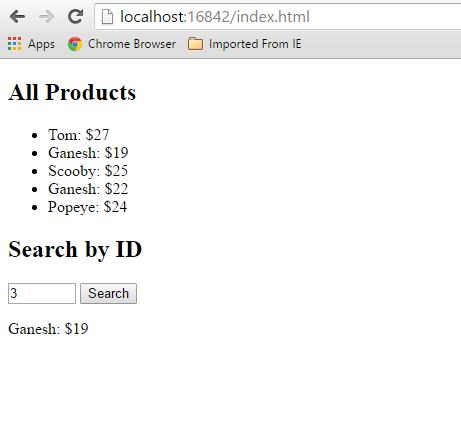
Now the MVC Application Works with Controller web api repository and a HTML page.
The output will be,
Click below to download the solution,
https://1drv.ms/u/s!ArddhCoxftkQg6hMmGfATxDIT2rtJw
Reference
http://www.asp.net/web-api/overview/getting-started-with-aspnet-web-api/tutorial-your-first-web-api
http://www.asp.net/web-api/overview/web-api-routing-and-actions/routing-in-aspnet-web-api
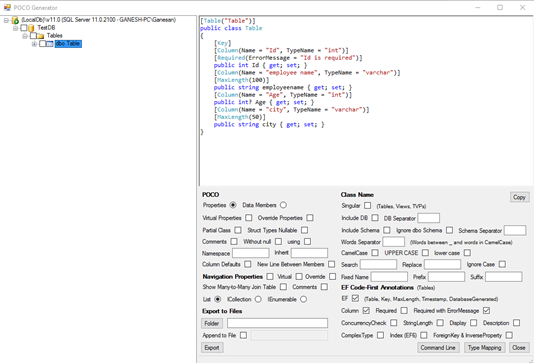
POCO Generator to generate Model Class files
Document by Ganesan – Ganesanva@hotmail.com – + 919600370429
Download POCO Generator EXE from the below URL.
It can be used for Reverse Engineering to change DB first approach to Code First Approach.

http://www.codeproject.com/Articles/892233/POCO-Generator
Connect to the DB.
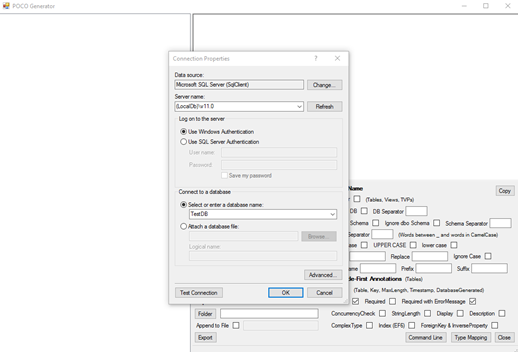
Select the Table that you want to Generate POCO Classes.
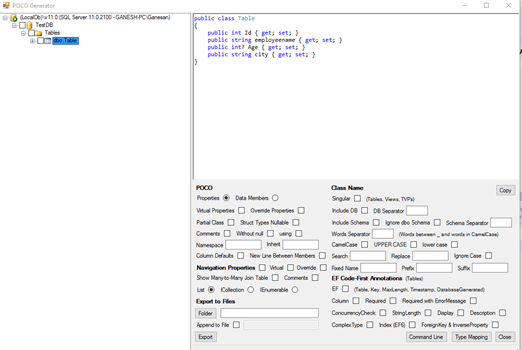
You can even generate Required attribute and Error field as EF Code First annotation as highlighted below.
Areas in MVC
Document by Ganesan – ganesanva@hotmail.com – + 919600370429
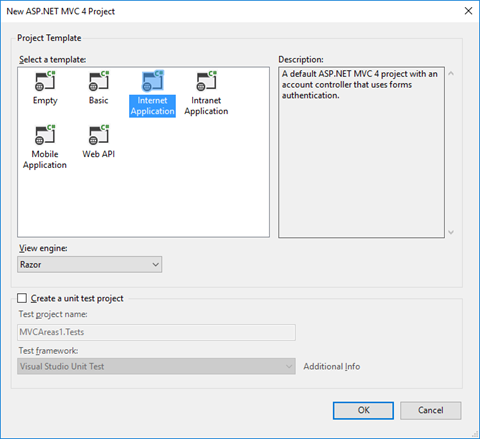
-Create a MVC Application
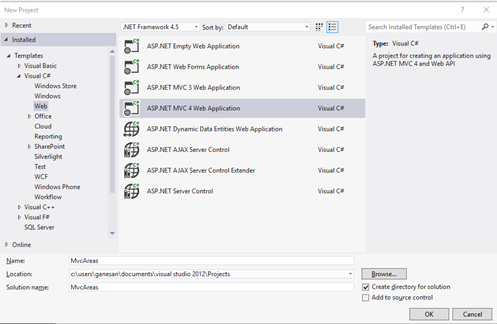
Click OK
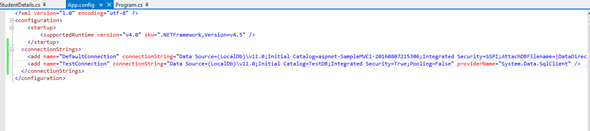
– Add Connection in web.config file as below,
| <connectionStrings> <add name=”TestConnection” connectionString=”Data Source=(LocalDb)\v11.0;Initial Catalog=TestDB;Integrated Security=True;Pooling=False” providerName=”System.Data.SqlClient” /> </connectionStrings> |
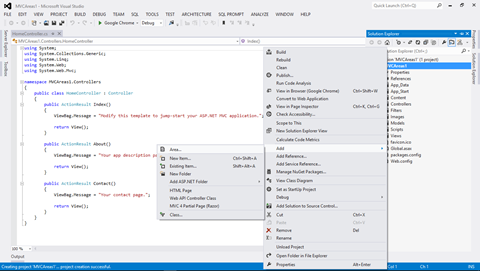
Add Area in the solution with name Admin
Create a Table in TestDB with AdminDetails Table as below.
| CREATE TABLE [dbo].AdminDetails ( [AdminId] INT NOT NULL PRIMARY KEY IDENTITY, [FirstName] VARCHAR(50) NOT NULL, [Lastname] VARCHAR(50) NOT NULL, [Email] VARCHAR(50) NULL, [Password] VARCHAR(50) NULL ) |
Create Employee Table in TestDB as below,
| CREATE TABLE [dbo].[Employee] ( [AdminId] INT NOT NULL, [employee name] VARCHAR (100) NULL, [Age] INT NULL, [Email] VARCHAR (50) NULL, PRIMARY KEY CLUSTERED ([AdminId] ASC) ); |
Add AdminDetails.cs in Admin Areas model as below,
AdminDetails.Cs snippet as below,
| public class AdminDetails { [Key] public int AdminId { get; set; } public string FirstName { get; set; } public string Lastname { get; set; } public string Email { get; set; } public string Password { get; set; } } public class AdminContext : DbContext { public AdminContext() : base(“TestConnection”) { } public DbSet<AdminDetails> AdminDetailsDB { get; set; } } |
Right Click on Controller and Add Controller as below,
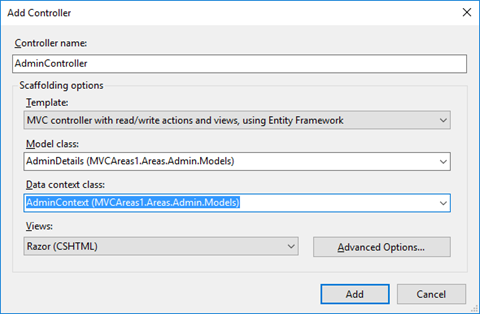
Now CRUD operation generated using Scaffolding.
Similarly Add Student Area by Right clicking on the solution and Add Areas.
Add StudentDetails.cs model in the Student Area.
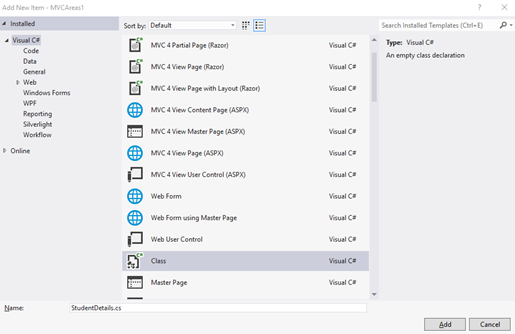
Copy the below snippet in StudentDetails.cs file,
| public class StudentDetails { [Key] public int Id { get; set; } public string StudentName { get; set; } public int? Age { get; set; } } public class StudentContext : DbContext { public StudentContext() : base(“TestConnection”) { } public DbSet<StudentDetails> StudentDetailsDB { get; set; } } |
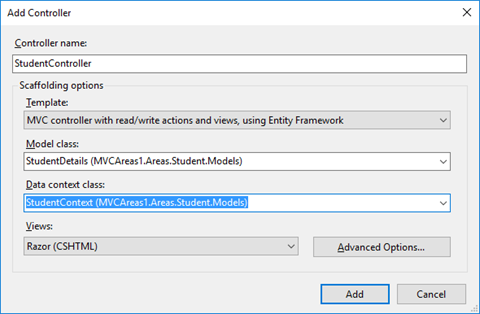
Add Scaffolding for StudentController as below,
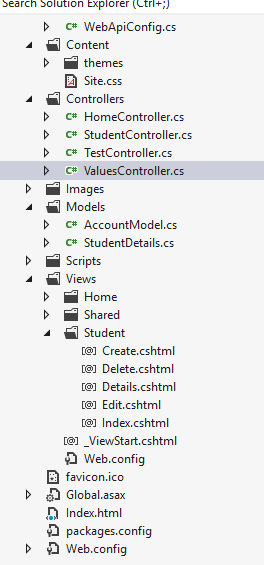
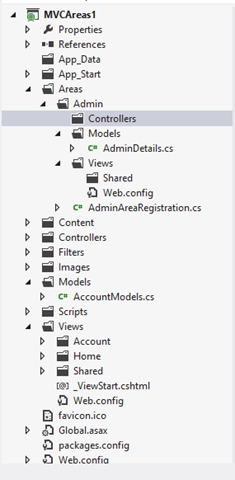
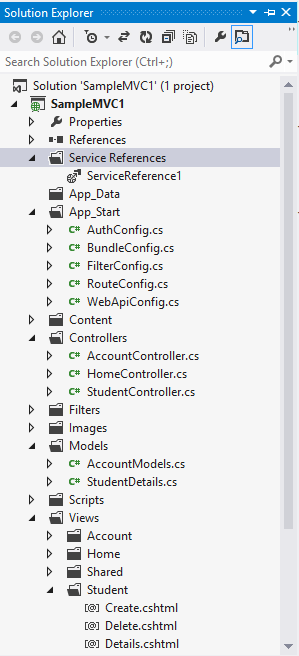
Now the Solution Explorer looks as below,
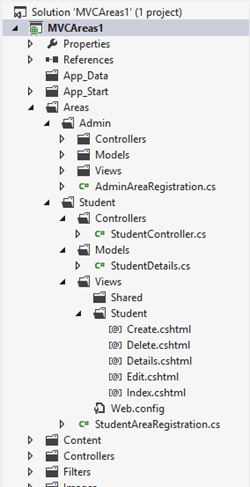
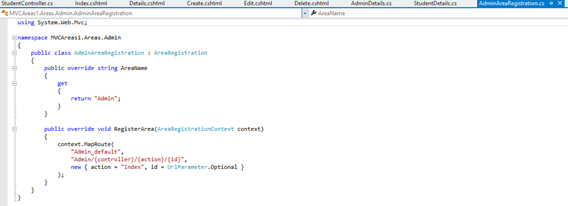
In AdminAreaRegistration and StudentAreaRegistration we can see the routing for Pages,
The OUTPUT for AREA Pages will be as below,
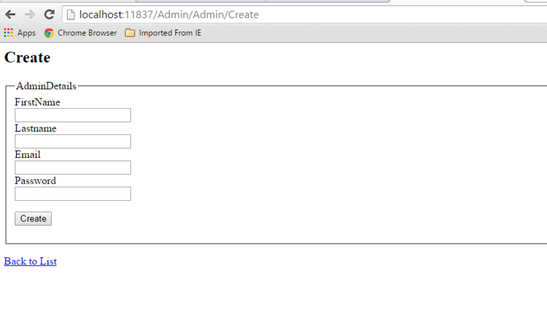
http://localhost:11837/Admin/Admin/Create
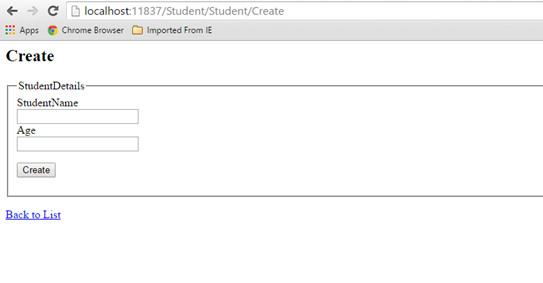
http://localhost:11837/Student/Student/Create
It allows to separate the modules in application development. This also helps for Link Building with relevant keywords.
Click below to download the solution,
https://1drv.ms/u/s!ArddhCoxftkQg6hXj8wspGLO_44ifQ
Windows Application CRUD Operation with ADO.net
Document by Ganesan – Ganesanva@hotmail.com – +919600370429
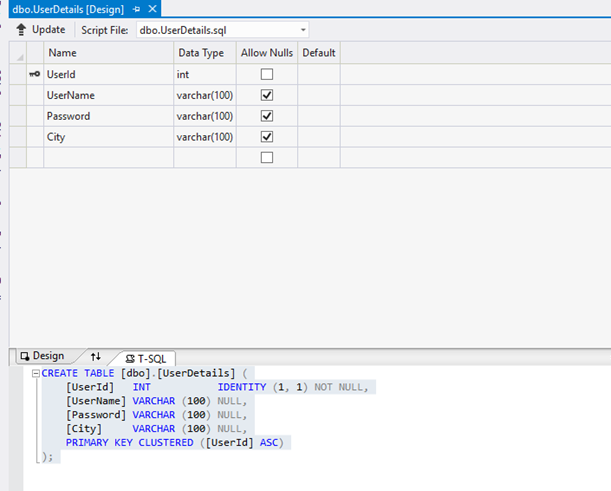
Create TestDB Database in Server Explorer
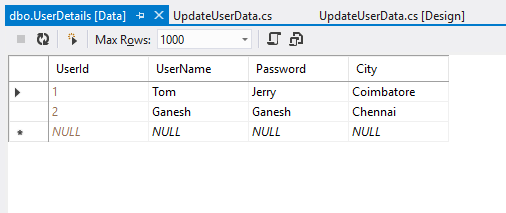
Create table UserDetails in TestDB with the below code snippet,
| CREATE TABLE [dbo].[UserDetails] ( [UserId] INT IDENTITY (1, 1) NOT NULL, [UserName] VARCHAR (100) NULL, [Password] VARCHAR (100) NULL, [City] VARCHAR (100) NULL, PRIMARY KEY CLUSTERED ([UserId] ASC) ); |
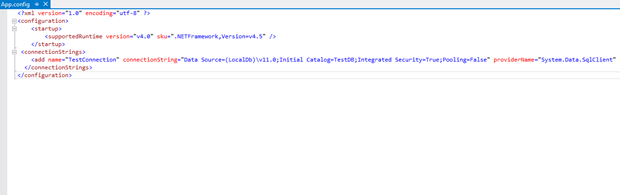
Add the below Connection string in app.config,
| <connectionStrings> <add name=”TestConnection” connectionString=”Data Source=(LocalDb)\v11.0;Initial Catalog=TestDB;Integrated Security=True;Pooling=False” providerName=”System.Data.SqlClient” /> </connectionStrings> |
Design Form1 as below,
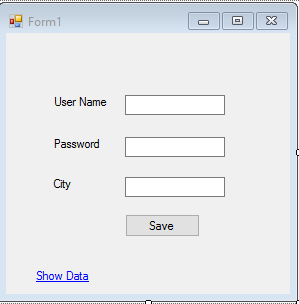
Textbox Properties
UserName Name – txtUserName
Password Name – txtPassword
City Name – txtCity
Save -btnSave
Show Data Link Name -linkLabel1
Events
btnSave OnClick =btnSave_Click
Show Data Link onClick= linkLabel1_LinkClicked
Add below Namespace in Form1.cs.
| Using System.Data.SqlClient; Using System.Configuration; |
Add Reference System.Configuration.DLL in the Project.
In Form1.cs (Replace) put the below Snippet,
| public partial class Form1 : Form { SqlConnection con = new SqlConnection(ConfigurationManager.ConnectionStrings[“TestConnection”].ConnectionString); public Form1() { InitializeComponent(); } private void btnSave_Click(object sender, EventArgs e) { con.Open(); SqlCommand cmd = new SqlCommand(“insert into UserDetails values(‘”+txtUserName.Text+”‘”+”,'”+txtPassword.Text +”‘,'”+txtCity.Text+”‘)”,con); int results=cmd.ExecuteNonQuery(); con.Close(); if (results > 0) { MessageBox.Show(“Inserted Successfully”); } } private void Clear() { txtUserName.Text = string.Empty; txtPassword.Text = string.Empty; txtCity.Text = string.Empty; } private void linkLabel1_LinkClicked(object sender, LinkLabelLinkClickedEventArgs e) { ShowData objShowData = new ShowData(); objShowData.Show(); this.Hide(); } } |
Add ShowData.cs form as below design,
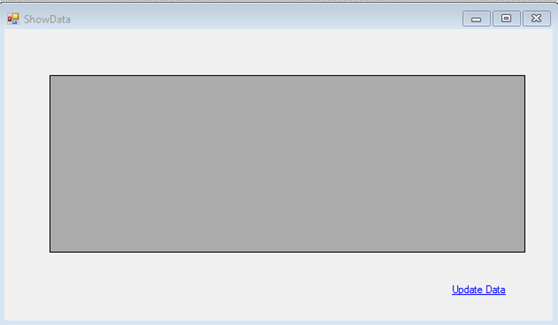
Properties
DataGrid Name – dgvGridData
Update Data Name – lnkUpdate
Events
lnkUpdate Link onClick Event – lnkUpdate_LinkClicked
ShowData Form OnLoad Event – ShowData_Load
Add below Namespace in ShowData .cs.
| Using System.Data.SqlClient; Using System.Configuration; |
In ShowData.cs (Replace) put the below Snippet,
| public partial class ShowData : Form { SqlConnection con = new SqlConnection(ConfigurationManager.ConnectionStrings[“TestConnection”].ConnectionString); public ShowData() { InitializeComponent(); } private void ShowData_Load(object sender, EventArgs e) { SqlCommand cmd = new SqlCommand(“select * from UserDetails”, con); SqlDataAdapter ada = new SqlDataAdapter(cmd); DataSet ds = new DataSet(); ada.Fill(ds); dgvGridData.DataSource = ds.Tables[0]; } private void lnkUpdate_LinkClicked(object sender, LinkLabelLinkClickedEventArgs e) { UpdateUserData objUpdateUserData = new UpdateUserData(); objUpdateUserData.Show(); this.Hide(); } } |
Add UpdateUserData.cs Form as below Design,
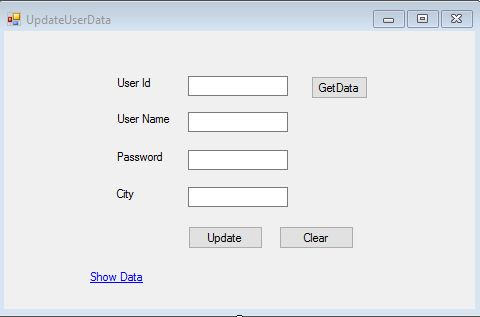
Properties
UserId textbox Name – txtUserId
UserName Textbox -txtUserName
Password Textbox – txtPassword
City Textbox – txtCity
Update button name -btnUpdate
Get Data button Name – btnGet
Clear button Name – btnClear
Show Data Link Name -linkLabel1
Event :
btnUpdate onClick =btnUpdate_Click
btnGet onClick= btnGet_Click
btnClear onClick =btnClear_Click
linkLabel1 onClick – linkLabel1_LinkClicked
Add below Namespace in UpdateUserData .cs.
| Using System.Data.SqlClient; Using System.Configuration; |
Put (Replace) the below snippet in UpdateUserData.cs ,
| public partial class UpdateUserData : Form { SqlConnection con = new SqlConnection(ConfigurationManager.ConnectionStrings[“TestConnection”].ConnectionString); public UpdateUserData() { InitializeComponent(); } private void btnUpdate_Click(object sender, EventArgs e) { con.Open(); SqlCommand cmd = new SqlCommand(“Update UserDetails Set UserName='” + txtUserName.Text + “‘,Password='” + txtPassword.Text + “‘,City='” + txtCity.Text + “‘ where UserId=” + txtUserId.Text, con); int results = cmd.ExecuteNonQuery(); con.Close(); if (results > 0) { MessageBox.Show(“Updated Successfully”); } Clear(); } private void Clear() { txtUserId.Text = string.Empty; txtUserName.Text = string.Empty; txtPassword.Text = string.Empty; txtCity.Text = string.Empty; btnGet.Enabled = true; } private void btnGet_Click(object sender, EventArgs e) { con.Open(); SqlCommand cmd = new SqlCommand(“select * from UserDetails where UserId=”+txtUserId.Text, con); SqlDataReader dr = cmd.ExecuteReader(); while (dr.Read()) { txtUserName.Text = dr[“UserName”].ToString(); txtPassword.Text = dr[“Password”].ToString(); txtCity.Text = dr[“City”].ToString(); } con.Close(); btnGet.Enabled = false; } private void linkLabel1_LinkClicked(object sender, LinkLabelLinkClickedEventArgs e) { ShowData objShowData = new ShowData(); objShowData.Show(); this.Hide(); } private void btnClear_Click(object sender, EventArgs e) { Clear(); } } |
The Output as below,
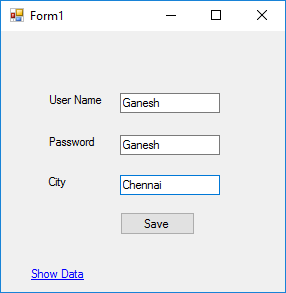
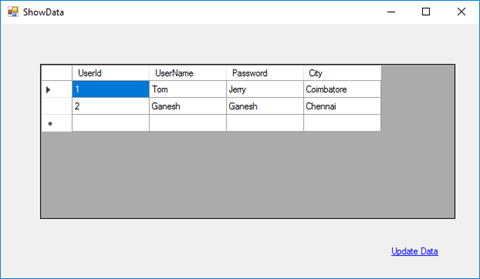

Table Data as below,
Click below to download the solution,
https://1drv.ms/u/s!ArddhCoxftkQg6khuXmrBnLklntXTA
Consume WCF application in MVC
Document by Ganesan – Ganesanva@hotmail.com – + 919600370429
Create a new MVC application.
Create Connection string in Web.config as below.
| <connectionStrings> <add name=”TestConnection” connectionString=”Data Source=(LocalDb)\v11.0;Initial Catalog=TestDB;Integrated Security=True;Pooling=False” providerName=”System.Data.SqlClient” /> </connectionStrings> |
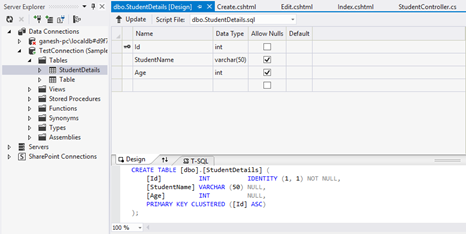
Create StudentDetails.cs Class file as below.
| [DataContract] public class StudentDetails { [DataMember] public int Id { get; set; } [DataMember] public string StudentName { get; set; } [DataMember] public int? Age { get; set; } } |
Create DBContext.Cs file as below
| public class UsersContext : DbContext { public UsersContext() : base(“TestConnection”) { } public DbSet<StudentDetails> studentDbset { get; set; } } |
Create ScafFolding and autogenerate Views and controllers.
Make sure the Code now works in DB first approach. After this we are going to change the
data source to consume From WCF.
Create Service Reference as below,
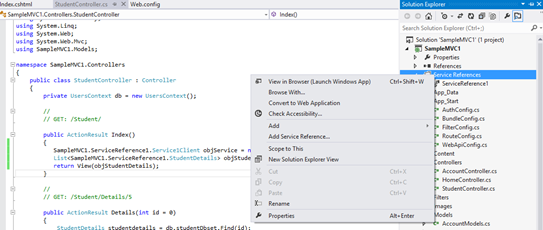
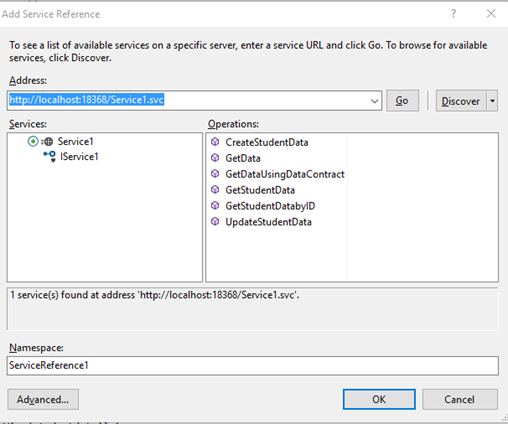
Click OK. Now the service reference will be added as below,
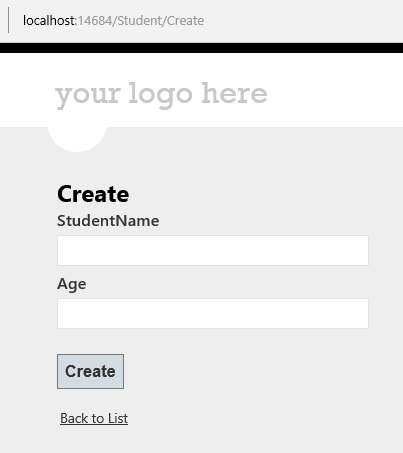
Replace the Controller methods for CRUD as below,
| public ActionResult Index() { SampleMVC1.ServiceReference1.Service1Client objService = new ServiceReference1.Service1Client(); List<SampleMVC1.ServiceReference1.StudentDetails> objStudentDetails= objService.GetStudentData(); return View(objStudentDetails); } [HttpPost] public ActionResult Create(SampleMVC1.ServiceReference1.StudentDetails studentdetails) { if (ModelState.IsValid) { SampleMVC1.ServiceReference1.Service1Client objService = new ServiceReference1.Service1Client(); string result= objService.CreateStudentData(studentdetails); return RedirectToAction(“Index”); } return View(studentdetails); } // // GET: /Student/Edit/5 public ActionResult Edit(int id = 0) { SampleMVC1.ServiceReference1.Service1Client objService = new ServiceReference1.Service1Client(); SampleMVC1.ServiceReference1.StudentDetails studentdetails = objService.GetStudentDatabyID(id); if (studentdetails == null) { return HttpNotFound(); } return View(studentdetails); } // // POST: /Student/Edit/5 [HttpPost] public ActionResult Edit(SampleMVC1.ServiceReference1.StudentDetails studentdetails) { if (ModelState.IsValid) { SampleMVC1.ServiceReference1.Service1Client objService = new ServiceReference1.Service1Client(); string result = objService.UpdateStudentData(studentdetails); return RedirectToAction(“Index”); } return View(studentdetails); } |
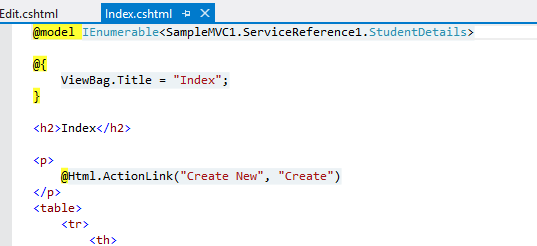
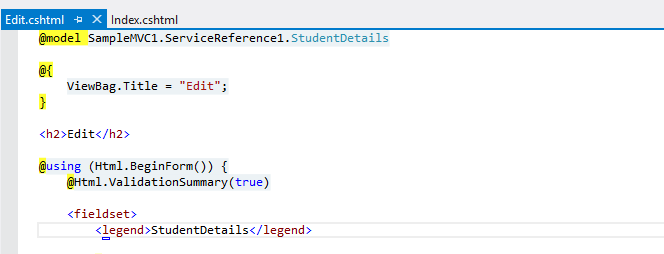
Replace the view First line I.E model reference to point to Service model

Similar for other pages too.
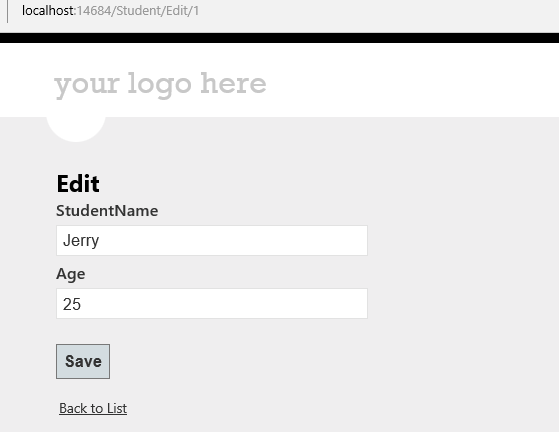
Now the pages will be like below

Click on the Link below to get the sample solution
https://1drv.ms/u/s!ArddhCoxftkQg6gdCJeDrlqBAJE0vg
Create wcf Application for CRUD operation
Document by Ganesan – Ganesanva@hotmail.com – + 919600370429
-Create StudentDetails Table in Local DB
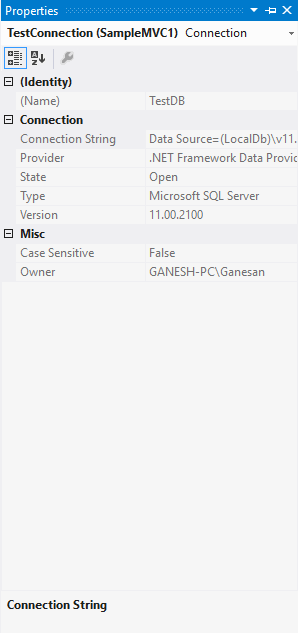
Right Click on the DB and Click Properties.
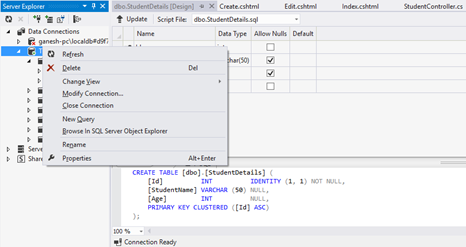
Connection String can be seen in Property window.
– Create a new WCF Service Application.
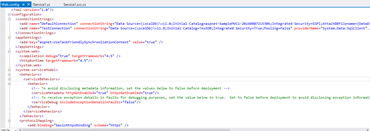
Put the connection string above in Web.config as in Snippet.
| <connectionStrings> <add name=”TestConnection” connectionString=”Data Source=(LocalDb)\v11.0;Initial Catalog=TestDB;Integrated Security=True;Pooling=False” providerName=”System.Data.SqlClient” /> </connectionStrings> |
Create StudentDetails.cs Class file as below.
| [DataContract] public class StudentDetails { [DataMember] public int Id { get; set; } [DataMember] public string StudentName { get; set; } [DataMember] public int? Age { get; set; } } |
Create DBContext.Cs file as below
| public class UsersContext : DbContext { public UsersContext() : base(“TestConnection”) { } public DbSet<StudentDetails> studentDbset { get; set; } } |
Open the default interface file IService1.cs
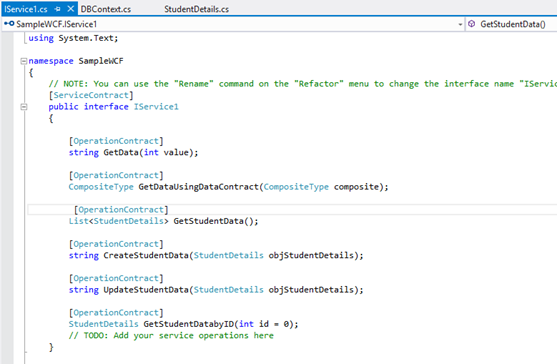
Insert the Snippet as below
| [OperationContract] List<StudentDetails> GetStudentData(); [OperationContract] string CreateStudentData(StudentDetails objStudentDetails); [OperationContract] string UpdateStudentData(StudentDetails objStudentDetails); [OperationContract] StudentDetails GetStudentDatabyID(int id = 0); |
Implement the below code in Service1.Svc.cs
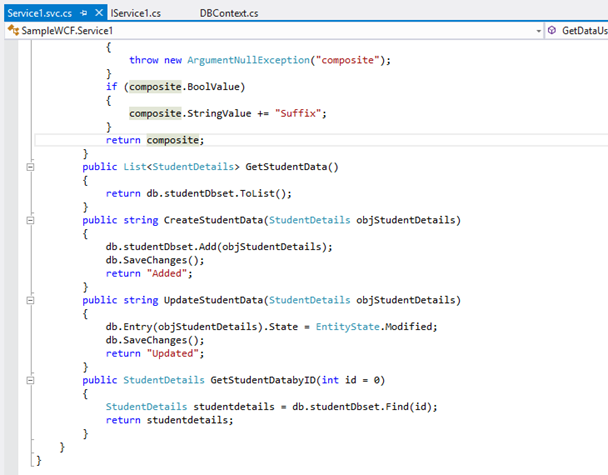
Code Snippet
| public List<StudentDetails> GetStudentData() { return db.studentDbset.ToList(); } public string CreateStudentData(StudentDetails objStudentDetails) { db.studentDbset.Add(objStudentDetails); db.SaveChanges(); return “Added”; } public string UpdateStudentData(StudentDetails objStudentDetails) { db.Entry(objStudentDetails).State = EntityState.Modified; db.SaveChanges(); return “Updated”; } public StudentDetails GetStudentDatabyID(int id = 0) { StudentDetails studentdetails = db.studentDbset.Find(id); return studentdetails; } |
Run the Service application as below

Click on the Link below to get the sample solution
https://1drv.ms/u/s!ArddhCoxftkQg6gdCJeDrlqBAJE0vg
Linq query with different data sources List, Array and SQL
Document by Ganesan – Ganesanva@hotmail.com – + 919600370429
Create StudentDetails Table in TestDB using the below snippet,
| CREATE TABLE [dbo].[StudentDetails] ( [Id] INT IDENTITY (1, 1) NOT NULL, [StudentName] VARCHAR (50) NULL, [Age] INT NULL, [inchargeStudentId] INT NULL, PRIMARY KEY CLUSTERED ([Id] ASC) ); |
– Create a Console Application
Use SQL to Linq Converter,
http://www.sqltolinq.com/
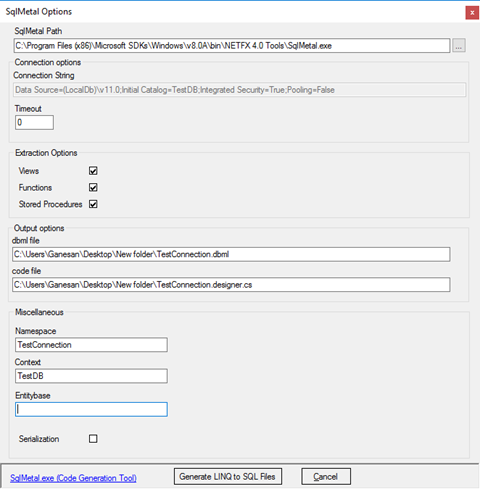
Click on Generate Linq to SQL Model Files,
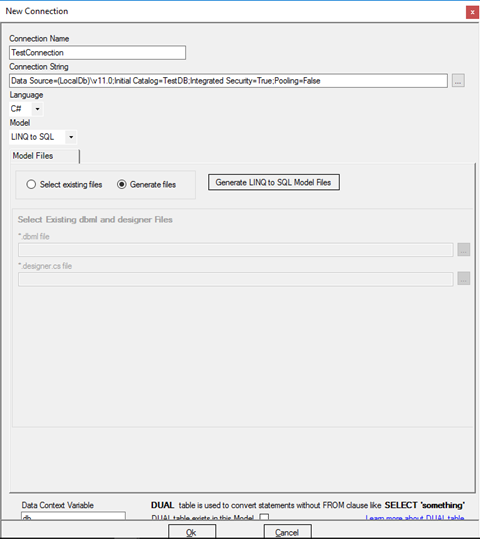
Browse a Folder and Click on OK.
Click on Generate Linq to SQL Files,
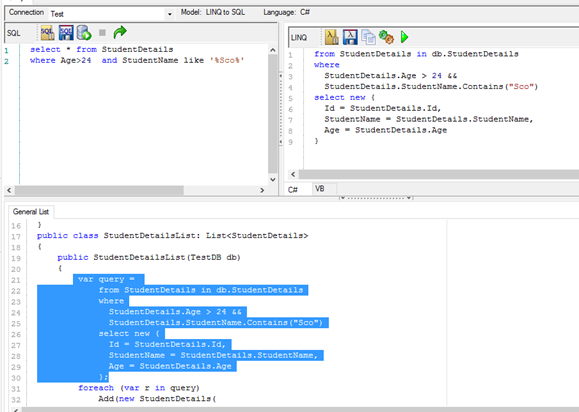
Convert SQL query to Linq as below,
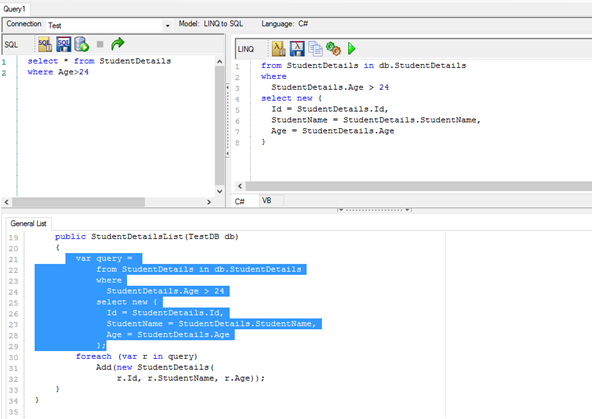
Age> 24 and StudentName contains ‘Sco’
Screen clipping taken: 10-09-2016 19:21
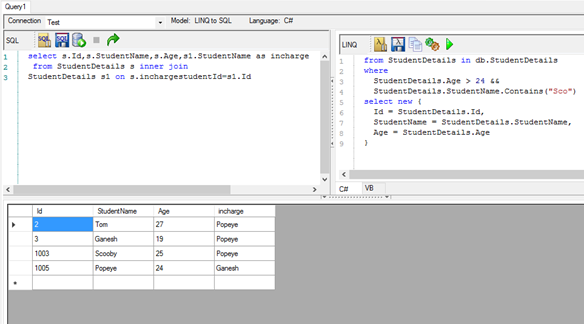
Self Join in Linq
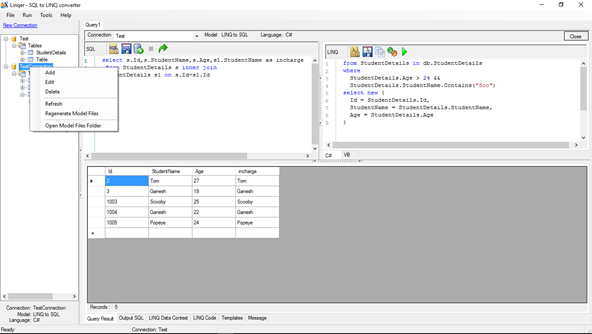
Right click on the table and select Regenerate Model Files.
Insert the connection below in App.config,
| <connectionStrings> <add name=”TestConnection” connectionString=”Data Source=(LocalDb)\v11.0;Initial Catalog=TestDB;Integrated Security=True;Pooling=False” providerName=”System.Data.SqlClient” /> </connectionStrings> |
Add StudentDetails.cs and data context file as below,
| public class StudentDetails { public int Id { get; set; } public string StudentName { get; set; } public int? Age { get; set; } public int? InchargeStudentId { get; set; } } public class UsersContext : DbContext { public UsersContext(): base(“TestConnection”) { } public DbSet<StudentDetails> studentDbset { get; set; } } |
Insert the below Code snippet in Console,
| class Program { private static UsersContext db = new UsersContext(); static void Main(string[] args) { /* Getting the Student Db Collection from DB */ List<StudentDetails> obj= db.studentDbset.ToList(); foreach (var item in obj) { Console.WriteLine(“Student Name” + “\t” + item.StudentName + “\t” + “Age:” + item.Age); } /* Getting the Student Db Collection for Age>24 from DB */ Console.WriteLine(“———————————————————-“); Console.WriteLine(“Printing Age > 24”); var query = from StudentDetails1 in db.studentDbset where StudentDetails1.Age > 24 select new { Id = StudentDetails1.Id, StudentName = StudentDetails1.StudentName, Age = StudentDetails1.Age }; foreach (var r in query) Console.WriteLine(“Student Name” + “\t” + r.StudentName + “\t” + “Age:” + r.Age); /* Getting the Student Db Collection for Age>24 from DB */ Console.WriteLine(“———————————————————-“); Console.WriteLine(“Printing Age > 24 && Student Name contains Sco”); var query1 = from StudentDetails1 in db.studentDbset where StudentDetails1.Age > 24 && StudentDetails1.StudentName.Contains(“Sco”) select new { Id = StudentDetails1.Id, StudentName = StudentDetails1.StudentName, Age = StudentDetails1.Age }; foreach (var r in query1) Console.WriteLine(“Student Name” + “\t” + r.StudentName + “\t” + “Age:” + r.Age); /* Getting the Student Db Collection for getting Incharge on Self join from DB */ Console.WriteLine(“———————————————————-“); Console.WriteLine(“Printing self join for Students Lead”); var query2 = from s in db.studentDbset join s1 in db.studentDbset on new { InchargeStudentId = s.InchargeStudentId.Value } equals new { InchargeStudentId = s1.Id } select new { s.Id, s.StudentName, s.Age, incharge = s1.StudentName }; foreach (var r in query2) Console.WriteLine(“Student Name” + “\t” + r.StudentName + “\t” + “Age:” + r.Age + “\t” + “Incharge:” + r.incharge); /* Getting the Collection from DB */ Console.WriteLine(“———————————————————-“); Console.WriteLine(“Printing from Array”); string[] ary = new string[] { “Jan”, “Feb”, “Mar”, “Apr”, “May”, “Jun”, “Jul”, “Aug”, “Sep”, “Oct”, “Nov”, “Dec” }; var res = from months in ary where months.StartsWith(“J”) select new { MonthStartWith_J = months }; foreach (var r in res) Console.WriteLine(“Month:” + “\t” + r.MonthStartWith_J); /* Getting the Collection from DB */ Console.WriteLine(“———————————————————-“); Console.WriteLine(“Printing from Collection”); List<string> objstring = new List<string>(); objstring.Add(“Yahooo”); objstring.Add(“Google”); objstring.Add(“HCL”); var obj1 = from company in objstring where company.StartsWith(“Goo”) select new { companyStartWith_Goo = company }; foreach (var r in obj1) Console.WriteLine(“Month:” + “\t” + r.companyStartWith_Goo); Console.ReadLine(); } } |
The Output as below,
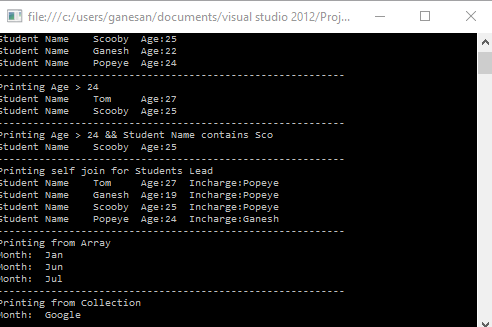
Screen clipping taken: 10-09-2016 21:34
Click below for download,
https://1drv.ms/u/s!ArddhCoxftkQg6hZlD6medX1rPn9pw
Reference
http://www.dotnetlearners.com/linq/linq-to-string-array-with-example.aspx
Asp.net Validation Controls
Document by Ganesan -ganesanva@hotmail.com – + 919600370429
List of Asp.net Validation available are as follows,
1.Required Field validator
2.Regular Expression validator
3.Range Validator
4.Custom Validator
5.Compare Validator
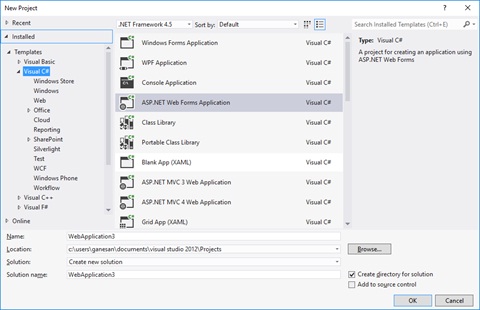
Create a new Asp.net Web application
File -> New Project
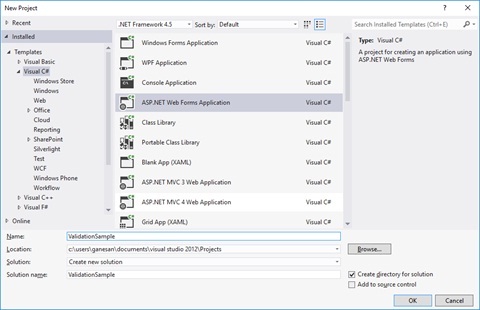
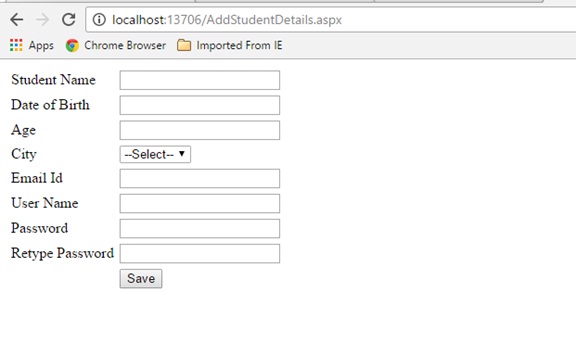
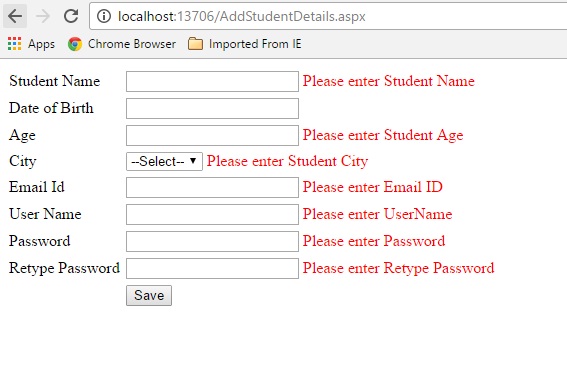
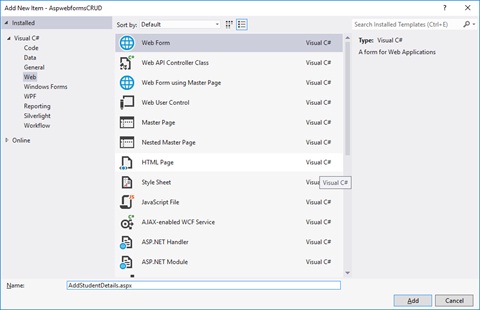
Right click on the solution and Add New web form page AddStudentDetails.aspx as below,

Replace the HTML Tag in AddStudentDetails.aspx with below snippet,
| <html xmlns=”http://www.w3.org/1999/xhtml”> <head runat=”server”> <title></title> </head> <body> <form id=”form1″ runat=”server”> <div> <table border=”0″ cellspacing=”2″ cellpadding=”2″> <tr> <td>Student Name </td> <td> <asp:TextBox ID=”txtStudentName” runat=”server”></asp:TextBox> <asp:RequiredFieldValidator ID=”RQStudentName” runat=”server” ControlToValidate=”txtStudentName” ErrorMessage=”Please enter Student Name” ForeColor=”Red”> </asp:RequiredFieldValidator> </td> </tr> <tr> <td> Date of Birth </td> <td> <asp:TextBox ID=”txtDOB” runat=”server”></asp:TextBox> <asp:RangeValidator ID=”Rvalid” runat=”server” ControlToValidate=”txtDOB” ErrorMessage=”Date of Birth should not be greater than current date” Type=”Date” ForeColor=”Red”></asp:RangeValidator> </td> </tr> <tr> <td> Age </td> <td> <asp:TextBox ID=”txtAge” runat=”server”></asp:TextBox> <asp:RequiredFieldValidator ID=”RqAge” runat=”server” ControlToValidate=”txtAge” ErrorMessage=”Please enter Student Age” ForeColor=”Red”> </asp:RequiredFieldValidator> <asp:RangeValidator ID=”RgAge” runat=”server” ControlToValidate=”txtAge” ErrorMessage=”Age should be greater than 18″ MinimumValue=”18″ ForeColor=”Red” MaximumValue=”2000″ Type=”Integer”></asp:RangeValidator> </td> </tr> <tr> <td> City </td> <td> <asp:DropDownList ID=”ddlCity” runat=”server”> <asp:ListItem Text=”–Select–” Value=”–Select–“></asp:ListItem> <asp:ListItem Text=”Chennai” Value=”Chennai”></asp:ListItem> <asp:ListItem Text=”Madurai” Value=”Madurai”></asp:ListItem> </asp:DropDownList> <asp:RequiredFieldValidator ID=”RqCity” runat=”server” InitialValue=”–Select–” ControlToValidate=”ddlCity” ErrorMessage=”Please enter Student City” ForeColor=”Red”> </asp:RequiredFieldValidator> </td> </tr> <tr> <td> Email Id </td> <td> <asp:TextBox ID=”txtEmailId” runat=”server”></asp:TextBox> <asp:RequiredFieldValidator ID=”RqEmailId” runat=”server” ControlToValidate=”txtEmailId” ErrorMessage=”Please enter Email ID” ForeColor=”Red”> </asp:RequiredFieldValidator> <asp:RegularExpressionValidator ID=”REVEmailId” runat=”server” ErrorMessage=”please enter correct email id” ControlToValidate=”txtEmailId” ValidationExpression=”\w+([-+.’]\w+)*@\w+([-.]\w+)*\.\w+([-.]\w+)*” ForeColor=”Red”></asp:RegularExpressionValidator> </td> </tr> <tr> <td> User Name </td> <td> <asp:TextBox ID=”txtUserName” runat=”server”></asp:TextBox> <asp:RequiredFieldValidator ID=”RequiredFieldValidator1″ runat=”server” ControlToValidate=”txtUserName” ErrorMessage=”Please enter UserName” ForeColor=”Red”> </asp:RequiredFieldValidator> <asp:CustomValidator ID=”CVUserName” runat=”server” ControlToValidate=”txtUserName” OnServerValidate=”CVUserName_ServerValidate” ErrorMessage=”UserName should not be greater than 15 digits” ForeColor=”Red”></asp:CustomValidator> </td> </tr> <tr> <td> Password </td> <td> <asp:TextBox ID=”txtPassword” runat=”server” TextMode=”Password”></asp:TextBox> <asp:RequiredFieldValidator ID=”RequiredFieldValidator2″ runat=”server” ControlToValidate=”txtPassword” ErrorMessage=”Please enter Password” ForeColor=”Red”> </asp:RequiredFieldValidator> </td> </tr> <tr> <td> Retype Password </td> <td> <asp:TextBox ID=”txtRetypePassword” runat=”server” TextMode=”Password”></asp:TextBox> <asp:RequiredFieldValidator ID=”RequiredFieldValidator3″ runat=”server” ControlToValidate=”txtRetypePassword” ErrorMessage=”Please enter Retype Password” ForeColor=”Red”> </asp:RequiredFieldValidator> <asp:CompareValidator ID=”cmpPasswordmatch” runat=”server” ControlToCompare=”txtPassword” ControlToValidate=”txtRetypePassword” ErrorMessage=”Password and Retype Password should not match” ForeColor=”Red”> </asp:CompareValidator> </td> </tr> <tr> <td></td> <td> <asp:Button ID=”btnSave” runat=”server” Text=”Save” CausesValidation=”true” OnClick=”btnSave_Click” /> </td> </tr> </table> </div> </form> </body> </html> |
Replace the AddStudentDetails.cs class with the below snippet,
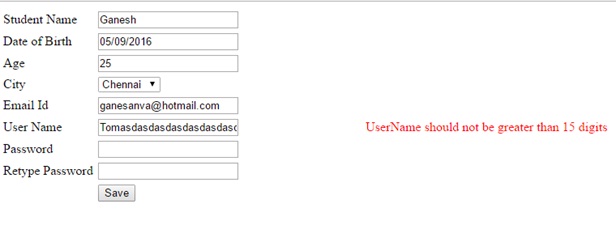
| public partial class AddStudentDetails : System.Web.UI.Page { protected void Page_Load(object sender, EventArgs e) { Rvalid.MinimumValue = DateTime.MinValue.ToString(“dd-MM-yyyy”); Rvalid.MaximumValue = DateTime.Now.ToString(“dd-MM-yyyy”); } protected void CVUserName_ServerValidate(object source, ServerValidateEventArgs args) { args.IsValid = (args.Value.Length < 15); } protected void btnSave_Click(object sender, EventArgs e) { if (Page.IsValid) { Response.Write(“Saved”); } } } |
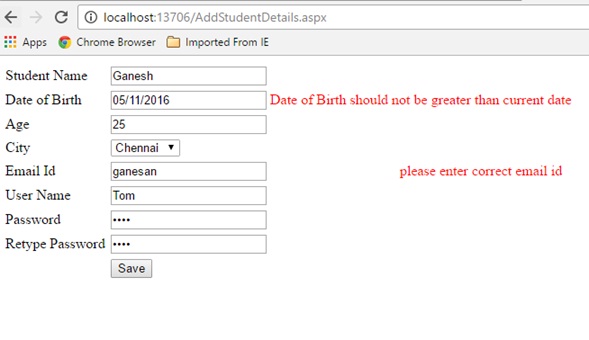
The Output as below,
Custom Validation on server event,
Click below to download the solution,
https://1drv.ms/u/s!ArddhCoxftkQg6kmic1tyrHNsIbXqA
Asp.net CRUD operation with Ado.net
Document by Ganesan – Ganesanva@hotmail.com – + 919600370429
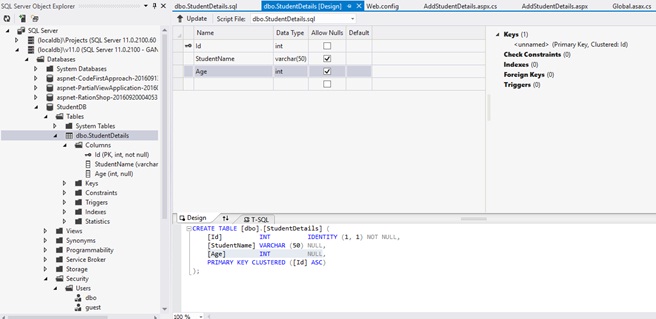
– Create Database in SQL as “StudentDB”
– Create Table “StudentDetails” with the below snippet,
| CREATE TABLE [dbo].[StudentDetails] ( [Id] INT IDENTITY (1, 1) NOT NULL, [StudentName] VARCHAR (50) NULL, [Age] INT NULL, PRIMARY KEY CLUSTERED ([Id] ASC) ); |
You can see the DB created in local SQL express as below,
– Create a new Asp.net Web forms Application as below
File –> New Project
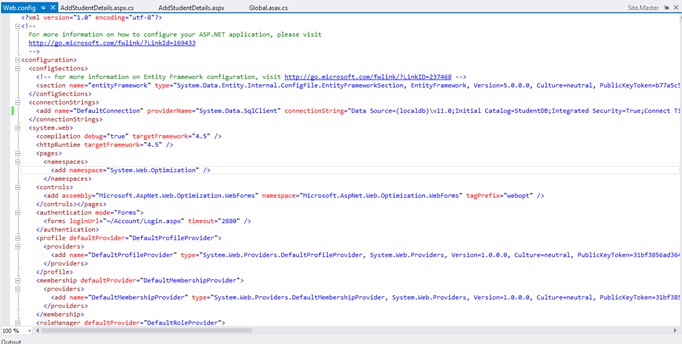
Add the Connection string in Web.config as below snippet,
| <connectionStrings> <add name=”DefaultConnection” providerName=”System.Data.SqlClient” connectionString=”Data Source=(localdb)\v11.0;Initial Catalog=StudentDB;Integrated Security=True;Connect Timeout=15;Encrypt=False;TrustServerCertificate=False” /> </connectionStrings> |
Add new Page as AddStudentDetails.aspx as below,
Replace the Below HTML code in AddStudentDetails.aspx file as below,
| <html xmlns=”http://www.w3.org/1999/xhtml”> <head runat=”server”> <title></title> </head> <body> <form id=”form1″ runat=”server”> <div> <table border=”0″ cellspacing=”2″ cellpadding=”2″> <tr> <td> <asp:Label ID=”lblStudentName” runat=”server” Text=”Student Name”></asp:Label> </td> <td> <asp:TextBox ID=”txtStudentName” runat=”server”></asp:TextBox> </td> </tr> <tr> <td> <asp:Label ID=”lblAge” runat=”server” Text=”Age”></asp:Label> </td> <td> <asp:TextBox ID=”txtAge” runat=”server”></asp:TextBox> </td> </tr> <tr> <td></td> <td> <asp:Button ID=”btnSubmit” runat=”server” Text=”Submit” OnClick=”btnSubmit_Click” /> <asp:Button ID=”btnUpdate” runat=”server” Text=”Update” OnClick=”btnUpdate_Click” /> <asp:Button ID=”btnClear” runat=”server” Text=”Clear” OnClick=”btnClear_Click” /> <asp:HiddenField ID=”hfId” runat=”server”></asp:HiddenField> </td> </tr> <tr> <td colspan=”2″> <asp:GridView ID=”grvStudentDetails” runat=”server” AutoGenerateColumns=”false”> <Columns> <asp:BoundField DataField=”Id” HeaderText=”Id” /> <asp:BoundField DataField=”StudentName” HeaderText=”StudentName” /> <asp:BoundField DataField=”Age” HeaderText=”Age” /> <asp:TemplateField> <ItemTemplate> <asp:Button ID=”btnEdit” runat=”server” Text=”Edit” OnClick=”btnEdit_Click” /> </ItemTemplate> </asp:TemplateField> </Columns> </asp:GridView> </td> </tr> </table> </div> </form> </body> </html> |
Replace the AddStudentDetails.aspx.cs file as below,
| public partial class AddStudentDetails : System.Web.UI.Page { SqlConnection con = new SqlConnection(ConfigurationManager.ConnectionStrings[“DefaultConnection”].ToString()); protected void Page_Load(object sender, EventArgs e) { if (!Page.IsPostBack) { BindGrid(); } } private void BindGrid() { btnSubmit.Visible = true; btnUpdate.Visible = false; SqlCommand cmd = new SqlCommand(“Select * from StudentDetails”, con); SqlDataAdapter ada = new SqlDataAdapter(cmd); DataSet ds = new DataSet(); ada.Fill(ds); grvStudentDetails.DataSource = ds.Tables[0]; grvStudentDetails.DataBind(); } protected void btnSubmit_Click(object sender, EventArgs e) { con.Open(); SqlCommand cmd = new SqlCommand(“insert into StudentDetails values(‘”+txtStudentName.Text+”‘,”+txtAge.Text+”)”, con); int result=cmd.ExecuteNonQuery(); if (result > 0) { Response.Write(“Inserted Successfully”); } con.Close(); BindGrid(); btnClear_Click(null, null); } protected void btnEdit_Click(object sender, EventArgs e) { Button btn = (Button)sender; //Get the row that contains this button GridViewRow gvr = (GridViewRow)btn.NamingContainer; hfId.Value = gvr.Cells[0].Text; txtStudentName.Text = gvr.Cells[1].Text; txtAge.Text = gvr.Cells[2].Text; btnSubmit.Visible = false; btnUpdate.Visible = true; } protected void btnUpdate_Click(object sender, EventArgs e) { con.Open(); SqlCommand cmd = new SqlCommand(“Update StudentDetails set StudentName='” + txtStudentName.Text + “‘,Age=” + txtAge.Text + ” where Id=”+hfId.Value, con); int result = cmd.ExecuteNonQuery(); if (result > 0) { Response.Write(“Updated Successfully”); } con.Close(); BindGrid(); btnClear_Click(null, null); } protected void btnClear_Click(object sender, EventArgs e) { txtStudentName.Text = string.Empty; txtAge.Text = string.Empty; hfId.Value = string.Empty; } } |
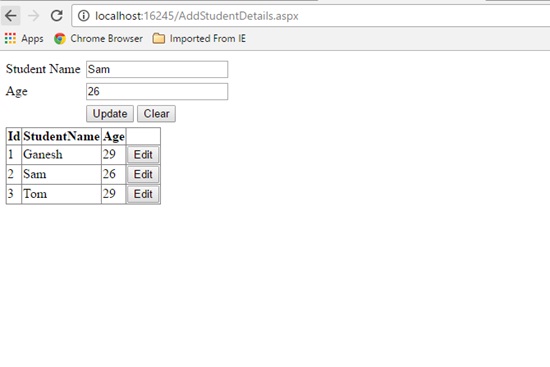
Run the solution.
The Output will be below,
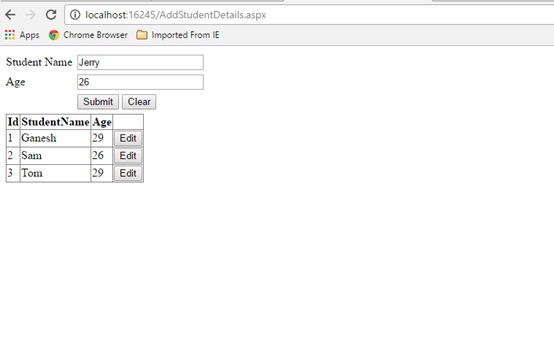
Click below to download the solution,
https://1drv.ms/u/s!ArddhCoxftkQg6h98mZAX_-Zv-6reQ
Identifying Dot Net Coaching Institutes in Chennai for Shaping the Skills
Dot net training is an essential one for those who get jobs in leading IT companies and other firms with better salaries. There are many organizations that recruit employees based on their experience and skills. Some even conduct tests for analyzing the potentials of a job seeker. It is an essential one to undergo a training program in a leading institute for shaping the potentials efficiently. However, it is necessary to find a right training center properly for choosing a course depending upon the needs. The internet is a best platform for this purpose because it helps to compare the services offered by various institutes easily. With dot net coaching, it is possible to develop the potentials to reach high levels in career.
Most training centers organize the classes based on the requirements of a person to shape his or her abilities with excellence. Besides that, they focus more on conduct the program with industry experts and live projects for achieving better results. Dot not training in Chennai is a suitable for students, job seekers and employees to develop their skills at different levels. It gives ways for learning the lessons in a comfortable environment to meet exact needs. Apart from that, it contributes a lot in augmenting the programming and other potentials with expert teaching faculties. Anyone interested in knowing more about the coaching classes can get ideas from a counselor for selecting a program which perfectly suits their requirements.
Some institutes even assist the students to apply for the jobs in reputed companies. On the other hand, it is necessary to go through the testimonials and reviews before choosing a course in a center. This will help a lot for learning the lessons in a comfortable environment. Different types of coaching programs are available for the students to augment their abilities. Dot net training institute in Chennai mainly aims at developing self confidence levels of students with different types of tasks. In fact, it gives ways for analyzing their skills with theory and practice classes. Satisfaction guarantee is the primary aim of a coaching center in Chennai while offering services to students. Online training is also available for those who want to augment their skills anywhere.
Dot net training is a perfect one for both employees and employers to complete a project with more accuracy. They can learn more about problem solving techniques to gain more benefits. It is an important one to consider certain important facts before choosing an institute. Study materials offered by the institutes are extremely useful for ensuring desired outputs when executing a new project. Many training institutes allow students to pay their fees with flexible options. Besides that, they conduct exams for the students to correct their mistakes as soon as possible. It is possible to learn more about the training programs from the internet for seeking admission into a right one. The students can undergo coaching classes in a center with the latest computer applications for meeting essential needs in the learning procedure.
Recent Posts
Categories
- All
- Angularjs training in Chennai
- ASP.NET Core
- dot net training
- dot net training in chennai
- dotnet full stack developer
- Free dotnet training
- information on dotnet
- Learn Java in chennai
- Learn Python at Karaikudi
- learn python online
- learn python online from chennai
- Linq Queries in .net
- mutual funds
- MVC Training Tutorials
- PHP Training in Chennai
- pmp training online
- power apps online training
- Python Training Online
- share market
- Sharepoint framework online training
- SharePoint Freelancers in Chennai
- software testing
- spfx online training
- Stock market
- Uncategorized