Python in Web Development
INTRODUCTION:
Python web development is a popular and adaptable option for creating dynamic websites and web apps. A wide range of frameworks, modules, and tools are available for Python, which makes development easier and enables programmers to design scalable and effective web solutions.
It comprises designing, developing, and maintaining websites with a range of functions and uses by utilizing a variety of technologies, programming languages, and tools.
At its foundation, web development includes two essential aspects:
1. Front-end development
2. Back-end development
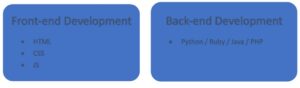
Front-end Development:
The visual and interactive components of a website that visitors interact with directly are the focus of front-end development. Using tools like HTML (Hypertext Markup Language), CSS (Cascading Style Sheets), and JavaScript, entails developing the layout, designing the user interface (UI), and implementing the visual components.
Back-end Development:
On the other hand, back-end development works with a website’s server-side functionality. It entails developing the architecture and logic needed to process data, manage database interactions, and maintain the operation of the website. Programming languages like Python, Ruby, Java, or PHP are used by back-end developers to create the server-side parts of websites.
WEB DEVELOPMENT USING PYTHON:
The process of developing websites and web applications with the Python programming language is known as Python web development. Python is a widely used and adaptable programming language that is well-known for its ease of use, readability, and extensive library and framework ecosystem.
Python is used by developers to construct server-side logic for web applications. This involves processing HTTP requests and responses, data storage and retrieval, business logic implementation, and dynamic content rendering.
SEVERAL ADVANTAGES TO USE PYTHON IN WEB DEVELOPMENT:
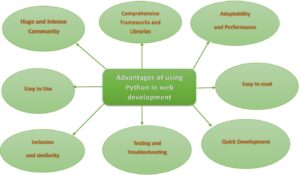
- Huge and Intense Community:
The Python community is large and vibrant, with many developers contributing to its development and providing assistance. Many tools, frameworks, and resources designed expressly for web development are available from the community. Python is a strong option for web development because of its wealth of community-driven tools and resources, which provide answers to a variety of needs.
- Comprehensive Frameworks and Libraries:
Python has a robust ecosystem of frameworks and tools that make web development chores easier. One of the most well-liked web frameworks for Python, Django, offers a sophisticated and comprehensive toolkit for creating intricate web applications. It is designed using the Model-View-Controller (MVC) architectural paradigm and comes pre-configured with features like URL routing, database ORM (Object-Relational Mapping), and authentication. Another lightweight and adaptable micro-framework that gives developers more control over the components and structure of an application is Flask. These frameworks, as well as others like Pyramid and Bottle, give web development a strong base and increase productivity.
- Adaptability and Performance:
Python is well-known for being performant and scalable, which makes it ideal for managing online applications with heavy traffic. Python frameworks like Django and asyncio can effectively manage concurrent requests and optimize server resources thanks to innovations like asynchronous programming. Furthermore, Python’s integration features make it simple to integrate with other languages, allowing programmers to use high-performance C or C++ libraries as necessary.
- Easy to read and use:
Python’s syntax is intended to be simple to understand and write, focusing on code readability and maintainability. Its simple syntax enables developers to express concepts in fewer lines of code, making development faster and more efficient. Python’s simplicity allows both new and experienced developers to work easily and collaboratively.
- Inclusion and Simplicity:
Python is adaptable for web development and interfaces with other technologies with ease. It supports a wide range of databases, including NoSQL databases like MongoDB and SQL-based databases like MySQL, PostgreSQL, and SQLite.
- Testing and Troubleshooting:
Python has strong testing frameworks that make developing and running tests for web applications easier, such unittest and pytest. Integrated development environments (IDEs) and pdb are two of the efficient debugging tools that enable developers to locate problems and solve them fast.
- Quick Development:
Python’s emphasis on productivity and simplicity makes it possible for developers to create web apps rapidly. Pre-built modules and libraries are readily available, allowing developers to take advantage of pre-existing solutions rather than having to start from scratch. Time-to-market is critical for startups and small-scale ventures, where this speedy development strategy is very helpful.
WEB DEVELOPMENT FRAMEWORKS IN PYTHON:
Python offers several web frameworks to suit different needs and preferences. The following are a few well-known Python web development frameworks:
- Django
- Flask
- Pyramid
- Bottle
- CherryPy
- Tornado
WEB DEVELOPMENT LIBRARIES IN PYTHON:
Python web development provides an abundance of tools and frameworks to improve productivity and improve the development process. The following libraries & tools are frequently used in Python web development:
- Jinja2
- Pydantic
- Redis-py
- PyJWT
- Flask-WTF
- Flask-SQLAlchemy
- Celery
- SQLAlchemy
- Pillow
- Beautiful Soup
- Requests
ROADMAP FOR PYTHON WEB DEVELOPMENT:
A road map for using Python to construct websites that highlights the main ideas and procedures involved:
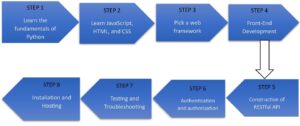
- Learn the fundamentals of Python:
Learn the syntax, data types, control structures, and functions that are essential to Python programming. To begin started, you can consult books or internet guides.
- Learn JavaScript, HTML, and CSS:
Get a fundamental knowledge of web technologies, like JavaScript for client-side interactivity, CSS for styling, and HTML for markup. These are required to understand and design websites.
- Pick a web Framework:
Choose a Python web framework based on the needs of your project. A few well-liked choices are Pyramid, Flask, and Django.
- Front-end Development:
Develop your web development abilities by being familiar with well-known front-end frameworks and modules like Angular, Vue.js, and React.
- Construction of RESTful API:
Create APIs that provide data and functionality to other apps or front-end interfaces using the web framework of your choice.
- Authentication and Authorization:
Learn how to use the built-in capabilities or extensions of your web framework to develop secure user registration, login, and access control techniques.
- Testing and Troubleshooting:
Become an expert at testing your websites. Find out more about end-to-end, integration, and unit testing. To write and run tests, use tools such as pytest, Python’s Selenium, or the testing frameworks included with your preferred web framework.
- Installation and Hosting:
Find out how to put your web application on a cloud platform or web server. Gain an understanding of ideas like scalability, security considerations, deployment automation, and server setup. For hosting web applications, platforms like Heroku, AWS, or PythonAnywhere are frequently utilized.
CONCLUSION:
Python is a powerful language that is well-suited for web development, which involves developing websites and web apps. Because of its ease of use, readability, and robust environment, Python is a great option for web development projects. Python offers a strong basis for web development, making it possible for programmers to create feature-rich, scalable websites quickly.
Learn ASP.NET Online
Introduction to ASP.NET
Microsoft created ASP.NET, which stands for Active Server Pages.NET. Thousands of organizations have utilized Microsoft ASP.NET to construct sophisticated, dynamic websites. It is a strong tool for programmers and developers that work on the development of rich and dynamic web apps and websites. ASP.NET is a Microsoft.NET Framework feature that is not limited to script languages; it may also be used by programmers. Microsoft’s Active Server Page was developed in response to the growing need for dynamic webpages.
It includes a Feature library with various ready-to-use methods and web controls for building applications from the ground up. Microsoft often modifies it to stay current with trends. ASP.NET is well-known for its advantages over alternative online development models, in addition to being a pioneering platform. It benefits both the organizations that use it and the developers who take ASP.NET classes.
In the fast-paced world of software development, knowing the most recent technologies and frameworks is critical. NET is one such technology that has seen enormous progress throughout time. As businesses strive to digitize their processes, the demand for knowledgeable.NET developers has skyrocketed. There are numerous online.NET courses available to meet this need and equip potential developers. The article explores into the area of online.NET courses, underlining their benefits, important components, and potential to boost your career.
Professionals with ASP.NET expertise benefit from things like:
capable to develop applications with ASP.NET.
Thanks to its complementary design and extensive toolkit, the ASP.NET framework provides wonderful features like drag-and-drop server controls and automated deployment, among others.
less time is spent coding and more time is spent creating large online apps.
The combination of HTML and source code makes it easy to construct and maintain websites.
Find lucrative career opportunities as a developer.
Spend less time and effort writing extra code for complex and large-scale applications to save down on development costs.
All students and freshmen interested in using the Microsoft platform to create modern desktop, web, and service-oriented applications are encouraged to take this course.
Pros of Online.NET Courses
The following are advantages for students taking online.NET classes:
Flexibility: With online courses, you may customize your education to fit your schedule and establish your own pace for learning.
Accessibility: No matter where you live in the world, you can access excellent.NET classes.
Interaction: A typical component of online platforms is discussion boards, which allow students to interact with teachers and peers and foster a collaborative learning environment.
Comprehensive Curriculum: Since respectable online courses offer a wide range of.NET topics, you can be confident that you’ll obtain a well-rounded education.
Practical Experience: A lot of courses incorporate practical activities and projects that let you put theory into practice in real-world settings.
All students and freshmen interested in using the Microsoft platform to create modern desktop, web, and service-oriented applications are encouraged to take this course.
To enroll in this course, there are no prerequisites.
Why should I study ASP.NET at Maria Academy (Marz Technologies)?
With more than five years of experience, we have taught ASP.NET online to students all around the world. We have also conducted online training courses in India and other nations. Our knowledgeable instructors will walk you through the process of creating and launching a dynamic website using the ASP.NET tools.
For beginners and intermediate developers, this course module offers practical experience covering everything from installing and setting up Visual Studio for Web and SQL Server Express to creating web form pages.
You will learn about C# programming, advanced C# ideas, OOPs concepts, database design with SQL Server,.NET and.NET Core, and other subjects.
In addition, you will learn how to establish a live project from Microsoft MVPs and Technical Consultants, as well as how to use Visual Studio 2019 for.NET programming.
We provide a variety of training options, such as corporate training, one-on-one training, and live instruction.
Our Fundamental Course Module:
Areas, Partial Views and Child Actions in ASP.NET MVC
Developers may organise their applications, build modular components, and improve code reuse by using Areas, Partial Views, and Child Actions in ASP.NET MVC. Let’s examine each of these ideas and how to employ them successfully:
Areas in ASP.NET MVC:
A huge ASP.NET MVC application can be divided up into manageable portions using areas. Within the application, each region represents a different functional area. You may designate several locations for the administration, user dashboards, or public-facing pages, for instance.
Right-click the project, pick “Add,” and then select “Area” from the context menu to create an area. Following that, you can give the region a name and designate a folder structure for it. It will have separate folders for its controllers, views, and models.
Areas facilitate better concern segregation and simplify the upkeep of sophisticated programmes.
Partial Views in ASP.NET MVC:
In order to display a portion of HTML content and C# code in various views throughout the application, partial views are reusable components.
You can build a partial view by adding a new view to the “Views” folder (or a subfolder) and naming it something like “_PartialView.cshtml.”
You can render a partial view within another view using the @Html.Partial or @Html.RenderPartial methods, passing the partial view’s name as an argument.
Child Actions in ASP.NET MVC:
Child actions are controller methods that return partial views. They come in handy when you need to render different elements of a view independently.
To create a child action, define a method in a controller that returns a PartialViewResult. You can use the ChildActionOnly attribute to ensure that the method can only be called as a child action and not directly as an HTTP request.
In your main view, you can call the child action using the @Html.Action or @Html.RenderAction methods, passing the name of the child action and any required parameters.
Advantages of utilising areas, partial views, and child actions
Utilizing areas, partial views, and child actions in ASP.NET MVC provides several advantages that can significantly enhance the development process and improve the overall architecture of your application. Here are some key benefits of using these features:
Modularity and Reusability:
Areas allow you to divide a large application into smaller functional sections, promoting modularity and separation of concerns. Each area can have its own set of controllers, views, and models, making it easier to manage and maintain specific features.
Partial views encapsulate reusable components, such as navigation bars, headers, footers, or widgets. Once created, you can include them in multiple views across the application, reducing duplication of code and promoting reusability.
Organization and Maintainability:
By structuring your application with areas, you create a clear organization that improves code maintainability and makes it easier for developers to navigate and understand the application’s structure.
Partial views and child actions help to decompose complex views into smaller, manageable components. This separation of concerns leads to cleaner code and makes it easier to maintain and update specific parts of a page independently.
Code Separation and Readability:
Areas encourage the separation of different functional parts of the application, reducing code coupling and increasing code readability.
Partial views and child actions enable you to separate the presentation logic from the main view, enhancing the readability and maintainability of the code.
Code Reusability and DRY Principle:
Areas, partial views, and child actions promote the “Don’t Repeat Yourself” (DRY) principle, allowing you to reuse code across different areas or views.
Instead of duplicating code for common UI components, you can create partial views once and then use them in multiple views, reducing development effort and avoiding inconsistencies.
Performance Optimization:
By utilizing child actions, you can optimize the rendering of complex views by rendering specific parts of a page separately, reducing the overall load time and enhancing user experience.
Partial views can help optimize rendering performance by allowing you to cache the output of specific components that are unlikely to change frequently.
Enhanced Testing and Debugging:
The use of areas allows for better isolation and targeted testing of specific functional sections, making unit testing and debugging more focused and effective.
Partial views and child actions can be tested independently, making it easier to verify the correctness of individual components.
In summary,, the strategic use of areas, partial views, and child actions in ASP.NET MVC not only fosters reusability, performance optimisation, and increased testing capabilities but also enhances code organisation and maintainability. Building scalable, stable, and modular web applications that are simpler to maintain and develop over time is made possible by these qualities.
Example
Consider the following scenario:
Assume you have an e-commerce site with distinct sections for the product catalogue and the user dashboard. You can construct partial views for common elements such as navigation, headers, and footers and then reuse them across several views inside each section. You can also call a child action in the header partial view to display the user’s shopping basket.
You may improve the flexibility and maintainability of your ASP.NET MVC application by efficiently utilising Areas, Partial Views, and Child Actions, resulting in a more organised and efficient development process.
Click here , if you look out for training in Asp.net Core and other Dot Net technology.
Routing in ASP.NET
Routing in ASP.NET is the process of sending HTTP requests to the appropriate controller. Whether a request should be forwarded to the controller for processing or not is up to the MVC middleware. This choice is made by the middleware based on the URL and some configuration data.
In other words, routing in ASP.NET is a mechanism that allows you to define URL patterns and map them to specific resources or handlers in your web application. It enables you to create clean, user-friendly URLs that are more meaningful and descriptive than traditional query-string based URLs.
Routing is an essential part of the ASP.NET MVC (Model-View-Controller) framework and the newer ASP.NET Core framework, although the concept remains similar across both technologies.
Routing’s main goal is to separate your web application’s physical file structure from its URL structure. In the past, URLs in web applications were linked to particular physical server files (for example, a particular.aspx page). However, routing gives you more flexibility when defining the URLs for your web application since it allows you to specify URL patterns and link them to controllers and actions (in MVC) or endpoints (in ASP.NET Core).
To address various scenarios and requirements, ASP.NET MVC supports a number of different forms of routing. The primary routing types that ASP.NET MVC supports are listed below:
Conventional Routing: In ASP.NET MVC, conventional routing is the default routing method. The mapping of URL segments to names of controller and action method uses a pattern-based technique. A URL pattern typically looks like this: “controller/action/id,” where “controller” and “action” stand in for the names of the controller and action method, respectively. It is possible to omit the “id” parameter.
Here’s a basic example of routing in ASP.NET MVC:
| // In the RouteConfig.cs file (MVC) public static void RegisterRoutes(RouteCollection routes) { routes.IgnoreRoute(“{resource}.axd/{*pathInfo}”); routes.MapRoute( name: “Default”, url: “{controller}/{action}/{id}”, defaults: new {controller = “Home”, action = “Index”, id = UrlParameter.Optional } ); } |
In this example, a default route is defined with a pattern like “{controller}/{action}/{id}”. When a user visits a URL like “example.com/Home/Index”, the routing system will map it to the “Index” action method in the “HomeController” within the MVC application. The “id” parameter is optional and can be omitted in the URL.
ASP.NET Core uses a similar concept of routing, but the syntax and configuration are slightly different. Here’s a basic example of routing in ASP.NET Core:
| // In the Startup.cs file (ASP.NET Core) public void Configure(IApplicationBuilder app, IWebHostEnvironment env) { // Other middleware configurations… app.UseRouting(); app.UseEndpoints(endpoints => { endpoints.MapControllerRoute( name: “default”, pattern: “{controller=Home}/{action=Index}/{id?}” ); }); } |
In this example, the UseRouting() method is called to enable routing, and then MapControllerRoute() is used to define the default route pattern.
Routing plays a crucial role in creating clean and SEO-friendly URLs, improving the maintainability of your web application, and supporting more structured and organized code through the proper separation of concerns.
Attribute Routing: Using attributes, you may build routes directly on the controller and action methods. This method gives you more fine-grained control over single action routing and allows you to build unique routes for individual actions. When you have non-conventional URL patterns or want more descriptive URLs, attribute routing comes in handy.
In ASP.NET MVC, here’s an example of attribute routing:
| // Controller with attribute routing [RoutePrefix(“products”)] public class ProductController : Controller { [Route(“”)] public ActionResult Index() { // Action logic } [Route(“{id}”)] public ActionResult Details(int id) { // Action logic } } |
Area Routing: Areas are used in ASP.NET MVC to partition related portions of a web application into different modules. Controllers, views, and models can be customised for each region. Area-specific routing can be used with areas to control routes inside that specified area. When dealing with large and complex applications, this helps to maintain clean and organised code.
Custom Route Constraints: Custom route constraints let you specify extra requirements that a route must meet in order to be accepted as a match. Implementing the IRouteConstraint interface enables you to create unique route constraints. For instance, you can build a custom constraint to guarantee that the “id” argument adheres to a particular format or fits within a given range.
Catch-All Routes: Any URL that doesn’t match one of the other defined routes is matched using catch-all routes. When dealing with specific URL patterns that don’t suit the typical route patterns, this is useful.
With these multiple routing systems in ASP.NET MVC, you may handle a variety of URL patterns, create custom routes, and set up your application’s URLs anyway you see fit.
How to get a DOTNET Job abroad from India?
First approach is, do your own research and get ideas to grab the Job. This article will give you some ideas on how to start your job search.
Below are the ways to grab the job opportunity.
- Networking
- Get opportunity based on Language skills
- Get Job based on your technical skills
- Pick good MNC companies in Offshore and travel abroad
- Register in portals like monster.com, LinkedIn
- Study and get placed in abroad.
Networking
Networking is the key to grab any good opportunity. If you have any of your friends, relatives working in countries Dubai, Singapore and others, you can ask them to refer you for interview. Networking and Association takes you to big places where you can’t reach alone.
If you are an experience guy in Dot net, engage with the peoples in Dot net community. There are lot of Dot net communities created by Microsoft, find their channels in Facebook, LinkedIn, meetup.com and join them. Some of the community names are mentioned below.
- Microsoft Azure User Group – Chennai
- Pune User Group
- Dot net Bangalore
- Kerala Microsoft Technology Meetup
Joining the community will give more exposure to the latest updates in technologies and also network with the experts. The community groups set up monthly technology meetup, that help peoples in the community to have a face to face connect. If you are a good speaker, you can take some technology seminars in the meet up and increase your visibility.
Get opportunity based on Language
There are few countries like Japan, Germany, China who prefer the candidates with good language skills. Japan prefers language certified candidates even though you are good in technology. Japanese language Proficiency Test has five levels N1, N2, N3, N4 and N5. The easiest level is N5 and the most difficult level is N1. In case you look out for a job in Japan, then studying these certifications will surely be an advantage.
Similar to Japanese language, German language also has its own scope in Job market. Even if you don’t have the proficiency to speak in German, holding a certificate will improve your chance to get a job in Germany. The level of competence in German is as below,
- Levels A1 and A2
- Levels B1 and B2
- Levels C1 and C2
Levels A1 and A2 – These levels provide the basic level of German language.
Levels B1 and B2 – You will learn German at an advanced level
Levels C1 and C2 – You will master German at this level
For Chinese, Hanyu Shuiping kaoshi is an international standardized exam which tests and rates Chinese language proficiency. HSK certification will improve your probability for job search in China.
Get Job based on your technical skills
Always work on the trending technologies in software. Keep upskilling even in case if you work on old technology. Most of the onsite openings look out for trending technology.
Some of the recent trending technology in dotnet are as below,
- Big Data with sql server
- Asp.net Core
- Tableau with sql server
- Data Science
- Artificial Intelligence
- Selenium with C# .net
First, the overseas company look out for the candidate in local for any job opportunity. If they can’t find any talent for that technology in local country, then they start their search in foreign country.
Being on the latest technology will increase your demand in the foreign job market. Recruiter in nearest country to India like UAE, Malaysia, Singapore extend their job search to India once they can’t find the right talent. Recruitment is mainly based on supply and demand. If the supply for the talent is not available within the country for a trending technology, then the demand rises and the recruiter starts looking outside country.
Pick good MNC companies in Offshore and travel abroad
Lot of companies in Chennai and Bangalore sends their employees to onsite for work. The company will take care of your visa process and place you in work in onsite. Every project in software works with few offshore resources and one or two onsite resources. The offshore company have the capability to arrange for your visa based on the project requirement. The only harder thing, you should be chosen as the onsite resource by your manager.
If your manager recognizes you as the skillful talent, then this is the easiest way to travel abroad.
Register in portals like monster.com, LinkedIn
Register your resume in portals like Monster.com, LinkedIn. Foreign Recruiters looks out in these portal to hire candidates. Monster provides you a lot of job opportunities in Singapore and Malaysia.
Naukri provides you job opportunity in Dubai and other overseas countries. Update your resume with recent technology and certification details. Nowadays, few companies in Oman walks down to India and arrange Job interviews. You can also attend skype interviews from Singapore, Malaysian companies.
Linked in optimization also increase your visibility to the foreign recruiters to hire you. You can even apply for jobs in Linked in and keep connected with the recruiters.
Study and then get placed in abroad
Upskilling and Cross skilling are the unique ways to grab the job opportunity in abroad. You can contact us on +91 – 90427 10472 if you look out to upskill yourself in Microsoft technologies.
Alternative approach is to join a professional 2 year course in abroad. It is quite costly and also a long term process.
Study in abroad and get yourself placed in foreign countries. You can study MS, PhD, engineering, diploma courses in countries like Canada, Australia, USA and get foreign exposure. Some countries allow you to do part time job while in study visa.
Once you complete your course, the companies will give you priority in their job opportunity as you studied in local universities.
Click here , if you look out for training in Asp.net Core and other Dot Net technology.
Three Tier Architecture in MVC
Three Tier (Three Layer) Architecture
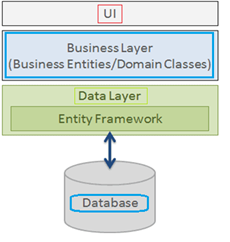
With a three-layer design, the project is divided into three layers: the user interface layer, the business layer, and the data layer (database), where we divide the UI, logic, and data into three groups. If a user wants to switch the user interface from a Windows computer to a smartphone, he or she simply needs to alter the UI layer; all other layers are unaffected. Like this, if a user wishes to change a database, he simply needs to update the data layer; everything else stays the same.
The widely used three-tier (or three-layer) architecture is a way to organise the codebase. This architecture divides the codebase into three distinct levels, each with a unique set of duties:

Presentation layer: This is the application’s user interface, which shows the user the features and data of the programme.
Business logic (or Application) layer: The business logic that powers the application’s essential features is contained in this layer. as processing the data moving between the other two layers and making judgements, calculations, and evaluations.
Data access layer (or Data) layer: To save and recover application data, this layer communicates with databases.
Advantages of using three-tier architecture are:
Accelerated development: Reducing product time to market and enabling developers to use the most current tools and layer appropriate languages.
Improved scalability: By deploying apps on many levels, each tier may always be scaled separately.
Improved Reliability: By using several tiers, you may execute additional components of your application on other servers and employ results that have been cached to improve reliability and availability.
Enhance security: By using a well-designed application layer as a private firewall to help avoid receptive weaknesses like SQL injection.
The package of different layers is as follows.
- Presentation Layer – controller package
- Business Logic Layer – service package
- Data Access Layer – repository package
Three Layer Architecture using MVC Sample:
Create an empty MVC web application project with Project name “WebApp” and solution name “TLA”. This WebApp project is the presentation layer.
In Solution TLA, add a new project to create business logic à Class library (.net framewok) à name the project as BusinessLayer.
Again, in Solution TLA, add a new project to create data access à Class library (.net framewok) à name the project as DataBaseLayer.
Add BusinessLayer & DataBaseLayer as reference in “WebApp”.
Add BusinessLayer as reference in “DataBaseLayer”.
In sql server explorer, add a new database with name “MYDB” and create a table with name “Registration”.
| CREATE TABLE [dbo].[Registration]( [RegId] [int] IDENTITY(1,1) NOT NULL, [FullName] varchar NULL, [Address] varchar NULL, [Gender] varchar NULL, [City] varchar NULL, [DoB] [date] NULL, [Cno] varchar NULL, PRIMARY KEY CLUSTERED ([RegId] ASC) |
In “DataBaseLayer”, add the model file using “ado.net entity data model”.
Once model is created, copy the connection string from app.config of “DataBaseLayer” and paste it in web.config of “WebApp”.
In “BusinessLayer”, create a class file with name “RegistrationModel” and replace with below snippet.
| public class RegistrationModel { public int RegId { get; set; } public string FullName { get; set; } public string Address { get; set; } public string Gender { get; set; } public string City { get; set; } public Nullable DoB { get; set; } public string Cno { get; set; } } |
In “DataBaseLayer”, add a new folder with name “DBOperation”, in it, add a class file with name “ManageRegistration” and replace with below snippet.
| public class ManageRegistration { public void AddReg(RegistrationModel regModel) { using (var DB = new MYDBEntities()) { Registration Reg = new Registration() { FullName = regModel.FullName, Address = regModel.Address, Gender = regModel.Gender, City = regModel.City, DoB = regModel.DoB, Cno = regModel.Cno }; DB.Registrations.Add(Reg); DB.SaveChanges(); } } } |
Then add EntityFramework.dll and EntityFramework.SqlServer.dll references in “WebApp”.
So now the business layer and data layer has been completely created.
Now, in WebApp (i. e. in presentation layer), add a new controller with name “Home controller” and replace with below snippet.
| public class HomeController : Controller { // GET: Home public ActionResult Index() { return View(); } ManageRegistration ManageReg = new ManageRegistration(); [HttpPost] public void AddReg(FormCollection Form) { RegistrationModel registrationModel = new RegistrationModel() { FullName = Form["txtName"], Address = Form["txtAddress"], Gender = Form["rdbGender"], City = Form["txtCity"], DoB = Convert.ToDateTime(Form["txtDoB"]), Cno = Form["txtCno"] }; ManageReg.AddReg(registrationModel); Response.Write("Saved"); } } |
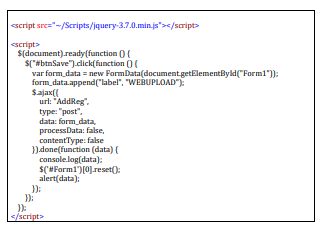
Add index view with empty without model and put the below html and ajax snippet in it
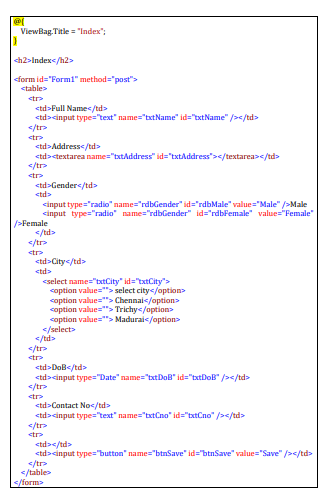
Run the program
Solid Principles in C#.net
In C#, the SOLID principles are a set of guidelines that help developers design software that is modular, maintainable, and extensible. SOLID is an acronym that stands for:
S – Single Responsibility Principle (SRP)
O – Open-Closed Principle (OCP)
L – Liskov Substitution Principle (LSP)
I – Interface Segregation Principle (ISP)
D – Dependency Inversion Principle (DIP)
Single Responsibility Principle (SRP):
A class should have only one reason to change. It states that a class should have only one responsibility or job. This principle helps to keep classes focused, maintainable, and easier to understand.
| public interface INotificationService { void SendNotification(string message); } public class EmailNotificationService : INotificationService { public void SendNotification(string message) { // Code to send an email notification } } public class SMSNotificationService : INotificationService { public void SendNotification(string message) { // Code to send an SMS notification } } public class NotificationSender { private readonly INotificationService _notificationService; public NotificationSender(INotificationService notificationService) { _notificationService = notificationService; } public void SendNotification(string message) { _notificationService.SendNotification(message); }} |
In this example, the FileManager class has the responsibility of reading and saving files, while the FileParser class is responsible for parsing files. Each class has a single responsibility, making it easier to understand and maintain.
Open-Closed Principle (OCP):
Software entities (classes, modules, functions, etc.) should be open for extension but closed for modification. This principle encourages designing modules that can be extended without modifying their existing code, reducing the risk of introducing bugs and making it easier to add new features.
| public abstract class Shape { public abstract double CalculateArea(); } public class Rectangle : Shape { public double Width { get; set; } public double Height { get; set; } public override double CalculateArea() { return Width * Height; }} public class Circle : Shape { public double Radius { get; set; } public override double CalculateArea() { return Math.PI * Radius * Radius; }} |
In this example, the Shape class is open for extension, as new shapes can be added by creating new subclasses of Shape. The existing code is closed for modification, as the Shape class and its existing subclasses do not need to be changed when adding new shapes.
Liskov Substitution Principle (LSP):
Objects of a superclass should be able to be replaced with objects of their subclass without breaking the behavior of the system. In other words, derived classes should be substitutable for their base classes, and they should honor the contracts defined by the base class.
| public class Vehicle { public virtual void Start() { Console.WriteLine(“Starting the vehicle”); } } public class Car : Vehicle { public override void Start() { Console.WriteLine(“Starting the car”); } } public class Motorcycle : Vehicle { public override void Start() { Console.WriteLine(“Starting the motorcycle”); } } |
In this example, the Car and Motorcycle classes are subclasses of Vehicle, and they can be substituted for Vehicle without breaking the behavior of the system. The Start method is overridden in each subclass, providing specific implementations for starting a car and starting a motorcycle.
Interface Segregation Principle (ISP):
Clients should not be forced to depend on interfaces they do not use. This principle encourages the creation of small, specific interfaces instead of large general-purpose interfaces. It helps to avoid forcing clients to implement methods they don’t need and promotes decoupling and flexibility.
| public interface IOrder { void ProcessOrder(); } public interface IShipping { void ShipOrder(); } public class OnlineOrder : IOrder, IShipping { public void ProcessOrder() { Console.WriteLine(“Processing online order”); } public void ShipOrder() { Console.WriteLine("Shipping online order"); }} public class OfflineOrder : IOrder { public void ProcessOrder() { Console.WriteLine(“Processing offline order”); } } |
In this example, we have two interfaces: IOrder and IShipping. The OnlineOrder class implements both interfaces, as it can process an order and ship it. The OfflineOrder class only implements the IOrder interface because it doesn’t involve shipping. This segregation of interfaces ensures that classes only depend on the methods they actually need.
Dependency Inversion Principle (DIP):
High-level modules should not depend on low-level modules; both should depend on abstractions. Abstractions should not depend on details; details should depend on abstractions. This principle promotes loose coupling between modules, promotes modular design, and enables easier testing and maintainability.
| public interface INotificationService { void SendNotification(string message); } public class EmailNotificationService : INotificationService { public void SendNotification(string message) { // Code to send an email notification } } public class SMSNotificationService : INotificationService { public void SendNotification(string message) { // Code to send an SMS notification } } public class NotificationSender { private readonly INotificationService _notificationService; public NotificationSender(INotificationService notificationService) { _notificationService = notificationService; } public void SendNotification(string message) { _notificationService.SendNotification(message); }} |
In this example, the NotificationSender class depends on the INotificationService interface rather than concrete implementations. This allows different notification services to be injected at runtime, promoting loose coupling. The high-level module (NotificationSender) depends on the abstraction (INotificationService) rather than the low-level modules (EmailNotificationService, SMSNotificationService).
By adhering to these principles, developers can create code that is easier to understand, maintain, and modify, leading to more robust and scalable software systems.
C# Web API
C# Web API
Asp.net Web API is a framework that is provided by Microsoft and used to create HTTP services.
ASP.NET Web API is an easy-to-build HTTP web service. To reach a range of clients, including browsers, mobile applications, desktop applications, and IOTs.
The Asp.net web API has two layers.
1.client layer
2.server layer
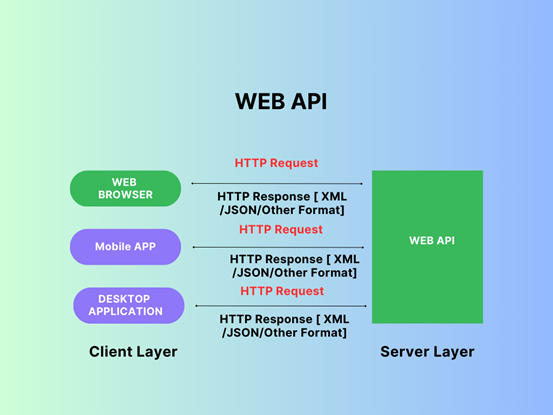
It is accessed by a wide range of clients, including web browsers, mobile applications, and desktop applications, when the client layer makes a request to the web API to get an output response in different formats like JSON or XML.
| Http Request = http://servername/apiname?id=101 Http Response = {“Name”,ABC,”Age”:”54”} |
| What is HTTP? HTTP – Hyper Text Transfer Protocol means the user gets a different device to get a request, but the output gets the same response server, also called HTTP. HTTP Is used more than providing web page and also strong foundation for the developing API. HTTP is a essential and pervasive protocol |
Why to choose ASP.NET Web API?
- Web API is light weight framework for API Development
- Web API has built-in support for standard formats like JSON and XML., and Other Formats.
- Web API is a Content Negotiation
- c#.net Web API maps HTTP Verbs to method names
Features of Web API
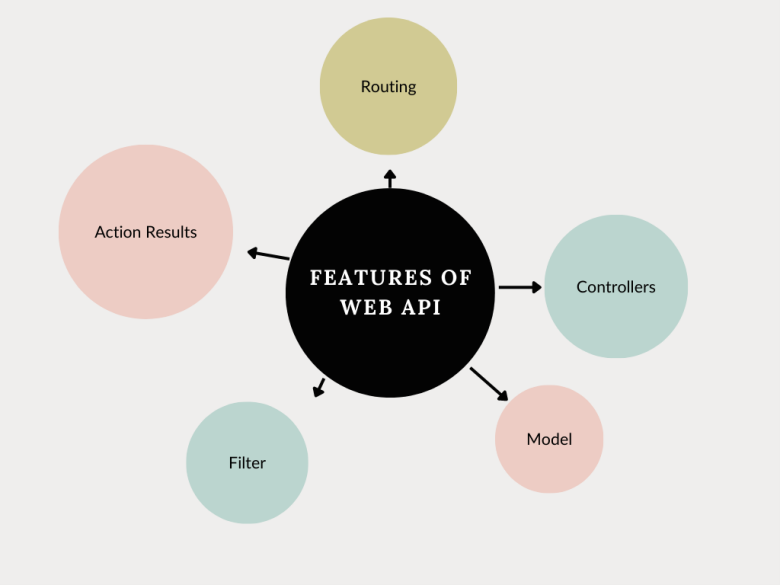
| Filter: It gives filters to the web application. Action Result: It can keep the action logos client, such as information recovery. Routing: It makes a difference in routing through different APIs. Controller: It gives useful capabilities to the web application. Model: It gives the basic capabilities of the web application. |
Types of Web API in C#
- public
- partner
- private
- Composite
Public APIs
A public API is open and available for use by outside developers or businesses; its application, Data, will develop and offer a public API. also called public APIs or external APIs.
Partner APIs
Partner APIs can interface the internal client information system with those outside groups no other APIs are allowed. APIs are generally stronger authentication, authorization, and security machines.
private APIs
Private APIs are used by enterprises to connect system and data APIs for internal use at certain security levels.
Composite APIs
Composite APIs generally combine two or more APIs’ interdependent operations. Composite APIs sometimes improve speed and performance.
C# Web API Sample Programming
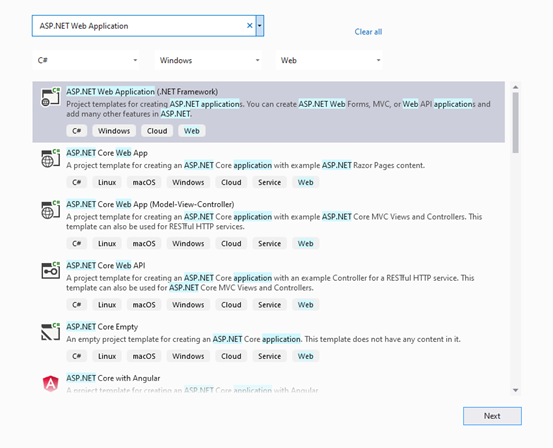
Open Visual Studio 2019 > Click Create a new project > Alt+s > ASP.NET Web Application (.NET Framework) > ProjectName ASP.NET MVC Web API
Create a new Models.cs Application Snapshot as below ,
Models Folder Right click > Add > Click Class > Reference Name Empolyee.cs
Replace the Empolyee.cs Class with below snippet,
| using System; using System.Collections.Generic; using System.Linq; using System.Web; namespace ASP.NET_MVC_Web_API.Models { public class Empolyee { public int ID { get; set; } public string Name { get; set; } public DateTime JoiningDate { get; set; } public int Age { get; set; } } } |
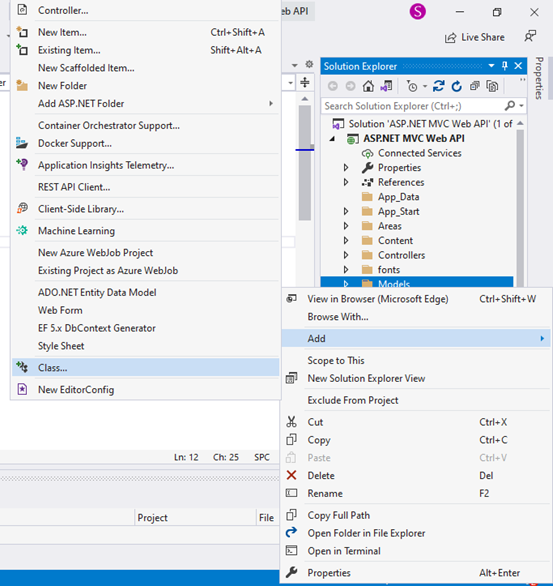
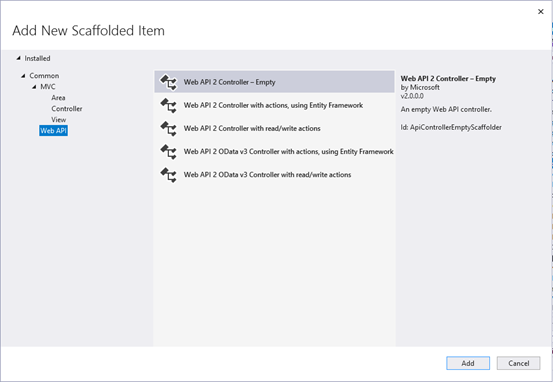
Controller Folder Right click > Add > Click Controller > Click Web API
> Click Web API 2 Controller Empty> ControllerName EmpolyeeController.cs
Create a new Controller.cs Application Snapshot as below
Replace the EmpolyeeController.cs With below Snippet ,
| using System; using System.Collections.Generic; using System.Linq; using System.Web.Http; using ASP.NET_MVC_Web_API.Models; namespace ASP.NET_MVC_Web_API.Controllers { public class EmpolyeeController : ApiController { Empolyee[] employees = new Empolyee[] { new Empolyee { ID = 1, Name = “sam”, JoiningDate = DateTime.Parse(DateTime.Today.ToString()), Age = 29 }, new Empolyee { ID = 2, Name = “Balu”, JoiningDate = DateTime.Parse(DateTime.Today.ToString()), Age = 36 }, new Empolyee { ID = 3, Name = “Michel”, JoiningDate = DateTime.Parse(DateTime.Today.ToString()), Age = 22 } }; public IEnumerable<Empolyee> GetAllEmployees() { return employees; } public IHttpActionResult GetEmployee(int id) { var employee = employees.FirstOrDefault((p) => p.ID == id); if (employee == null) { return NotFound(); } return Ok(employee); } } } |
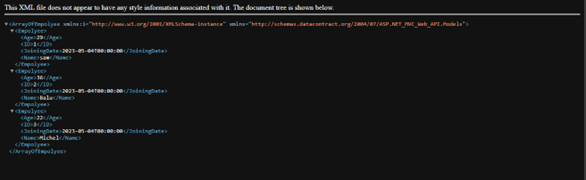
Run the Application and Replace the Url

Output :
SQL Job Support in India
SQL Overview:
SQL is a database management language that includes database creation, database deletion, fetching data rows, modifying, and deleting data rows, and so on.
SQL stands for Structured Query Language, and it is a computer language used to store, manipulate, and retrieve data from relational databases. SQL was created by IBM Computer Scientists in the 1970s and was adopted as a standard by the American National Standards Institute (ANSI) in 1986 and the International Organization for Standardization (ISO) in 1987.
SQL is the industry standard for communicating with Relational Database Systems. SQL is the Standard Database Language used by all Relational Database Management Systems (RDMS) such as MySQL, MS Access, Oracle, Sybase, Informix, Postgres, and SQL Server.
Data is everything nowadays. To comprehend this, you must be familiar with data management. SQL is a language that can be used to understand databases. SQL (Structured Query Language) is the name given to a language used to communicate with databases. The SQL language can be used to edit, pull, and add information to a database. SQL is the foundation of relational databases. More information is available in our SQL online job support.
SQL is widely used because it provides the following benefits:
Users can
- access data stored in relational database management systems.
- describe the data.
- define and manipulate data in a database.
- create and delete databases and tables.
- create views, stored procedures, and functions in a database.
- assign permissions to tables, procedures, and views.
- embed SQL modules, libraries, and pre-compilers within other languages.
SQL Job Assistance:
Do you require SQL Job Support? If you are having trouble completing daily tasks at work due to a lack of practical SQL knowledge, you are most likely looking for an online job support service, which is considered to be the most effective and simplest solution these days. ‘Job Support Online’ offers the best on-the-job support services. No matter what kind of issues you are having with your project tasks, our top IT experts will assist you in dealing with and solving each and every issue on your own. We excel at providing the best on-the-job support services. What exactly are you waiting for? Call today for the best SQL on-the-job support services from anywhere in the world.
Why should you hire our SQL server job support team?
We offer the most effective SQL server job support services. We have built a team of highly experienced and professional IT consultants over the years to provide the best on-the-job support services. Every expert on our team has over a decade of experience in the IT industry, provides professional job support services, and can assist you in completing tasks at your job on time. We aim to provide expert job support to all IT freshers, but we understand that money may be an issue for some. As a result, we charge low prices to make our on-site support services affordable. Furthermore, we work hard to provide the best job support services possible.
Our SQL project assistance programme:
We offer full-time on-the-job support in both online and offline.
We will assign you an expert IT professional to conduct the demo session.
First and foremost, you must explain everything about your project and the technologies used in it to our expert IT professional, and if he/she is satisfied, we will agree to provide you with job support services.
Our IT professionals assist you in managing complex projects on the job.
Fees for job support are non-refundable. So please only pay the fees if you are likely that you require job support services.
Please call us at +91-90427 10472 or +91-95851 77725 for more information on job support and SQL training.
Stored Procedure in SQL Server
- A stored procedure is a precompiled and stored database object that contains a set of SQL statements and procedural logic that can be executed as a single unit. It can be used in a database management system to simplify complex queries and database operations. It is a prepared SQL code that you can save, so the code can be reused over and over again. Stored procedures help improve performance and security, as well as simplify the code.
Here’s a basic example of a stored procedure that accepts two input parameters and returns the sum of those two numbers:
| CREATE PROCEDURE AddNumbers @n1 INT, @n2 INT AS BEGIN SET NOCOUNT ON; SELECT @n1 + @n2 AS ‘Sum’; END |
In this example, CREATE PROCEDURE is used to define the name of the procedure (AddNumbers) and its input parameters (@n1 and @n2). The AS keyword is used to begin the code block for the stored procedure.
SET NOCOUNT ON is used to prevent the count of the number of rows affected by the stored procedure from being returned.
The code block then calculates the sum of the two input parameters and returns the result using the SELECT statement.
Once the stored procedure is defined, it can be executed by calling its name:
| EXEC AddNumbers 2, 3; |
This will return the result 5 as the sum of 2 and 3.
Stored Procedure in a Basic CRUD Operation
Now, let us have an idea about using stored procedure in a basic CRUD operation sample.
Let us create a database as follows:
| Create database Company |
Then create a table in the corresponding database.
| CREATE TABLE Employee( EmpCode int, EmpName nchar(100), EmpAge int, EmpSal int) |
Inserting data into a table: This stored procedure inserts a new employee record into a table named Employee:
| CREATE PROCEDURE AddEmployee @EmpCode int, @EmpName nchar(100), @EmpAge int, @EmpSal int AS BEGIN SET NOCOUNT ON; INSERT INTO Employee(EmpCode, EmpName, EmpAge, EmpSal) VALUES (@EmpCode, @EmpName, @EmpAge, @EmpSal); END |
On executing the above snippet, a stored procedure to add the details in the table will be created.
Now, by calling the below query, the table will get added the following 5 datas.
| EXEC AddEmployee 1, ‘TOM’, 25, 30000 EXEC AddEmployee 2, ‘RAM’, 25, 30000 EXEC AddEmployee 3, ‘RAJA’, 26, 32000 EXEC AddEmployee 4, ‘SIVA’, 26, 32000 EXEC AddEmployee 5, ‘GOPI’, 25, 30000 |
Retrieving data from a table: This stored procedure retrieves all the rows from a table named Employee:
| CREATE PROCEDURE GetEmployees AS BEGIN SET NOCOUNT ON; SELECT * FROM Employee; END |
On executing the above snippet, a stored procedure to get the employee details from the table will be created.
Then by simply calling the below query, the datas stored in the table can be retrieved.
| EXEC GetEmployees |
Updating data in a table: This stored procedure updates an existing employee record in a table named Employee:
| CREATE PROCEDURE UpdateEmployee @EmpCode int, @EmpName nchar(100), @EmpAge int, @EmpSal int AS BEGIN SET NOCOUNT ON; UPDATE Employee SET EmpName = @EmpName, EmpAge = @EmpAge, EmpSal = @EmpSal WHERE EmpCode = @EmpCode; END |
On executing the above snippet, a stored procedure to update the details in the table will be created.
Now, by calling the below query, the data with “EmpCode =1” in the table can be updated with new data as follows.
| EXEC UpdateEmployee 1, ‘Jerry’, 26, 32000 |
Deleting data from a table: This stored procedure deletes an existing employee record from a table named Employee:
| CREATE PROCEDURE DeleteEmployee @EmpCode int AS BEGIN SET NOCOUNT ON; DELETE FROM Employee WHERE EmpCode = @EmpCode; END |
On executing the above snippet, a stored procedure to delete the details in the table will be created.
Now, by calling the below query, the data with “EmpCode=1” in the table can be deleted
| EXEC DeleteEmployee 1 |
These are just a few examples, and there are many more possibilities for what you can do with stored procedures.
SQL & C# Dot Net – Online Training in India:
SQL and DOT NET Technologies:
SQL and DOT NET are two distinct technologies that are frequently used in software development. SQL is an abbreviation for Structured Query Language, a programming language used to manage and manipulate relational databases. DOT NET is a software development framework that allows you to create and run applications on a variety of platforms, including Windows, macOS, and Linux.
SQL is widely used in relational databases such as MySQL, Oracle, and Microsoft SQL Server to manage data. SQL allows developers to use a standardised syntax to create, modify, and query databases. SQL allows for a wide range of operations, such as data insertion, deletion, modification, and retrieval. SQL is also used to analyse data, report on it, and gather business intelligence.
DOT NET is a well-known software development framework that is used to create desktop, web, and mobile applications. DOT NET provides a set of libraries, tools, and runtime environments that simplify the development, testing, and deployment of applications. DOT NET supports a variety of programming languages, including C#, F#, and Visual Basic, and it can be used to create applications for a variety of platforms, including Windows, macOS, Linux, and mobile devices.
SQL and DOT NET, when used together, can provide powerful solutions for managing and manipulating data in applications. For example, a DOT NET application can use SQL to manage its data in a relational database, making it easier to store and retrieve data. Furthermore, DOT NET includes a set of libraries and tools that make it easier to integrate with SQL databases, allowing developers to create applications that can handle large amounts of data while also supporting complex data analysis and reporting.
Future of DOT NET:
Dot Net has a broad scope, and its future appears bright. Dot net is the future of Windows and other operating systems development.
It is a comprehensive framework for developing large enterprise-scale and scalable software applications.
Dot Net is a modern, flexible, fast, and secure technology that integrates well with other technologies.
Our Training Institute – Maria Academy
With our online course, you can broaden your career opportunities in SQL, C#, and Dot Net Technology.
A C# course can take you to the next skill level whether you are an experienced programmer looking to expand your skills and knowledge or you are just getting started in object-oriented programming. Discover what you can do with C# by learning from experienced instructors at Maria Academy.
Our experts will provide you with the SQL training you require to become a database professional. This course is also ideal for advanced engineers who need to refresh their knowledge. SQL courses aren’t just for engineers; they’re also for business analysts who need to learn about new trends and markets.
We will enthusiastically teach you SQL, C# & DOT NET. Our trainers will be more interactive, addressing real-world problems and providing solutions. Students will be able to improve their programming skills through hands-on programming. Trainers must have a minimum of six years of experience. The curriculum was created to cover the entire C# learning process. A practical test and periodic exercises will be provided to help students improve their programming skills. By the end of the training, you should be able to provide a solution for a real-world scenario using your programming skills.
In terms of placement, course, syllabus, and practical, we are the best C#.NET Training Providers in India.
“c++” is the result of the evolution of “c.” C++’s evolution continues. C# is a modern, dependable, and robust programming language. C#.net works with the Microsoft.NET framework. Delegates, Interface, and Abstraction are just a few of the cool features that have propelled C#.net to the top of the world. C# has inherited the best characteristics of its forefathers, including C, C++, and Java. Because of their best features, C# continues to be the solution provider for various hypothetical problems. C#.net was derived from various object-oriented programming extracts.
OOPs Concepts
OOPs Concepts:
It is a programming paradigm that focuses on the use of objects to represent data and behaviors in software applications.
It is based on the concept of “classes” and “objects”.
The main principles of OOPs are Encapsulation, Inheritance, Polymorphism & Abstraction
Classes:
A class is a blueprint for creating objects. It defines the properties and methods that an object of that class will have. For example, a class called “Person” might have properties such as “name”, “age”, and “gender”, and methods such as “walk” and “talk”.
In C#, classes are a fundamental building block of object-oriented programming (OOP). A class is a blueprint or a template that defines the structure and behaviour of a particular type of object.
Here’s an example of a class in C#:
public class Person
{
public string Name { get; set; }
public int Age { get; set; }
public string Address { get; set; }
public void PrintDetails()
{
Console.WriteLine($”Name: {Name}, Age: {Age}, Address: {Address}”);
}
}
In this example, we have defined a class called Person that has three properties: Name, Age, and Address. These properties are defined using auto-implemented properties, which are shorthand for defining a private field and public getter/setter methods.
The PrintDetails method is a behaviour of the Person class. It is a public method that can be called on an instance of the Person class to print out the person’s details.
To create an instance of the Person class and set its properties, we can do the following:
Person person = new Person();
person.Name = “John”;
person.Age = 30;
person.Address = “123 Main St.”;
And to call the PrintDetails method on the person instance:
person.PrintDetails(); // Output: Name: John, Age: 30, Address: 123 Main St.
In this way, classes in C# allow us to define the structure and behaviour of our objects and create instances of those objects with specific properties and methods.
Objects:
An object is an instance of a class. It represents a specific instance of the class and has its own set of values for the properties defined by the class. For example, an object created from the “Person” class might have a name of “John”, an age of 25, and a gender of “Male”.
In C#, an object is an instance of a class. When we create an instance of a class using the new keyword, we are creating an object of that class.
Here’s an example of creating an object of the Person class we defined earlier:
Person person = new Person();
In this example, person is an object of the Person class. We can access its properties and call its methods using the dot notation:
person.Name = “John”;
person.Age = 30;
person.Address = “123 Main St.”;
person.PrintDetails(); // Output: Name: John, Age: 30, Address: 123 Main St.
Each object of a class has its own set of properties and can have different values for those properties. For example, we can create another object of the Person class with different values for its properties:
Person person2 = new Person();
person2.Name = “Jane”;
person2.Age = 25;
person2.Address = “456 Elm St.”;
person2.PrintDetails(); // Output: Name: Jane, Age: 25, Address: 456 Elm St.
In this way, objects in C# allow us to create multiple instances of a class, each with its own set of properties and values. We can use these objects to represent real-world entities or concepts in our programs and manipulate them by calling their methods and accessing their properties.
Encapsulation:
One of the key features of OOP is encapsulation, which is the concept of bundling data and methods that operate on that data within a single unit. This makes it easier to manage and maintain the code and helps to prevent the data from being accessed or modified by code outside of the class.
Encapsulation is one of the core principles of object-oriented programming (OOP) and refers to the practice of bundling data and the methods that operate on that data within a single unit, called a class, and restricting access to the inner workings of that class from the outside world.
In C#, encapsulation is achieved through access modifiers, which are keywords that determine the level of access that other code has to a particular class member (i.e., fields, properties, methods). C# provides four access modifiers:
public: The member is accessible from any code.
private: The member is accessible only within the same class.
protected: The member is accessible within the same class and any derived classes.
internal: The member is accessible within the same assembly.
Here’s an example of using encapsulation to hide the implementation details of a Person class:
public class Person
{
private string name;
private int age;
private string address;
public string Name
{
get { return name; }
set { name = value; }
}
public int Age
{
get { return age; }
set { age = value; }
}
public string Address
{
get { return address; }
set { address = value; }
}
public void PrintDetails()
{
Console.WriteLine($”Name: {Name}, Age: {Age}, Address: {Address}”);
}
}
In this example, the fields name, age, and address are marked as private, which means they can only be accessed from within the Person class. However, we’ve also defined public properties Name, Age, and Address that provide access to these fields from outside the class. By using properties, we can control the access to the fields and add logic to the getter/setter methods if necessary.
The PrintDetails method is also a public method that can be called from outside the class to print out the person’s details. However, it does not provide direct access to the internal fields.
By using encapsulation in this way, we can ensure that the internal state of a class is not accidentally or intentionally modified from outside the class, and that changes to the internal implementation of the class do not affect the external code that uses it.
Inheritance:
Inheritance allows a new class to be based on an existing class, inheriting its properties and methods. This can save time and effort in development, as the new class can reuse the code of the existing class.
Inheritance is another core principle of object-oriented programming (OOP) and refers to the ability of a class to inherit properties and behaviours from a parent class. In C#, inheritance is achieved through the : symbol followed by the name of the parent class.
Here’s an example of using inheritance to create a Student class that inherits from the Person class:
public class Student : Person
{
public int GradeLevel { get; set; }
public string SchoolName { get; set; }
public void PrintSchoolInfo()
{
Console.WriteLine($”School: {SchoolName}, Grade: {GradeLevel}”);
}
}
In this example, the Student class inherits from the Person class using the: symbol. This means that the Student class has access to all of the public and protected members of the Person class, including its fields, properties, and methods.
In addition to the inherited members, the Student class defines two new properties, GradeLevel and SchoolName, and a new method, PrintSchoolInfo.
We can create an object of the Student class and set its properties just like we did with the Person class:
Student student = new Student();
student.Name = “John”;
student.Age = 15;
student.Address = “123 Main St.”;
student.GradeLevel = 9;
student.SchoolName = “High School”;
And we can call methods from both the Person and Student classes on the student object:
student.PrintDetails(); // Output: Name: John, Age: 15, Address: 123 Main St.
student.PrintSchoolInfo(); // Output: School: High School, Grade: 9
By using inheritance in this way, we can reuse code from existing classes and create more specialized classes that add new properties and behaviours on top of the existing ones. It also allows us to create a hierarchy of related classes, where each class builds on the properties and behaviours of the classes above it in the hierarchy.
Polymorphism:
Polymorphism allows objects of different classes to be treated as if they are of the same class, by using a common interface. This makes it easier to write code that works with multiple objects, as the code can be written to work with the interface rather than the specific classes.
Polymorphism is another core principle of object-oriented programming (OOP) and refers to the ability of objects of different classes to be used interchangeably in the same context. In C#, polymorphism is achieved through inheritance and interfaces.
There are two main types of polymorphism in C#: compile-time polymorphism and runtime polymorphism.
Compile-time polymorphism, also known as method overloading, refers to the ability of a method to have multiple definitions with different parameter lists. The correct method to call is determined at compile time based on the number and types of arguments passed to the method.
Here’s an example of method overloading in C#:
public class Calculator
{
public int Add(int x, int y)
{
return x + y;
}
public float Add(float x, float y)
{
return x + y;
}
}
In this example, the Calculator class defines two Add methods with different parameter types (int and float). Depending on the arguments passed to the Add method, the compiler will choose the appropriate overload at compile time.
Runtime polymorphism, also known as method overriding, refers to the ability of a subclass to provide a different implementation of a method that is already defined in its parent class. The correct method to call is determined at runtime based on the type of the object that the method is called on.
Here’s an example of method overriding in C#:
public class Animal
{
public virtual void MakeSound()
{
Console.WriteLine(“The animal makes a sound.”);
}
}
public class Dog : Animal
{
public override void MakeSound()
{
Console.WriteLine(“The dog barks.”);
}
}
In this example, the Animal class defines a virtual MakeSound method that can be overridden by its subclasses. The Dog class overrides the MakeSound method and provides a different implementation that prints “The dog barks.” to the console.
We can create objects of both the Animal and Dog classes and call the MakeSound method on them:
Animal animal = new Animal();
Dog dog = new Dog();
animal.MakeSound(); // Output: The animal makes a sound.
dog.MakeSound(); // Output: The dog barks.
By using polymorphism in this way, we can write code that is more flexible and adaptable to different types of objects, without having to know the exact type of the object at compile time. This makes our code more modular and easier to maintain over time.
Abstraction:
Abstraction is the concept of hiding unnecessary details and complexity from the user, while still providing the necessary functionality. This can make the code easier to use and maintain, as well as improve performance.
Abstraction is a core principle of object-oriented programming (OOP) that refers to the ability to hide the implementation details of a class from the outside world and expose only the relevant features and behaviours through a simplified interface. In C#, abstraction is achieved using abstract classes and interfaces.
An abstract class is a class that cannot be instantiated directly and can only be used as a base class for other classes. It may contain abstract methods, which are declared but not implemented in the abstract class. The subclasses of an abstract class must implement all its abstract methods to be instantiated.
Here’s an example of an abstract class in C#:
public abstract class Shape
{
public abstract float GetArea();
}
In this example, the Shape class is declared as abstract, which means that it cannot be instantiated directly. It contains an abstract GetArea method, which is declared but not implemented in the abstract class.
Subclasses of the Shape class must provide their own implementation of the GetArea method in order to be instantiated. Here’s an example of a Rectangle class that extends the Shape class and implements the GetArea method:
public class Rectangle : Shape
{
public float Width { get; set; }
public float Height { get; set; }
public override float GetArea()
{
return Width * Height;
}
}
In this example, the Rectangle class extends the Shape class and provides its own implementation of the GetArea method, which calculates the area of a rectangle based on its width and height.
An interface is a contract that specifies a set of methods and properties that a class must implement. It does not contain any implementation code, but rather defines a set of public members that must be implemented by any class that implements the interface.
Here’s an example of an interface in C#:
public interface IPlayable
{
void Play();
void Pause();
void Stop();
}
In this example, the IPlayable interface defines three methods (Play, Pause, and Stop) that must be implemented by any class that implements the interface.
Classes that implement the IPlayable interface must provide their own implementation of these three methods. Here’s an example of a MediaPlayer class that implements the IPlayable interface:
public class MediaPlayer : IPlayable
{
public void Play()
{
Console.WriteLine(“Playing…”);
}
public void Pause()
{
Console.WriteLine(“Paused.”);
}
public void Stop()
{
Console.WriteLine(“Stopped.”);
}
}
In this example, the MediaPlayer class implements the IPlayable interface and provides its own implementation of the Play, Pause, and Stop methods. Any class that implements the IPlayable interface can be used interchangeably with the MediaPlayer class in any context that requires an IPlayable object.
By using abstraction in this way, we can create classes that are more flexible, modular, and easier to maintain over time. We can also create a hierarchy of related classes and interfaces that define a set of common behaviours and features that can be reused and extended in different contexts.
Securing ASP.NET Core web application with Identity Framework
Securing ASP.NET Core web application with Identity Framework:
Web application security is more important than ever in today’s world. Identity Framework is one of the tools and features available in ASP.NET Core for securing web applications. Identity Framework is a membership system that provides the user interface, APIs, and features required for the creation and management of user accounts.
In this article, we’ll go over how to use Identity Framework to secure your ASP.NET Core web application.
Step 1: ASP.NET Core Web Application Creation:
The first step is to build an ASP.NET Core web app. You can accomplish this by taking the following steps:
Launch Visual Studio and select “New Project.”
Click “Next” after selecting “ASP.NET Core Web Application.”
Select a project template (such as MVC, Web API, or Razor Pages) and click “Create.”
Step 2: Identity Framework Installation:
Following the creation of the ASP.NET Core web application, the Identity Framework must be installed. You can accomplish this by including the following package in your project:
Microsoft.AspNetCore.Identity.EntityFrameworkCore
You can install this package using the NuGet Package Manager or by adding the following line to your.csproj file:
<PackageReference Include=”Microsoft.AspNetCore.Identity.EntityFrameworkCore” Version=”2.2.0″ />
Step 3: Identity Framework Configuration:
The following step is to set up Identity Framework. You can accomplish this by including the following code in the Startup.cs file’s ConfigureServices method:
services.AddIdentity<IdentityUser, IdentityRole>()
.AddEntityFrameworkStores<ApplicationDbContext>()
.AddDefaultTokenProviders();
This code instructs Identity Framework to use the IdentityUser and IdentityRole classes as the user and role entities, respectively, as well as the ApplicationDbContext as the database context.
Step 4: Database Creation:
The database will be created next. You can do this by running the following command in the Package Manager Console:
Update-Database
This command will populate the database with the necessary tables.
Step 5: Implement of Authentication and Authorization
The final step is to put authentication and authorization in place. This is accomplished by appending the [Authorize] attribute to the controllers or actions that require authorization. Policies can also be used to implement more complex authorization requirements.
Identity Framework’s SignInManager and UserManager classes can be used to implement authentication.
In Conclusion, we have discussed how to use Identity Framework to secure your ASP.NET Core web application in this article. We went over the steps for developing an ASP.NET Core web application, installing and configuring the Identity Framework, creating the database, and implementing authentication and authorization. You can create a secure ASP.NET Core web application that protects your users’ data and privacy by following these steps.
ENTITY FRAMEWORK
What is Entity Framework?
We (developers) used to frequently write ADO.NET code or Enterprise Data Access Block in Dot NET 3.5 to save or retrieve application data from the underlying database. Microsoft has provided a framework called “Entity Framework” to automate all these database-related activities for your application. Entity Framework is a Microsoft-supported open-source ORM framework for.NET applications. It enables developers to work with data using objects of domain-specific classes without focusing on the underlying database tables and columns where this data is stored.
Entity Framework in C#:
In this article, we will see how to use Entity Framework in C# applications using Visual Studio. The examples in this and likely future articles will use C# under Win Forms, but as previously stated, this choice will not affect a different intended use that the developer may reasonably request.
ORM in C#:
Optical mark recognition (also called optical mark reading or OMR) is the process of using hardware, software, or both to capture fields, for example, marks on documents such as multiple-choice questions, questionnaires with true or false fields, and other document forms.
Types of ORM Fields:
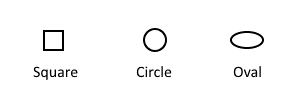
There are numerous types of OMR fields, but this section will give an overview of some of the most common ones. There can be shapes like squares, circles, and ovals.
Why Entity Framework in .NET Applications?
Entity Framework is an ORM tool, and ORM tools are primarily used to boost developer productivity by eliminating the redundant task of performing CRUD operations against a database in a.NET application.
Entity Framework can generate the necessary database commands for doing the database CRUD operation, i.e., can generate select, insert, update, and delete commands for us.
While working with Entity Framework, we can perform different types of operations on the domain objects (basically classes representing database tables) using LINQ to entities.
Entity Framework will generate and execute the SQL command in the database and then store the results in the instances of your domain objects so that you can do different types of operations on the data.
Prerequisites to Learn Entity Framework:
To fully benefit from this Entity Framework Course, you should have a basic understanding of C# as well as any database such as SQL Server, Oracle, or MySQL. It is recommended that you install the.NET Framework, Visual Studio, and SQL Server on your computer.
Advantages of Entity Framework:
Productivity:
Entity Framework can take up to 35 percent of the entire application code. It makes the developer’s life easier than ever. Despite its limitations, the designer integrated into Visual Studio dramatically simplifies the mapping process.
Maintainability:
Since you have fewer lines of code to fetch data from the database, the fewer lines of code you have to maintain.
Performance:
The complexity of ORM introduces an obvious slowdown in performance. In the entity framework first request to fetch data is a little bit slow but after that is fast to fetch data from the database.
Transactions:
ORM does all possible automation as transactions while querying the data or storing the data periodically. We can also customize transaction management practices to make the most of it out of the entity framework.
Selenium Automation Testing with C#
Automation Testing:
Due to the increasing demand for effective software products, each software development team must conduct several tests before to releasing the finished product onto the market. Before a software product is launched, test engineers work hard to find any flaws or bugs, yet deployed software is always flawed. Even with the best manual testing procedures, there is always a chance that the finished software product will have a flaw or won’t be able to satisfy the needs of the end user. The best approach to improve the efficacy, efficiency, and coverage of your software testing is through automation testing.
Automation testing employs specialised tools to automate the execution of manually designed test cases without the involvement of humans. Automation testing tools can access test data, control test execution, and compare actual results to expected results. As a result, detailed test reports of the system under test are generated.
Automation testing on an application includes both functional and performance tests.
Selenium:
Selenium is a vital automation testing tool because it supports a wide range of programming languages, including Java, Python, C#, Ruby, Perl, and PHP and to automate test scripts in a variety of browsers, including Google Chrome, Firefox, Safari, Internet Explorer, and Opera, on a variety of operating systems, including Windows, Mac, and Linux.
Selenium is a popular open-source Web UI (User Interface) automation testing suite.
Selenium can be used to automate functional tests and is compatible with automation testing tools like Maven, Jenkins, and Docker to achieve continuous testing. It can also be used in conjunction with tools like TestNG and JUnit to manage test cases and generate reports.
Selenium Tool Suite:
Selenium is a software suite, that supports automation testing in various ways and is not a single tool. It is made up of four major components, which are as follows:
• Selenium Integrated Development Environment (Selenium IDE)
• Selenium Remote Control (Selenium RC)
• WebDriver
• Selenium Grid
Selenium IDE:
Selenium IDE is a Firefox extension that allows test scripts to be recorded and played back. Testers can export recorded scripts in a variety of languages, including HTML, Java, Ruby, RSpec, Python, C#, JUnit, and TestNG. These exported scripts can be used in Selenium RC or Web driver.
The scope of the Selenium IDE is limited, and the generated test scripts are not very robust or portable.
Selenium RC:
The Selenium RC (officially deprecated by selenium) framework enables testers to create automated web application UI tests in any of the supported programming languages. It also includes an HTTP proxy server, which convinces the browser that the web application being tested is from the domain specified by the proxy server.
Selenium RC is comprised of two parts.
• RC Server for Selenium (acts as a HTTP proxy for web requests)
• Client for Selenium RC (library containing your programming language code)
Selenium RC was very effective for testing complex AJAX-based web user interfaces as part of a Continuous Integration System.
Web Driver:
The successor to Selenium RC, Selenium Web Driver (Selenium 2), is by far the most important component of the Selenium Suite. Selenium Web Driver offers a programming interface for creating and running test cases. Test scripts are written to identify web elements on web pages and then perform desired actions on those elements.
Selenium Web Driver is much faster than Selenium RC because it makes direct calls to web browsers. To interact with the web browser, RC requires the use of an RC server. Since WebDriver calls the methods of different browsers directly, we have a separate driver for each browser. Some of the most popular web drivers are:
• Mozilla Firefox Driver (Gecko Driver)
• Google Chrome Driver
• Internet Explorer Driver
• Opera Driver
Selenium Grid:
Selenium Grid is another important component of Selenium Suite that allows us to run our tests on multiple machines against multiple browsers at the same time. In other words, we can run our tests on multiple machines running different browsers and operating systems at the same time.
To achieve parallel execution of test scripts, Selenium Grid employs the Hub-Node Architecture. The Hub is the network’s master, while the nodes are its slaves. The Hub manages the execution of test scripts on various network nodes.
C# programming language:
C# is an object-oriented programming language that is pronounced C-sharp and runs on the.Net framework.
The CLR, or Common Language Runtime, is built to run the C# programming language.
C# is also known as a structured programming language since it allows us to segment programmes using functions.
The benefits of C# for automation testing are
• C# is useful for automation testing because it allows the automation test engineer to create an application on the.Net framework using Visual Studio. As C# IDE is Visual Studio, it provides a faster development and debugging experience than Java’s Eclipse.
• C# is a programming language that supports Selenium binding, this language binding will also be updated in combination with the Java code.
• C# has many built-in functions that speed up development.
Negotiation in Project Management:
Negotiation in Project Management:
Negotiation is a process by which people get into an agreement by avoiding arguments. A good negotiator should always look for a Win – Win situation. Negotiation is the important management skill for any Project manager as they spent most of their time in communication with stakeholders.
Negotiations can occur at any point in the project’s lifecycle and can be formal or informal.
Some basic negotiation skills are
- High Emotional Intelligence
- Good Listening and Communication
- Planning Negotiation Strategy
Project Managers’ Golden Rules to begin as a negotiator
You don’t get what you deserve in business; you get what you negotiate for.
Negotiation success is directly related to the amount preparation that precedes the negotiation.
Prepare Ahead of Time and Know Exactly What You Want. You should have a communication plan before starting the negotiation.
Conflicts are inevitable in meaningful negotiation. People who want to avoid conflict is mostly the loser in any Negotiation.
A good negotiation starts with building rapport with the other party.
Negotiation Processes:
The process of negotiation can be divided into the following phases:
- Planning: The gathering of all relevant information required for the discussion.
- Debate: The key issues are examined and discussed here.
- Proposal: The development of the proposal as a solution to the problem presented
- Revision: This can include negotiating compromises prior to formalizing an agreement.
Achieving a Win-Win Outcome:
Almost all negotiations yield the best results when both parties leave with a positive feeling about achieving their objectives i.e., is a win-win outcome.
This ideal situation can be accomplished by the four keys:
- Avoid focusing your negotiation on a single issue.
- Don’t assume you understand the other party’s requirements.
- Recognize that the other party does not have the same needs and desires as you.
- Believe point number two in your heart.
Some Successful Business Negotiation Strategies:
- Be always ready.
- Listen and understand the issues of other party’s issues and their point of view.
- Begin the negotiation by making a highball or lowball offer.
- Set a deadline for your offer.
- Be respectful and professional throughout the
- Show that you’re paying attention by using mirroring.
- Body language can be used to send messages.
- Recognize the dynamics of the deal.
- The best alternative for a negotiated agreement should be accepted.
- You should be ready to “play poker” and to walk
- Avoid using the unwise tactic of “continuous conceding” when
- Don’t focus only on the opportunity in front of you and ignore other
- Don’t get too focused on a single issue.
- Determine who really makes the
- Never take a deal at face value
- Make the proper inquiries.
- Create a Letter of Intent or Term Sheet to represent your agreement.
- Obtain the assistance of the best advisors and attorneys.
- Always create the initial version of the contract.
- Remember that time is the enemy of many deals.
- Always Strive for a win-win situation.
ASP.NET Vs ASP.NET Core
ASP.NET:
ASP.NET is a basic web development tool designed and developed by Microsoft, it is used to create windows applications, websites, and web services. There are around 60 programming languages available on the ASP.NET platform, among which VB.Net and C# are mostly used.
ASP.NET Core
ASP.NET Core is a new version of ASP.NET, which was also released by Microsoft. It is a free, open source, general-purpose development tool used to develop modern cloud-based software applications on Windows or Linux or mac operating systems. It was launched as a version of ASP.NET (i. e ASP.NET 5) and later it was renamed as ASP.NET Core.
Table: difference between ASP.NET and ASP.NET Core:
|
ASP.NET |
ASP.NET Core |
|
Only some components of the ASP.NET Framework are open source.
|
ASP.NET Core is completely a free and open-source tool.
|
|
It runs only on ASP.NET Framework.
|
It runs on ASP.NET Core and ASP.NET Framework. |
|
Performance is good.
|
Performance is very high than ASP.NET.
|
|
ASP.NET Framework is compatible only with the Windows operating system.
|
ASP.NET Core is compatible with various operating systems — Windows, Linux, and Mac OS.
|
|
It Supports Web-Forms, MVC and Web API.
|
It supports MVC, Web API and web pages of ASP.NET Core2.0. but does not support Web-Forms.
|
|
C#, VB, and many other languages can be used.
|
C# and F# languages are only supportable.
|
|
All major versions supported.
|
Supports Visual Studio core from version 3 to current version.
|
|
Whenever we modify or update a code, we need to re-compile the program.
|
Whenever we modify or update a code, the Core Browser refresh will compile and execute the program itself, So no need to re-compile it again.
|
|
It is not suitable for any mobile application development. But used for the development of both desktop and web applications.
|
It is not suitable for desktop application development, but suits well for development of web, windows mobile and windows store. In case of mobile applications, it can be used on devices which work on android and windows OS, Xamarin’s tools is used to configure such mobile applications.
|
|
It is installed as a single package for Windows OS.
|
As it is cross-platform, it is packaged and installed individually depending on the operating system used.
|
|
ASP.NET Framework is heavy for Command Line Interface (CLI).
|
ASP.NET core gives a lightweight CLI.
|
|
Code access security is available for security purposes.
|
No such security features available.
|
Summary:
If your application
- is to be designed to run only on Windows
- uses only the technologies of ASP.NET framework and if it does not support the technology of ASP.NET Core
- is already running on ASP.NET Framework
Then it is better to choose ASP.NET Framework.
If you are
- developing a new application and have a choice to choose between ASP.NET Core or ASP.NET Framework
- Targeting for microservices applications
- in need of a tool with features such as cross-platform, high performance, and scalability
Then ASP.NET Core is best choice.
The ASP.NET Core has the following advantages in comparison to ASP.NET Framework
- Open Source
- Cross-Platform
- High Performance
- Multiple development platform
- Multi environmental modes
MVC Training in Chennai
MVC training in Chennai has evolved by leaps and bounds in the last few years. Normally this course is designed as an 8 to 10 lecturer in a classroom session. There is a hand on lab exercises with the help of a live project which is evaluated by a trainer. To undertake this training you need to choose an institute of repute and the main point is that the learning environment has to be indeed good. They should provide you with a conducive learning environment where you can go on to understand the concepts of MVC in general. The training sessions needs to be a combination of theory and practical in details. It should be flexible and convenient as far as the timings are concerned. The course normally starts to begin with a demo view and an on student review. The instructors need to answer all the doubts of the student.
Real doting training is provided by most of the institutes in case of fresher’s to help them placed in software companies. The students are educated by the professional instructors in such a manner in the domain of Microsoft technologies so that they go on to become experts in this domain. Job assistance re provided to them so that they can stay ahead of the competition. From time to time workshops are conducted in the concept of .net technology. A good institute will not push the students into the course, and they are advised to undertake a free interactive session and then go on to decide which the best course of action is. All their efforts are channelized in the direction on how to go about fulfilling the dreams of the students.
What do you need to know about MVC in general?
MVC Training in Chennai is the best place to incorporate your skills in this domain. You can avail the services hands on of an experienced instructor and training on the latest version of MVC 5.0 is provided. In The focus is on theory and the main advantage of it over the web form is illustrated .Then one gets to know on to how to create a controller and then action. The MVC presentation has to start with some sort of diagram. When you are looking for something you tend to place a request that gets routed to a router. You need to understand the design pattern of MVC and then work on the module of ASP. NET framework and in this process, you tend to have an idea of developing lightweight web applications. You need to ensure that you have a suitable amount of walk thoughts and video tutorials as part of the program. Some of the features of this program are as follows
- You can modulate using the areas
- Work and develop areas that tend to be mobile compatible
- Have a clear cut idea about the benefits of MVC design in comparison to the traditional ASP. NET web forms
To undertake the course it is suggested that prior knowledge of HTML is needed.
Create Site Columns, Content Types, Bind content type to list in share point
Document by Vairavan – enquiry@softwaretraininginchennai.com – + 919042710472
Navigate to the Site URL http://htc:7004/
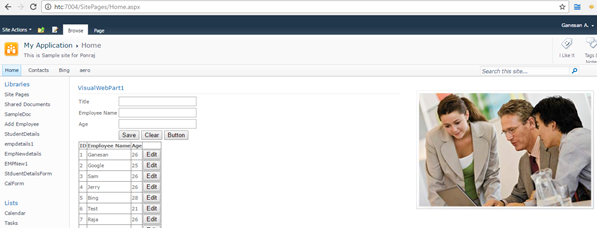
Click on Site Action -> Site Settings
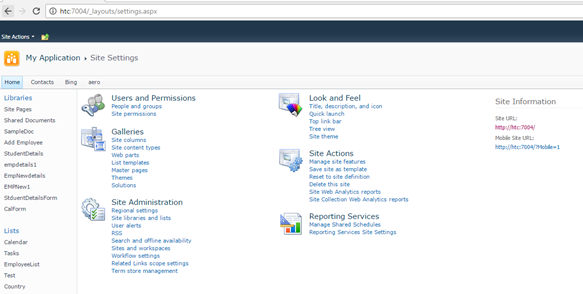
Click on Site Columns in Gallery.
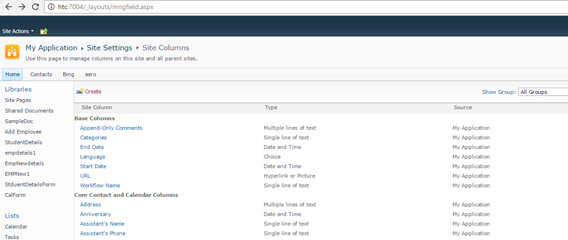
http://htc:7004/_layouts/mngfield.aspx
Click on Create.
Create a Site column with column name StudentName and type as Single Line of Text. Click Ok.
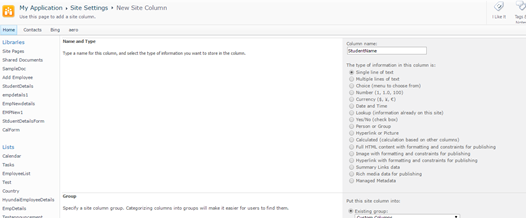
Create Site column Age with Number as DataType.
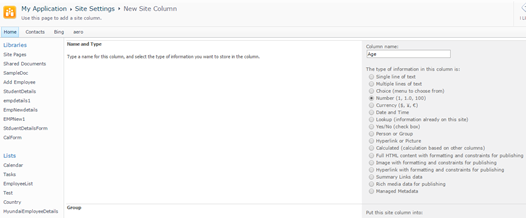
Create a site column Place with Choice
Chennai
Madurai
Trichy.
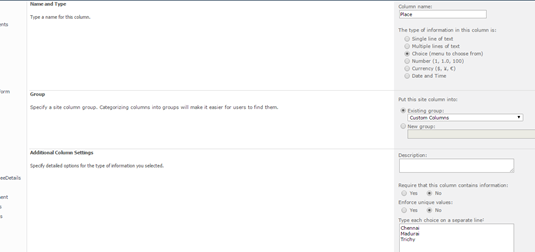
Navigate to Site Action –>Site Settings
Click on Site Content Types in Gallery.
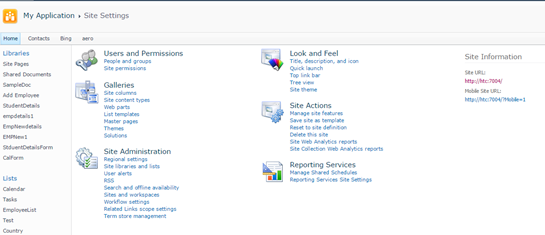
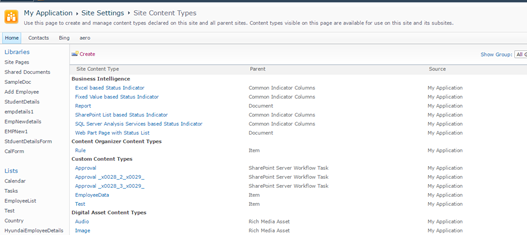
Click on Create.Create a site content type with name as StudentDetails and Parent Content Type from as
List Content Type and Parent Content Type as Item.
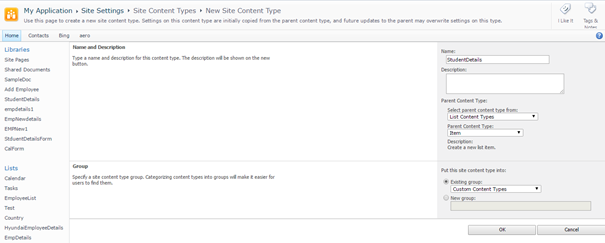
Click Ok.
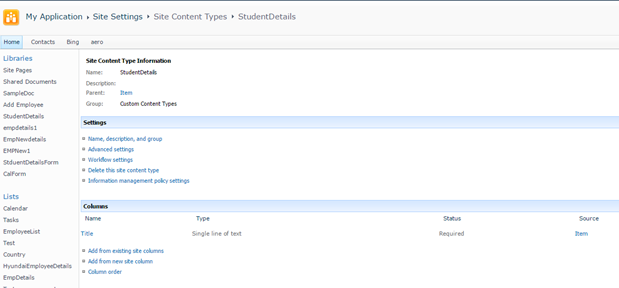
Click on Add from Existing Site column.
Select Custom Columns in the dropdown.
Add StudentName,Age,Place to Columns to add.Click on Add.
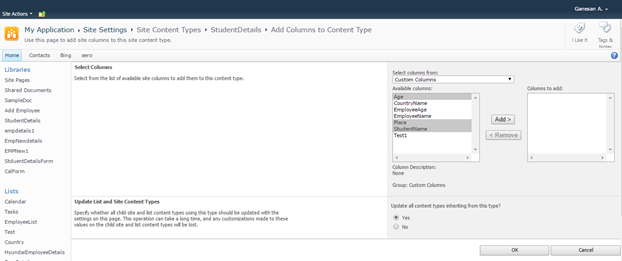
Click Ok.
Create a Custom List as shown below.
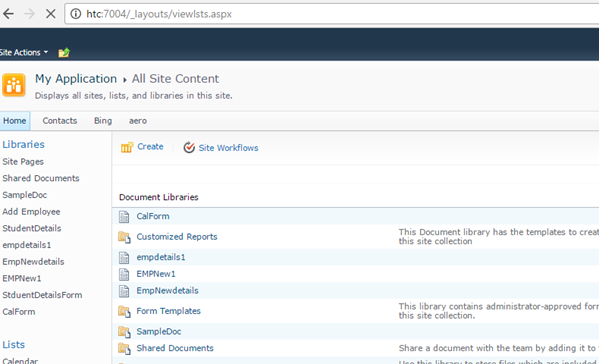
Click on Site Action –> View All site content
Click on Create.
Select Custom List as shown.
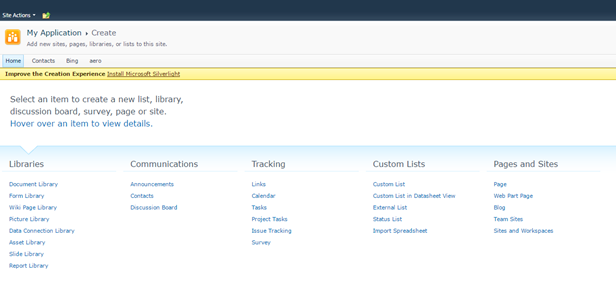
Create a List StudentDB.
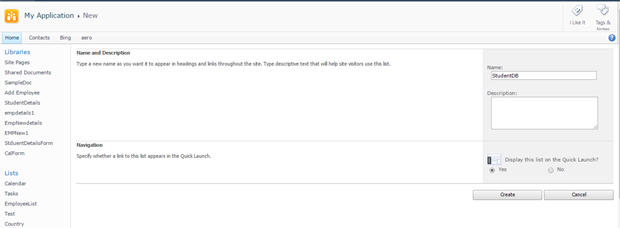
Click on Create.
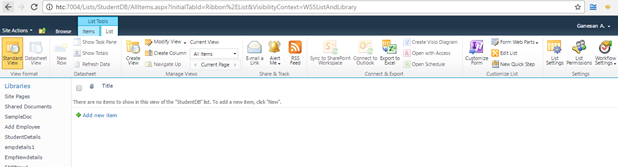
Click on List settings. Click on Advanced Settings.
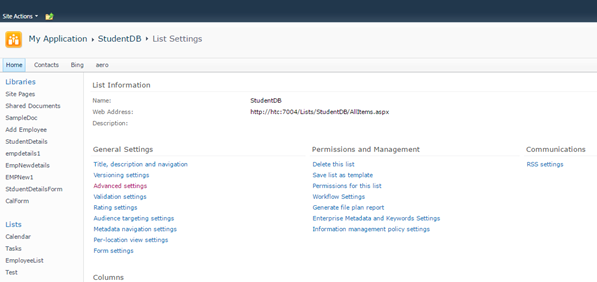
Change Allow Management of Content Types to Yes.
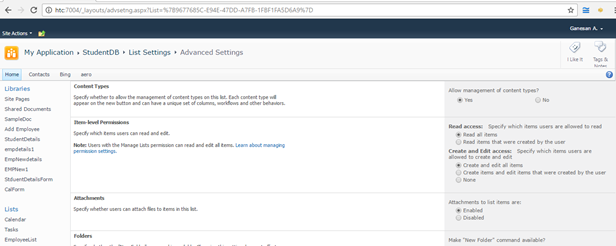
Click Ok.
Click on Add from Existing Site content Types from Content Types Tab.
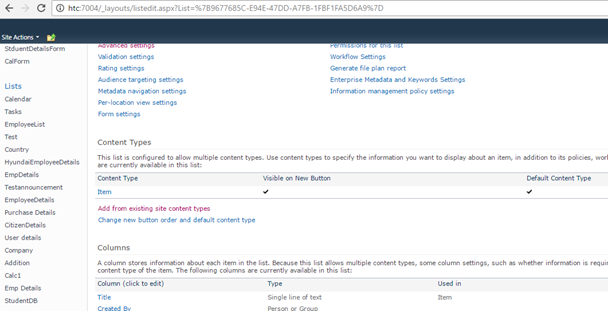
Select Custom Content Types from Dropdown as shown below.
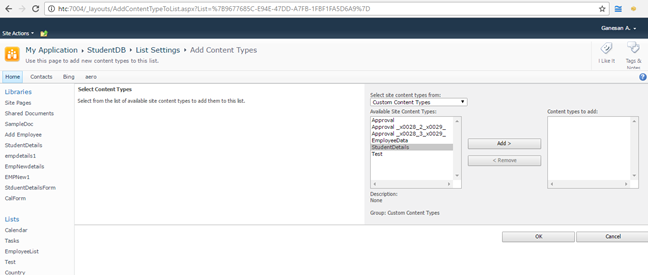
Select Student Details and Click on Add.
Click on Ok .Now the content Type will be added to List.
Now you can see both content types.

Click on Item Content Type.
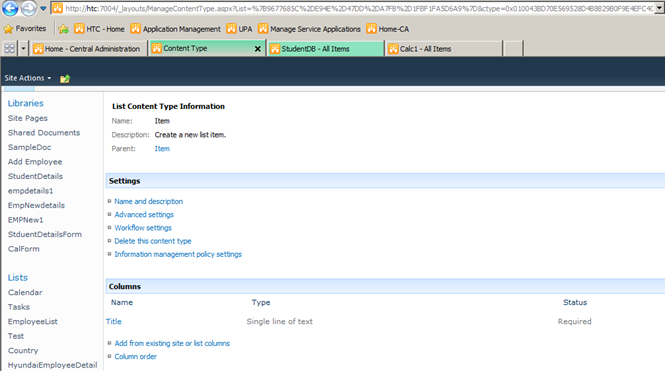
Click on Delete this Content Type.
Now you can see only one Content Type associated with the List ie. StudentDetails .
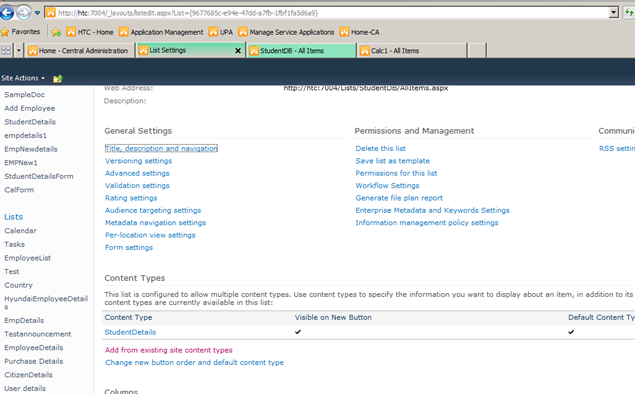
Click on New item in StudentDb List.It shows StudentDetails ContentType.
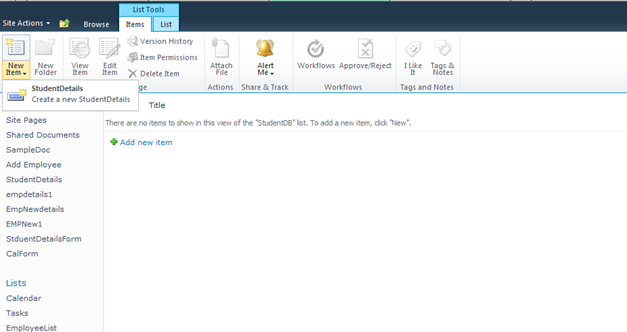
http://htc:7004/Lists/StudentDB/AllItems.aspx
Click on New Student Details link. The New form appears as below.
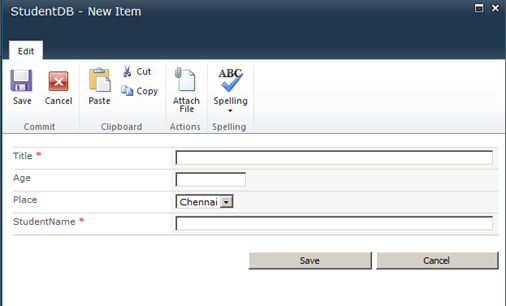
Click on Modify View and Add the columns to View.
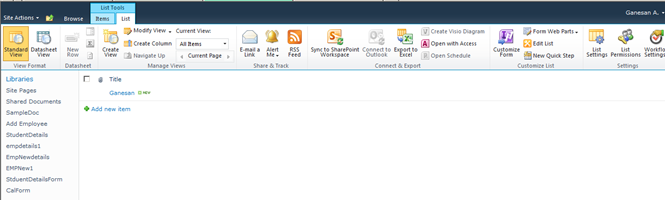
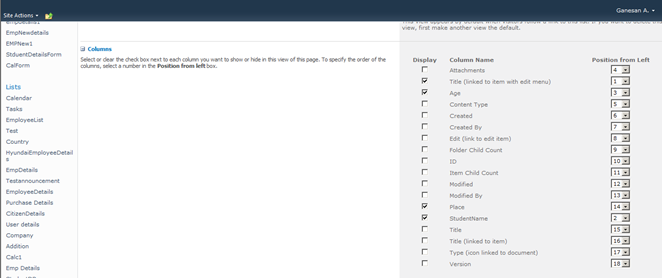
Click on Ok .Now the view looks as below.

All About Dot Net Courses and Training available in Chennai
The .net courses are gaining in popularity and the developers have been able to create intelligent applications which can go on to integrate with other platforms within a limited time frame. Net training in Chennai has also soared the popularity charts in a big manner. Net is a concept that you would need on your windows PC to run the computer.
One of the main reasons on why you should undertake dot net training in Chennai is because of the fact that it works out to be one of the popular programming languages that provides everything to be developed and you can go on to employ web based architectural deployment. More and more organizations are on the verge of implementing web services and .net technologies which helps to connect the business on a global platform. Another important aspect is that when you undertake dot net course Chennai you open your world of opportunities and gain employment to some of the top companies in the world.
When you undertake a dot net training institute in Chennai you will have hands on idea about the operating system, the fundamentals of programming along with the object oriented concepts. All the job aspirants who are pursuing graduation in IT or non IT stream who are looking to make the most of the job opportunities can go ahead and pursue this course. Roughly, this course spreads around 2126 hours.
To learn the, best dot net training institute in Chennai, there are some points that you need to give due consideration of sorts. Rather than rely on online training you can resort to the classroom led, instructor training. When there is a face to face interaction the focus not only improves but you are better faced to deal with employment chances. The institute that you should choose needs to have teaching staff with the proven level of experience. There should be a process where the teachers are handpicked and all their skills are tested, before they embark on the journey to provide their knowledge to the students. A good set up will undertake your periodic evaluation from time to time and you will be able to understand on where you stand currently. If you tend to miss any classes they will make arrangements that you attend the alternate classes and cover it up. In case of any doubts that might spring up, the faculty is always there to lend you a helping hand. If the situation permits you can also opt for extra classes and clear your doubts as well.
In the modern day world, with information being part and parcel of our life in a big way, choosing a good institute is an easy task. You just need to type the course name of dot net and a host of names will spring up in front of you. You need to do a research yourself and find out that in terms of value of money the course is right up there.
Send mail to users from gmail account using c#.net
Document by Alagappan -ganesanva@hotmail.com – + 919042710472
Click on File –> New Project in Visual Studio. Enter the solution name as MailUser.
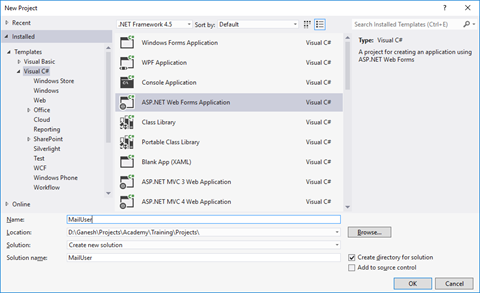
Click OK
Right Click on the Project and add new item.
Add new form with name SendEmail.aspx
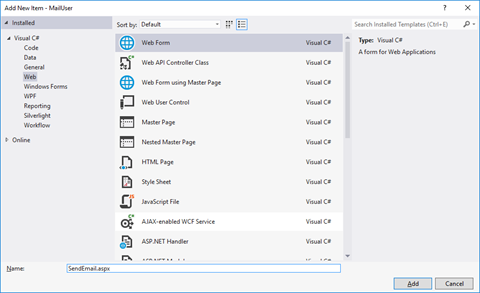
Put / Replace the below code in SendEmail.aspx
| <!DOCTYPE html> <html xmlns=”http://www.w3.org/1999/xhtml”> <head runat=”server”> <title></title> </head> <body> <form id=”form1″ runat=”server”> <div> <table border=”0″ cellspacing=”2″ cellpadding=”2″> <tr> <td> Email To </td> <td> <asp:TextBox ID=”txtMailTo” runat=”server”></asp:TextBox> </td> </tr> <tr> <td> Subject </td> <td> <asp:TextBox ID=”txtSubject” runat=”server”></asp:TextBox> </td> </tr> <tr> <td> Body </td> <td> <asp:TextBox ID=”txtBody” runat=”server” TextMode=”MultiLine”></asp:TextBox> </td> </tr> <tr> <td> </td> <td> <asp:Button ID=”btnSend” runat=”server” Text=”Send” OnClick=”btnSend_Click” /> </td> </tr> </table> </div> </form> </body> </html> |
Put / Replace the below code In SendEmail.aspx.cs
| public partial class SendEmail : System.Web.UI.Page { protected void Page_Load(object sender, EventArgs e) { } protected void btnSend_Click(object sender, EventArgs e) { string result=SendEmailtousers(txtMailTo.Text, txtSubject.Text, txtBody.Text); Response.Write(result); } protected string SendEmailtousers(string toAddress, string subject, string body) { string result = “Message Sent Successfully..!!”; string senderID = WebConfigurationManager.AppSettings[“SenderID”];// use sender’s email id here.. string senderPassword = WebConfigurationManager.AppSettings[“SenderPassword”]; // sender password here… try { SmtpClient smtp = new SmtpClient { Host = “smtp.gmail.com”, Port = 587, EnableSsl = true, DeliveryMethod = SmtpDeliveryMethod.Network, Credentials = new System.Net.NetworkCredential(senderID, senderPassword), Timeout = 30000, }; MailMessage message = new MailMessage(senderID, toAddress, subject, body); message.CC.Add(WebConfigurationManager.AppSettings[“CCMail”]); smtp.Send(message); } catch (Exception ex) { result = “Error sending email.!!!””; } return result; } } |
Add the below code in web.config below Connectionstrings tag
| <appSettings> <add key=”SenderID” value=”ganesvija@gmail.com”/> <add key=”SenderPassword” value=”*****”/> <add key=”CCMail” value=”ganesanva@hotmail.com”/> </appSettings> |
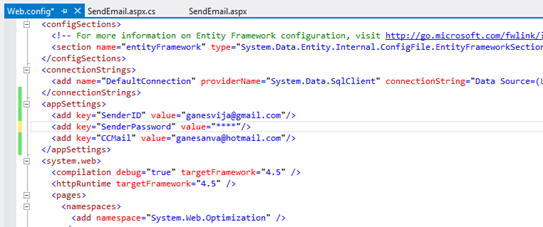
Replace **** with actual password in key SenderPassword.
Run the solution.
The Output as below,
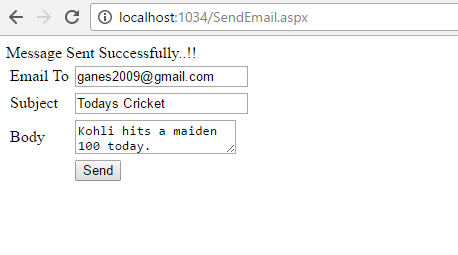
GMAIL inbox,

Note:
In order to trigger mail from client, Enable this on the From Address Gmail account.
Turn on Allow for Less Secure apps.
https://www.google.com/settings/security/lesssecureapps
Reference:
https://support.google.com/accounts/answer/6010255?hl=en
Click below to download the solution,
https://1drv.ms/u/s!ArddhCoxftkQg7UPuVICB-batxhXag
Real Time Dot Net Training Centers in Chennai
There is a wide market for freshers in software companies, especially in dot net field. Many real time dot net training centers are available in Chennai. Experts in dot net training centers train students in Microsoft technologies to excel in IT sector. Trainers in dot net training centers have more than four years of experience in IT sector. The real time dot net training centers provide three types of services which include dot net training, share point training and web development. Training on dot net is given to students for job assistance purpose and training is given till the students are familiar with the technology. The training centers give a complete guidance on software development life cycle. Regular workshops on dot net technology have been conducted for students and students have their own choice of choosing timing.
Trainers in dot net training centers provide assistance for Microsoft certification such as Microsoft certified technology specialist for dot net and SQL server. Both online and offline training classes are available for dot net. Online sessions are conducted via Skype, students can save money and time by adopting online dot net training. The dot net course include dot net architecture, OOPS concept, web and windows application with visual studio, connect Sql server database using ado.net, entity framework. Apart from this dot net training centers give training in web services, deploying dot net applications, to build Asp.net web application with MVC architecture.
Practices on design patterns based on dot net with programming share point 2010 application. C# dot net programming with real time examples and web applications. Dot trainers mainly focus on training people to excel well in dot net to meet world class standards. The real time dot net centers have well equipped classrooms, broad band facilities, course materials. Students can get real time exposure as all trainers are good at their teaching skills. The training centers provide course materials for all students who enroll under the training program, apart from this they also train persons for resume preparation. Experts in real time dot net training centers train persons based on current technology requirement. Based on market strategy students can avail the best options from experts and can develop themselves in dot net technology.
Training batches are small so that trainers give more attention to each individual to train persons to become expert in that field and also they can clarify student doubts. Based on their flexi timing students can avail the training. The trainers in dot net training centers prepare students to face the interview. Apart from coaching they train students from interview point. Students can have both course based training as well as interview based training. Certificates are issued to all the students after their successful completion of the course. The certificates enable the students to get placed in software companies. Students who have been trained by the dot net training centers excel well in programming skills. In addition to this they develop knowledge in software related to dot net applications.
State management in Asp.net
Document by Vairavan – Ganesanva@hotmail.com – +919042710472
There are 2 types of state management
1.Server side
2.Client Side
Client Side
- View State
- Hidden Fields
- Cookies
- Query strings
Server Side
- Application state
- Session state
View state
It allows to maintain the value with in the page
Hidden Fields
It is the control in Asp.net used to store value with in the page. It does not shows visibility in the page.
Cookies
It is the small amount of data stored in client browser session
Query string
IT allows to pass the data from one page to another in the browser URL.
Application state:
Asp.net allows to save values using Application state in HttpApplicationstate class.
Session State:
It allows to store data in the server side using HttpSessionState class.
Create a new Project File –>New Project in Visual studio
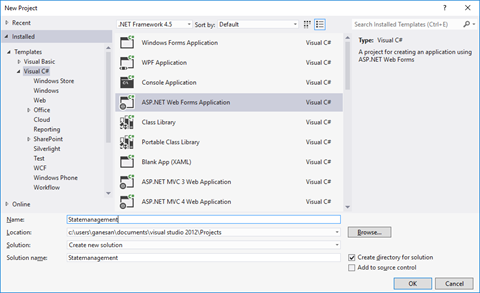
Click ok.
Right Click on the solution and Add New Item.
Select Web form and Name GetValues.aspx.

Add one another form as SetValues.aspx
Put / Replace the below HTML in SetValues.aspx
| <!DOCTYPE html> <html xmlns=”http://www.w3.org/1999/xhtml”> <head runat=”server”> <title></title> </head> <body> <form id=”form1″ runat=”server”> <div> <asp:TextBox ID=”txtsessionvalue” runat=”server”></asp:TextBox> <asp:Button ID=”btnSetSession” runat=”server” Text=”Set Session Value” OnClick=”btnSetSession_Click” /> </div> </form> </body> </html> |
Put / Replace the below code in SetValues.aspx.cs
| public partial class SetValues : System.Web.UI.Page { protected void Page_Load(object sender, EventArgs e) { } protected void btnSetSession_Click(object sender, EventArgs e) { Session[“Uservalue”] = txtsessionvalue.Text; Response.Redirect(“GetValues.aspx?ID=2”); } } |
Put / Replace the below HTML in GetValues.aspx
| <!DOCTYPE html> <html xmlns=”http://www.w3.org/1999/xhtml”> <head runat=”server”> <title></title> </head> <body> <form id=”form1″ runat=”server”> <div> <asp:TextBox ID=”txtviewstate” runat=”server”></asp:TextBox> <asp:Button ID=”btnGetSession” runat=”server” Text=”Get Session” OnClick=”btnGetSession_Click” /> <asp:Button ID=”btnSetViewState” runat=”server” Text=”Set View State” OnClick=”btnSetViewState_Click” /> <asp:Button ID=”btnGetViewState” runat=”server” Text=”Get View State” OnClick=”btnGetViewState_Click” /> <asp:Button ID=”btnGetQuerystringvalue” runat=”server” Text=”Get Query string Value” OnClick=”btnGetQuerystringvalue_Click” /> </div> </form> </body> </html> |
Put / Replace the below code in GetValues.aspx.cs
| public partial class GetValues : System.Web.UI.Page { protected void Page_Load(object sender, EventArgs e) { } protected void btnGetSession_Click(object sender, EventArgs e) { string sessionvalue = (string)Session[“Uservalue”]; Response.Write(“The Session State value is ” + sessionvalue); } protected void btnSetViewState_Click(object sender, EventArgs e) { ViewState[“data”] = txtviewstate.Text; } protected void btnGetViewState_Click(object sender, EventArgs e) { string viewstatevalue = (string)ViewState[“data”]; Response.Write(“The view State value is “+viewstatevalue); } protected void btnGetQuerystringvalue_Click(object sender, EventArgs e) { string QueryStringvalue = (string)Request.QueryString[“ID”]; Response.Write(“The Query string value is ” + QueryStringvalue); } } |
The Output as below,
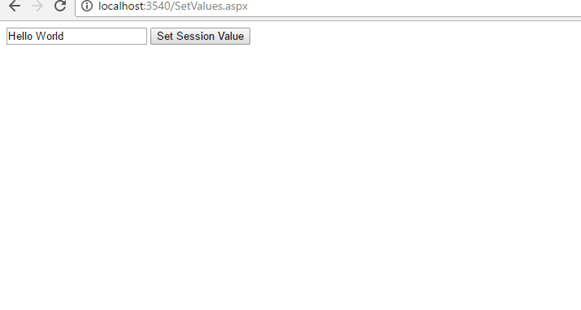
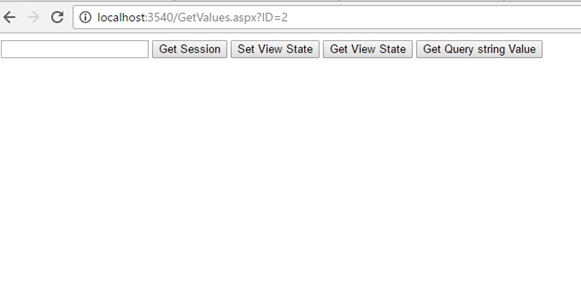
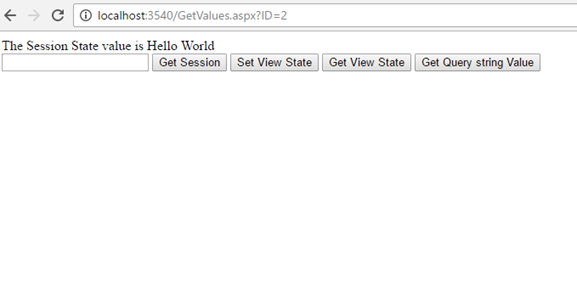
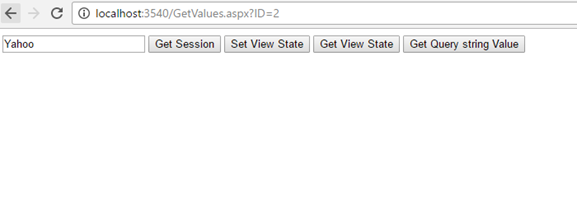

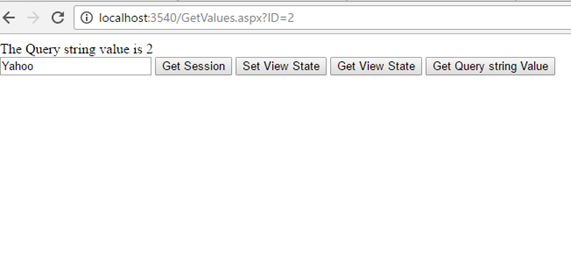
Click below to download the solution,
https://1drv.ms/u/s!ArddhCoxftkQg617pH3vPsuhyrHvDA
CRUD operation in PHP with MySQL
Download and install XAMPP from the below url
https://www.apachefriends.org/download.html
Run the Xampp Exe File as below,
xampp-win32-7.0.13-0-VC14-installer.exe
Install XAMPP in the Customised location as below in E:\ drive.
Run Xampp_control.exe from XAMPP folder,
Start Apache and Mysql in XAMPP Control Panel
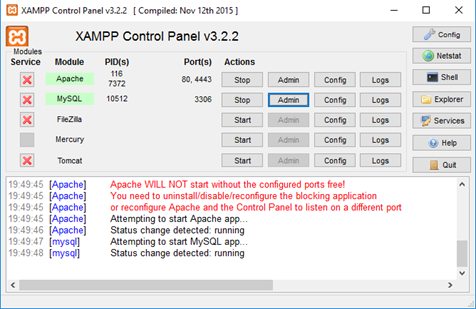
Click on Admin to redirect to MySQL Page,
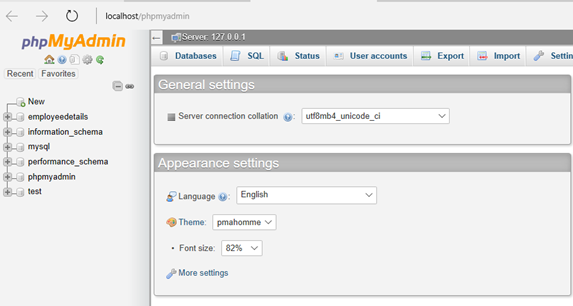
Create employeedetails Database by clicking on New.
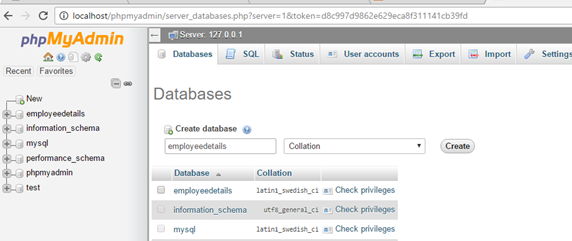
Click on Create to create database.
Click on New to create a new table.
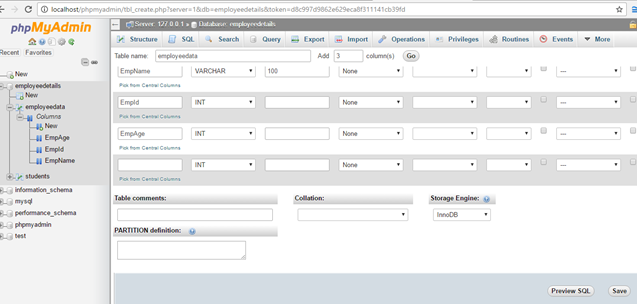
Click on Save to create a new table.
Put the PHP files in htdocs folder as below,

Create CRUD folder in htdocs.
Create db.php,AddEmployee.php,index.php as shown below in CRUD folder.
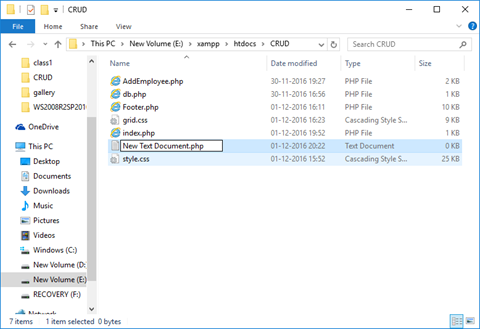
Add below code in db.php,
| <?php $servername = “localhost”; $username = “root”; $password = “”; $dbname = “employeedetails”; // Create connection $conn = new mysqli($servername, $username, $password, $dbname); ?> |
Code in index.php,
| <style type=”text/css”> </style> <?php include(‘db.php’); ?> <a href=”AddEmployee.php” value=”Create Employee” >Create</a> <table cellspacing=”5″ cellpadding=”5″> <tr> <th> Employee Id </th> <th> Employee Name </th> <th> Age </th> </tr> <?php $sql =”select * from employeedata”; $result1 = $conn->query($sql); if ($result1->num_rows > 0) { // output data of each row while($row = $result1->fetch_assoc()) { ?> <tr> <td> <?php echo $row[“EmpId”]?> </td> <td> <?php echo $row[“EmpName”]?> </td> <td> <?php echo $row[“EmpAge”]?> </td> <td> <a href=”AddEmployee.php?edited=1&id=<?php echo $row[“EmpId”]; ?>”>Edit</a> </td> <td> <a href=””>Delete</a> </td> </tr> <?php } }else { echo 0; } ?> </table> |
Code in AddEmployee.php as below,
| <?php include(‘db.php’); $EmployeeID=”; $EmployeeName=”; $Age=”; $Operation=’Create’; if(isset($_POST[‘btnSave’])) { if($_POST[‘txtoperation’] ==”Create”) { $EmpId=$_POST[‘txtEmployeeID’]; $EmpName=$_POST[‘txtEmployeeName’]; $Age=$_POST[‘txtAge’]; $sql=”INSERT INTO Employeedata(EmpId, EmpName, EmpAge) VALUES (‘$EmpId’,’$EmpName’,’$Age’)”; if ($conn->query($sql) === TRUE) { echo “New record created successfully”; header(‘Refresh:0; index.php’); } else { echo “Error: ” . $sql . “<br>” . $conn->error; } } else { $EmpId=$_POST[‘txtEmployeeID’]; $EmpName=$_POST[‘txtEmployeeName’]; $Age=$_POST[‘txtAge’]; $sql=”UPDATE Employeedata SET EmpName=’$EmpName’,EmpAge=’$Age’ WHERE EmpId='{$_GET[‘id’]}'”; if ($conn->query($sql) === TRUE) { echo “New record updated successfully”; header(‘Refresh:0; index.php’); } else { echo “Error: ” . $sql . “<br>” . $conn->error; } } } if(isset($_GET[‘edited’])) { $sql =”select * from employeedata where EmpId='{$_GET[‘id’]}'”; $result1 = $conn->query($sql); if ($result1->num_rows > 0) { // output data of each row if($row = $result1->fetch_assoc()) { $EmployeeID=$row[“EmpId”]; $EmployeeName=$row[“EmpName”]; $Age=$row[“EmpAge”]; $Operation=”Edit”; } } } ?> <form action=”” method=”post”> <table> <tr> <td>Employee Id</td> <td><input type=”text” name=”txtEmployeeID” value=”<?php echo $EmployeeID; ?>” /> <input type=”hidden” name=”txtoperation” value=”<?php echo $Operation; ?>” /> </td> </tr> <tr> <tr> <td>Student Name</td> <td><input type=”text” name=”txtEmployeeName” value=”<?php echo $EmployeeName; ?>” /></td> </tr> <tr> <td>Age</td> <td><input type=”text” name=”txtAge” value=”<?php echo $Age; ?>” /></td> </tr> <tr> <td></td> <td><input type=”submit” value=”save” name=”btnSave” /></td> </tr> </table> </form> |
The Output is as below,

http://localhost/CRUD/index.php
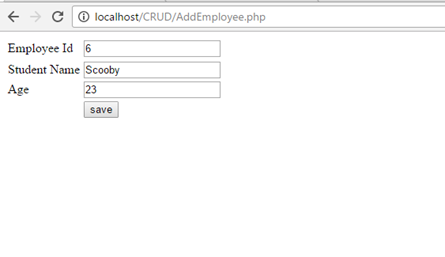
http://localhost/CRUD/AddEmployee.php
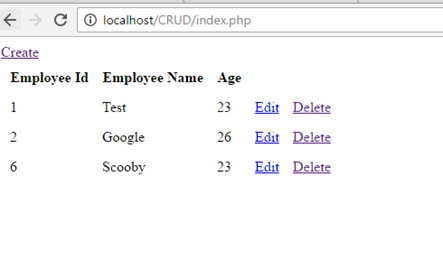
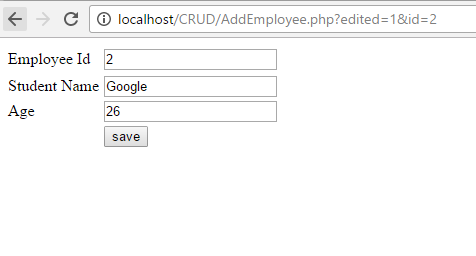
http://localhost/CRUD/AddEmployee.php?edited=1&id=2
Click below to download the solution,
https://1drv.ms/u/s!ArddhCoxftkQg6w5Te07v0wqAspR4g
JQuery validation in Asp.net web application
Document by Ganesan – Ganesanva@hotmail.com – + 919042710472
Create a new Asp.net web application using File -> New Project
Solution Explorer looks as below,
Add new page AddEmployee.aspx
Put / replace the below code in AddEmployee.aspx
| <html xmlns=”http://www.w3.org/1999/xhtml”> <head runat=”server”> <title></title> <script src=”https://ajax.googleapis.com/ajax/libs/jquery/1.12.0/jquery.min.js”></script> <script type=”text/javascript”> function validate() { if ($(‘#txtEmployeeName’).val() == “”) { alert(‘Please enter Employee Name’); return false; } if ($(‘#txtAge’).val() == “”) { alert(‘Please enter Age’); return false; } var radios = document.getElementsByName(‘Gender’); var radioselected = ”; for (var i = 0, length = radios.length; i < length; i++) { if (radios[i].checked) { // do whatever you want with the checked radio radioselected = radios[i].value; // only one radio can be logically checked, don’t check the rest break; } } if(radioselected ==””) { alert(‘Please select Gender’); return false; } if ($(‘#ddlCity’).val() == “–Select–“) { alert(‘Please select city’); return false; } return true; } </script> </head> <body> <form id=”form1″ runat=”server”> <div> <table border=”0″ cellspacing=”2″ cellpadding=”2″> <tr> <td>Employee Name </td> <td> <asp:TextBox ID=”txtEmployeeName” runat=”server”></asp:TextBox> </td> </tr> <tr> <td>Age </td> <td> <asp:TextBox ID=”txtAge” runat=”server”></asp:TextBox> </td> </tr> <tr> <td>Gender </td> <td> <asp:RadioButton ID=”rbtnMale” runat=”server” GroupName=”Gender” Text=”Male” /> <asp:RadioButton ID=”rbtnFemale” runat=”server” GroupName=”Gender” Text=”Female” /> </td> </tr> <tr> <td>City </td> <td> <asp:DropDownList ID=”ddlCity” runat=”server”> <asp:ListItem Text=”–Select–” Value=”–Select–“></asp:ListItem> <asp:ListItem Text=”Chennai” Value=”Chennai”></asp:ListItem> <asp:ListItem Text=”Madurai” Value=”Madurai”></asp:ListItem> </asp:DropDownList> </td> </tr> <tr> <td></td> <td> <asp:Button ID=”btnSave” runat=”server” Text=”Save” OnClientClick=”return validate();” OnClick=”btnSave_Click” /> </td> </tr> </table> </div> </form> </body> </html> |
Replace the below code in AddEmployee.aspx.cs
| public partial class AddEmployee : System.Web.UI.Page { protected void Page_Load(object sender, EventArgs e) { } protected void btnSave_Click(object sender, EventArgs e) { Response.Write(“Saved Successfully”); } } |
On clicking Save button ,JQuery validation Fires as below.
The Output is as below,
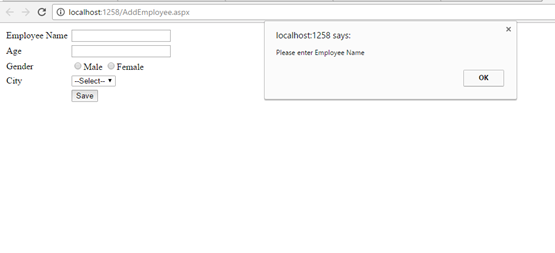
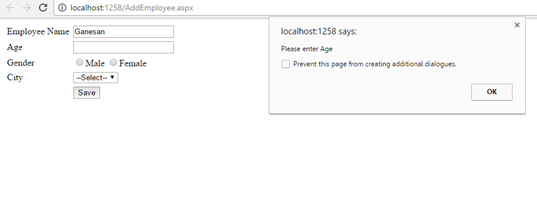
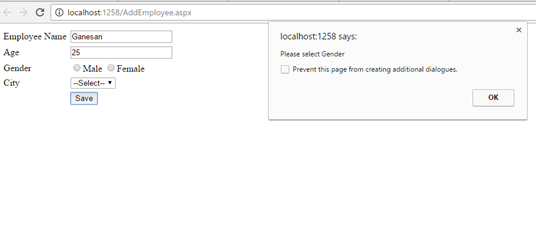
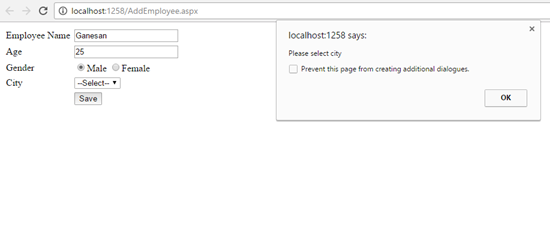
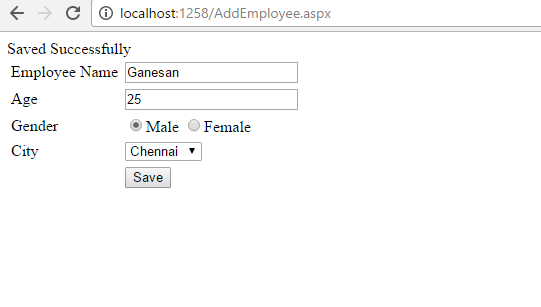
Note
You can check the Jquery validation using Console in Chrome.
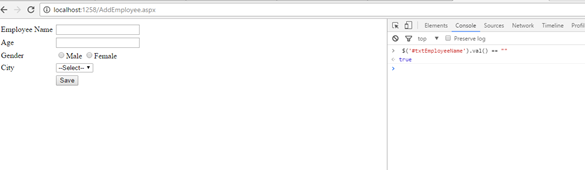
Click below to download the solution,
https://1drv.ms/u/s!ArddhCoxftkQg6orGTGKP9owdu4fbQ
CRUD in ASP.net web application using Stored procedure
Document by Maria Academy – mariatrainingacademy@gmail.com – +919042710472
Create Database in SQL server as below,
| Create database StudentDB |
Create StudentDetails table using the below script,
| CREATE TABLE [dbo].[StudentDetails]( [StudentId] [int] IDENTITY(1,1) NOT NULL, [StudentName] [varchar](100) NULL, [Age] [int] NULL ) ON [PRIMARY] |
Run the below Stored Procedures in SQL Server,
| create Proc [dbo].[Ins_StudentDetails] @StudentName varchar(100), @Age int as begin INSERT INTO [StudentDetails] ([StudentName] ,[Age]) VALUES (@StudentName ,@Age) |
| create Proc [dbo].[Select_StudentDetails] as begin select * from StudentDetails end |
| create Proc [dbo].[Update_StudentDetails] @StudentId int, @StudentName varchar(100), @Age int as begin UPDATE [StudentDetails] SET [StudentName] = @StudentName ,[Age] = @Age WHERE StudentId=@StudentId end |
Create a new Asp.net web application CRUDinProcedure as below,
File -> New Project
Click OK.
Solution Explorer as below,
Add new Page AddStudentDetails.aspx
Put / Replace the below code in AddStudentDetails.aspx
| <html xmlns=”http://www.w3.org/1999/xhtml”> <head id=”Head1″ runat=”server”> <title></title> </head> <body> <form id=”form1″ runat=”server”> <div> <table border=”0″ cellspacing=”2″ cellpadding=”2″> <tr> <td> <asp:Label ID=”lblStudentName” runat=”server” Text=”Student Name”></asp:Label> </td> <td> <asp:TextBox ID=”txtStudentName” runat=”server”></asp:TextBox> </td> </tr> <tr> <td> <asp:Label ID=”lblAge” runat=”server” Text=”Age”></asp:Label> </td> <td> <asp:TextBox ID=”txtAge” runat=”server”></asp:TextBox> </td> </tr> <tr> <td></td> <td> <asp:Button ID=”btnSubmit” runat=”server” Text=”Submit” OnClick=”btnSubmit_Click” /> <asp:Button ID=”btnUpdate” runat=”server” Text=”Update” OnClick=”btnUpdate_Click” /> <asp:Button ID=”btnClear” runat=”server” Text=”Clear” OnClick=”btnClear_Click” /> <asp:HiddenField ID=”hfId” runat=”server”></asp:HiddenField> </td> </tr> <tr> <td colspan=”2″> <asp:GridView ID=”grvStudentDetails” runat=”server” AutoGenerateColumns=”false”> <Columns> <asp:BoundField DataField=”StudentId” HeaderText=”StudentId” /> <asp:BoundField DataField=”StudentName” HeaderText=”StudentName” /> <asp:BoundField DataField=”Age” HeaderText=”Age” /> <asp:TemplateField> <ItemTemplate> <asp:Button ID=”btnEdit” runat=”server” Text=”Edit” OnClick=”btnEdit_Click” /> </ItemTemplate> </asp:TemplateField> </Columns> </asp:GridView> </td> </tr> </table> </div> </form> </body> </html> |
Replace the below code in AddStudentDetails.aspx.cs,
| public partial class AddStudentDetails : System.Web.UI.Page { SqlConnection con = new SqlConnection(ConfigurationManager.ConnectionStrings[“DefaultConnection”].ToString()); protected void Page_Load(object sender, EventArgs e) { if (!Page.IsPostBack) { BindGrid(); } } private void BindGrid() { btnSubmit.Visible = true; btnUpdate.Visible = false; SqlCommand cmd = new SqlCommand(“Select_StudentDetails”, con); cmd.CommandType = CommandType.StoredProcedure; SqlDataAdapter ada = new SqlDataAdapter(cmd); DataSet ds = new DataSet(); ada.Fill(ds); grvStudentDetails.DataSource = ds.Tables[0]; grvStudentDetails.DataBind(); } protected void btnSubmit_Click(object sender, EventArgs e) { con.Open(); SqlCommand cmd = new SqlCommand(“Ins_StudentDetails”, con); cmd.CommandType = CommandType.StoredProcedure; cmd.Parameters.Add(“@StudentName”, SqlDbType.VarChar).Value = txtStudentName.Text; cmd.Parameters.Add(“@Age”, SqlDbType.Int).Value = txtAge.Text; int result = cmd.ExecuteNonQuery(); if (result > 0) { Response.Write(“Inserted Successfully”); } con.Close(); BindGrid(); btnClear_Click(null, null); } protected void btnEdit_Click(object sender, EventArgs e) { Button btn = (Button)sender; //Get the row that contains this button GridViewRow gvr = (GridViewRow)btn.NamingContainer; hfId.Value = gvr.Cells[0].Text; txtStudentName.Text = gvr.Cells[1].Text; txtAge.Text = gvr.Cells[2].Text; btnSubmit.Visible = false; btnUpdate.Visible = true; } protected void btnUpdate_Click(object sender, EventArgs e) { con.Open(); SqlCommand cmd = new SqlCommand(“Update_StudentDetails”, con); cmd.CommandType = CommandType.StoredProcedure; cmd.Parameters.Add(“@StudentId”, SqlDbType.Int).Value = hfId.Value; cmd.Parameters.Add(“@StudentName”, SqlDbType.VarChar).Value = txtStudentName.Text; cmd.Parameters.Add(“@Age”, SqlDbType.Int).Value = txtAge.Text; int result = cmd.ExecuteNonQuery(); if (result > 0) { Response.Write(“Updated Successfully”); } con.Close(); BindGrid(); btnClear_Click(null, null); } protected void btnClear_Click(object sender, EventArgs e) { txtStudentName.Text = string.Empty; txtAge.Text = string.Empty; hfId.Value = string.Empty; } } |
Screenshot as below,
The Output will be as below,

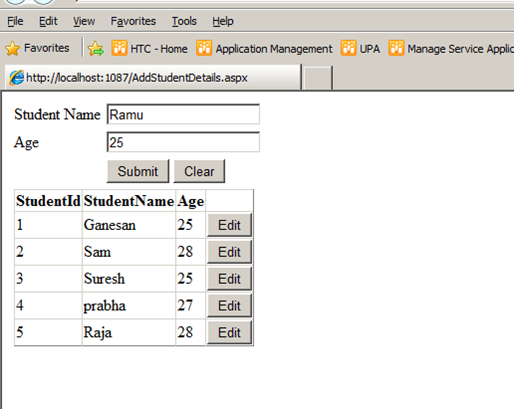
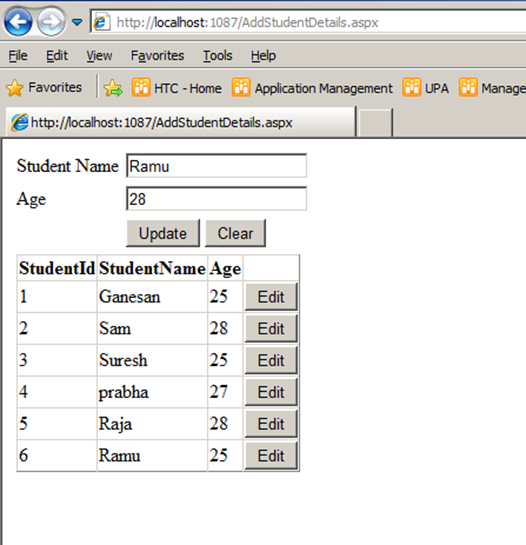
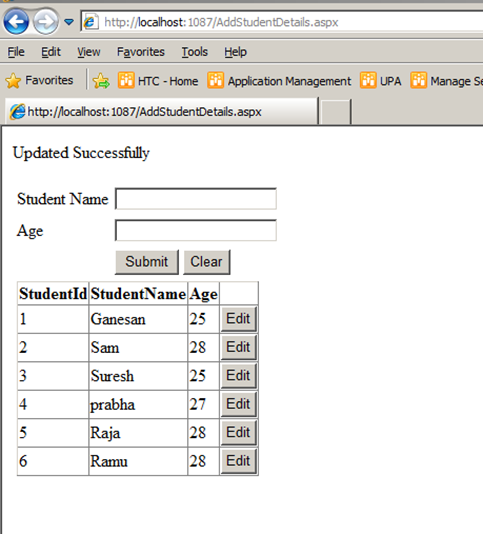
Click below to download the solution,
https://1drv.ms/u/s!ArddhCoxftkQg6of7HjHOGOkB8IMXA
Dot Net Training Institute in Chennai
Dot net is a software program developed by Microsoft Corporation that plays a significant role in web development applications. Dot net employees are in great demand over the recent years and many companies recruit them who have undergone a training program. There are several private institutes that organize training classes for college students and working people to shape their skills effectively. However, it is necessary to identify a right one among them for developing the abilities considerably. This will help to start a bright career after completing college studies. There are several sources available for knowing the details of a coaching center in a location. On the other hand, it is essential to make a study on them from the internet for finding a institute accordingly.
Dot net training classes are extremely useful for the beginners who want to get jobs with good salaries in various fields. At the same time, it is advisable to check the prerequisites before choosing a training program. Dot net training institute in Chennai offers programs from basic to advanced levels which ultimately help students to focus more on their objectives. It provides excellent opportunities for the students to learn the lessons with latest concepts. Expert staffs and industry professionals will show ways for enhancing the skills of a student in a comfortable environment. Students can get also interact with them for knowing more about opportunities in various industries to start a bright future. Moreover, it is possible to build the skills with real time projects for getting a certificate with high grades.
Most training institutes organize full time, part time and week end classes for the students with excellent teaching faculties. Moreover, they can choose online classes to study the lessons from anywhere easily. Some even conduct seminars, workshops and conferences in order to evaluate the potentials of students. Dot net course Chennai enables the students to undergo training at affordable rates for reaching next levels. Apart from coaching, it offers job assistance services to students who have successfully finished a course. Anyone interested in knowing more about the programs can attend the introductory sessions in a center for gaining more ideas. This in turn gives ways for increasing the efficiency levels while applying for a job in a company.
It is advisable to select a best dot net training institute in Chennai that provide classes with the updated syllabus. Students can enroll their names in a training course for learning the lessons with industry experts. Fresh graduates will benefit a lot with a training program for achieving goals. One must give importance to the reviews and testimonials before joining in an institute for meeting essential requirements. The main objective of dot net course is to make students to fulfill their dreams. Another advantage is that it helps to become familiar with the applications when seeking jobs in a software company. Training fees are an affordable one enabling the students to develop their abilities with innovative approaches. Dot net training paves ways for seeking jobs in reputed companies with high salaries.
CRUD operation with SharePoint List in Visual web part
Document by Ganesan – Ganesanva@hotmail.com – + 919600370429
-
Create EmployeeList in Sharepoint 2010 site with the below Columns.
EmployeeName, Age
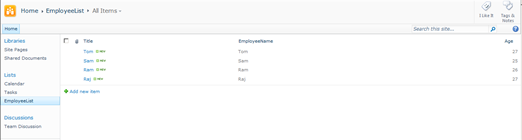
- Create a new Visual Web part Project using File –>New Project
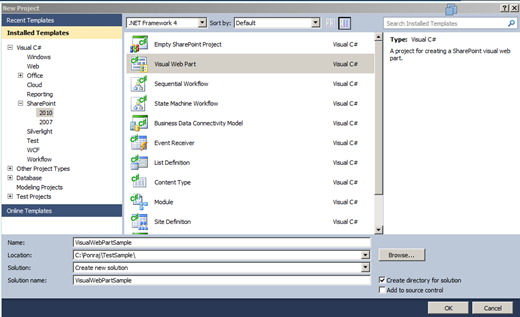
Click Ok.
The Solution Explorer will looks as below,
In VisualWebPart1UserControl.ascx Put the below code snippet,
| <table border=”0″ cellpadding=”2″ cellspacing=”2″> <tr> <td colspan=”2″ style=”color:Green”> <asp:Label ID=”lblresults” runat=”server”></asp:Label> </td> </tr> <tr> <td> Employee Name </td> <td> <asp:TextBox ID=”txtEmployeeName” runat=”server”></asp:TextBox> </td> </tr> <tr> <td> Age </td> <td> <asp:TextBox ID=”txtAge” runat=”server”></asp:TextBox> </td> </tr> <tr> <td> </td> <td> <asp:Button ID=”btnSave” runat=”server” Text=”Save” OnClick=”btnSave_Click” /> <asp:Button ID=”btnUpdate” runat=”server” Text=”Update” onclick=”btnUpdate_Click” /> <asp:HiddenField ID=”hfId” runat=”server” /> <asp:Button ID=”btnClear” runat=”server” Text=”Clear” onclick=”btnClear_Click” /> </td> </tr> <tr> <td colspan=”2″> <asp:GridView ID=”grvEmployeeDetails” runat=”server” AutoGenerateColumns=”false”> <Columns> <asp:BoundField DataField=”ID” HeaderText=”ID” /> <asp:BoundField DataField=”EmployeeName” HeaderText=”Employee Name” /> <asp:BoundField DataField=”Age” HeaderText=”Age” /> <asp:TemplateField> <ItemTemplate> <asp:Button ID=”btnEdit” runat=”server” Text=”Edit” onclick=”btnEdit_Click” /> </ItemTemplate> </asp:TemplateField> </Columns> </asp:GridView> </td> </tr> </table> |
In VisualWebPart1UserControl.ascx.cs put/Replace the below code snippet,
| public partial class VisualWebPart1UserControl : UserControl { protected void Page_Load(object sender, EventArgs e) { if (!Page.IsPostBack) { BindGrid(); btnSave.Visible = true; btnUpdate.Visible = false; } } private void BindGrid() { using (SPSite site = new SPSite(SPContext.Current.Site.Url)) // Site Collection { using (SPWeb web = site.OpenWeb()) // Site { SPList list = web.Lists[“EmployeeList”]; // List SPQuery curQry = new SPQuery(); curQry.Query = “”; //Get the Items using Query SPListItemCollection olistitemcollection = list.GetItems(curQry); DataTable dt = olistitemcollection.GetDataTable(); grvEmployeeDetails.DataSource = dt; grvEmployeeDetails.DataBind(); } } } protected void btnSave_Click(object sender, EventArgs e) { using (SPSite site = new SPSite(SPContext.Current.Site.Url)) // Site Collection { using (SPWeb web = site.OpenWeb()) // Site { SPList list = web.Lists[“EmployeeList”]; // List SPListItem oListItem = list.Items.Add(); oListItem[“Title”] = txtEmployeeName.Text; oListItem[“EmployeeName”] = txtEmployeeName.Text; oListItem[“Age”] = txtAge.Text; oListItem.Update(); BindGrid(); lblresults.Text = “Saved Successfully”; } } } protected void btnEdit_Click(object sender, EventArgs e) { Button btn = (Button)sender; //Get the row that contains this button GridViewRow gvr = (GridViewRow)btn.NamingContainer; hfId.Value = gvr.Cells[0].Text; txtEmployeeName.Text = gvr.Cells[1].Text; txtAge.Text = gvr.Cells[2].Text; btnSave.Visible = false; btnUpdate.Visible = true; } protected void btnUpdate_Click(object sender, EventArgs e) { using (SPSite site = new SPSite(SPContext.Current.Site.Url)) // Site Collection { using (SPWeb web = site.OpenWeb()) // Site { SPList list = web.Lists[“EmployeeList”]; // List SPListItem oListItem = list.Items.GetItemById(Convert.ToInt32(hfId.Value)); oListItem[“Title”] = txtEmployeeName.Text; oListItem[“EmployeeName”] = txtEmployeeName.Text; oListItem[“Age”] = txtAge.Text; oListItem.Update(); BindGrid(); lblresults.Text = “Updated Successfully”; } } } protected void btnClear_Click(object sender, EventArgs e) { txtEmployeeName.Text = string.Empty; txtAge.Text = string.Empty; hfId.Value = string.Empty; lblresults.Text = string.Empty; btnSave.Visible = true; btnUpdate.Visible = false; } } |
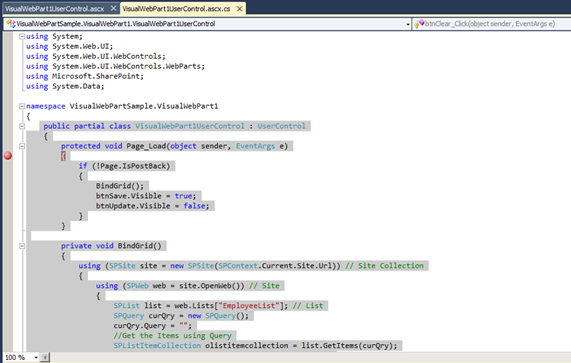
Right click on the Project and Click Deploy.
Go to Home Page and Click on Site Actions –>Edit Page
Insert –>Web part in Ribbon.

Select the Web part and click Add.
The Output as below,
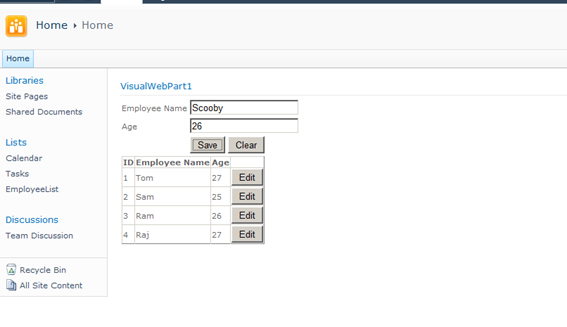
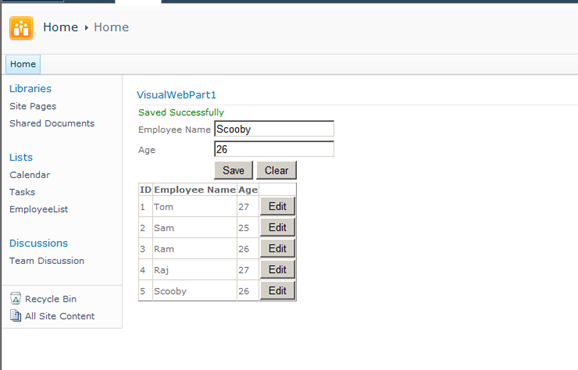
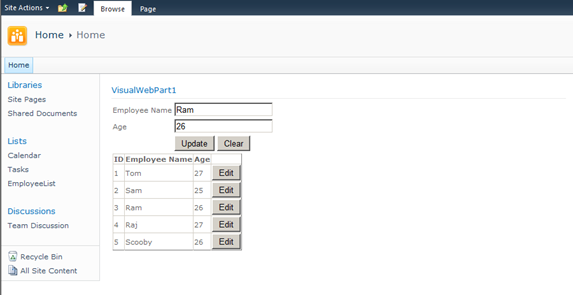
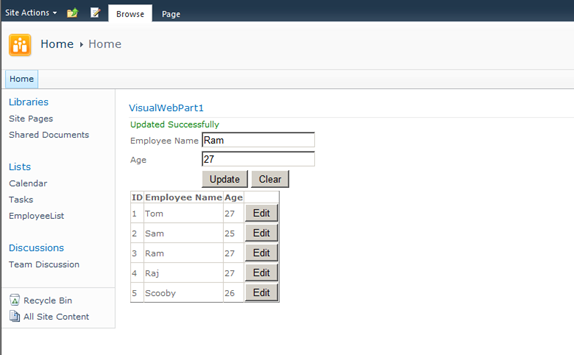
Click below to download the solution,
https://1drv.ms/u/s!ArddhCoxftkQg6l3ED81o25f4nzffg
Dot net / SharePoint freelance Consultants in Chennai
Document by Ganesan – Ganesanva@hotmail.com – +919042710472
Given the huge demand for dot net and SharePoint applications today and the growing importance of freelancers across the city, .net and SharePoint freelancers in Chennai have engaged in providing the best available professional coaching in the software applications. The job opportunities for dot net with certification have significantly increased the number of .net freelancers in Chennai. Whether it is for professional or educational purposes, it is advisable to take a Dot net Freelance trainer in Chennai to meet the ever-changing demands of corporates and educational systems.
Hiring a Microsoft certified trainer in Chennai helps with professional coaching on Microsoft technologies such Asp.Net, C#.Net, SQL server etc. And in today’s digitalized world, the virtual presence of the trainers in substantial enough for an expert coaching on the applications. An online Dot net trainer uses the best practices of the industry to ensure dot net and SharePoint solutions meet business and educational needs of contemporary period.
A certified Dot net corporate trainer in Chennai combines the passion for technological innovation and deep platform expertise to ensure that proper training is delivered. The key focus of an online Dot net trainer in Chennai is to equip individuals leverage dot net and SharePoint technologies effectively to meet the professional and educational requirements. Young and dynamic professional and aspiring students can utilize the services of many Dot net part time consultants in Chennai to handle challenging and innovative projects. Further, given the array of opportunities in SharePoint and dot net, career as a Freelance SharePoint developer in Chennai or as an asp.net MVC consultant in Chennai holds a lot of promise for the future.
Today’s competitive market has brought dot net and SharePoint professionals to the forefront. A few years ago, a dot net or a SharePoint consultant in Chennai would have been just another consultant but today dot net and SharePoint developers have defined the career path of many individuals and professional services. Being ahead of the industry and constantly upgrading in the latest versions, dot net and SharePoint developers have been and are the preferred vendors for many corporates and students for their training and educational needs.
Along with a good demonstration of how projects are developed in real-time environment, a Microsoft certified trainer in Chennai imparts confidence and knowledge of technical skills for both freshers and working professionals and also ensures that the sessions are well structured and interactive.
With the shifting expectations of the IT industry and education, the ecosystems of dot net and SharePoint and the range of professionalism exhibited by dot net and SharePoint trainers have become more radical and created excitement and interest in learning more about the applications.
Asp.net MVC Course content
Document by Vairavan – enquiry@softwaretraininginchennai.com – + 919042710472
- MVC Architecture
- Benefits of Asp.net MVC
- Explanation on Model, View and Controller.
- Filters in MVC
- View models
- JQuery and JavaScript
- Entity Framework with Asp.net
- Code First Approach
- Database First Approach
- POCO Generator
- Data Annotation in MVC
- Custom Data Annotation
- Textbox, Option button ,List box ,Dropdown controls in MVC
- Ajax call in MVC
- Dependency Injection
- MVC with Bootstrap controls
- Layered Architecture in MVC
- Working with Areas
- Partial Views
- Working with Web api
- WCF Consumption in ASP.net MVC
- Convert Asp.net web application to MVC application
- MVC with Angular JS
- Sample Project on MVC
Consume Web api Http service in MVC solution
Document by Vairavan – ganesanva@hotmail.com – + 919042710472
Create a MVC solution using Code First Approach MVC Entity framework.
Add a Web Api Controller Class as below,
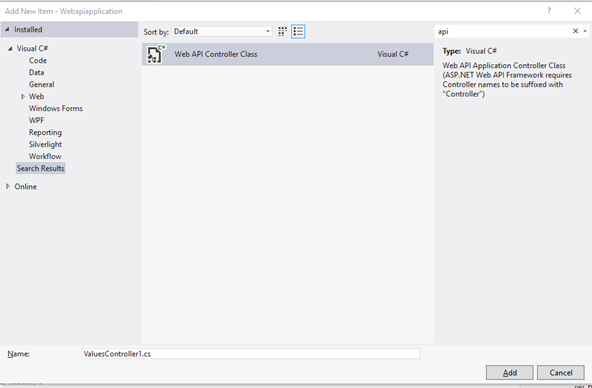
Look on the WebApiConfig.cs how the Routes are made.
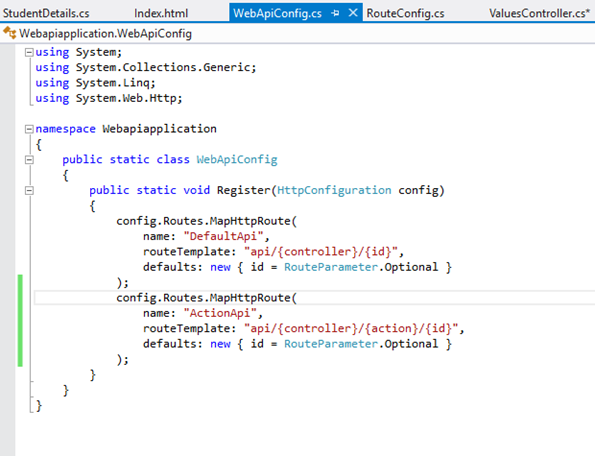
The API URL can be routed as both API/Controller/Id and Api/Controller/Action/Id by registering the Routes in Web api config.
Add the Below code in Api Controller(Used for CRUD),
| private UsersContext db = new UsersContext(); // GET api/values public IEnumerable<StudentDetails> GetallStudents() { return db.StudentDbset.ToList(); } // GET api/values/5 public StudentDetails GetStudents(int id) { StudentDetails studentdetails = db.StudentDbset.Find(id); return studentdetails; } [HttpPost] [ActionName(“Delete”)] // Post api/values/Delete/5 public string DeleteStudents(int id) { StudentDetails studentdetails = db.StudentDbset.Find(id); db.StudentDbset.Remove(studentdetails); db.SaveChanges(); return “Deleted”; } // POST api/values [HttpPost] [ActionName(“Post”)] public void Post([FromBody]string value) { } // PUT api/values/5 public void Put(int id, [FromBody]string value) { } // DELETE api/values/5 public void Delete(int id) { } |
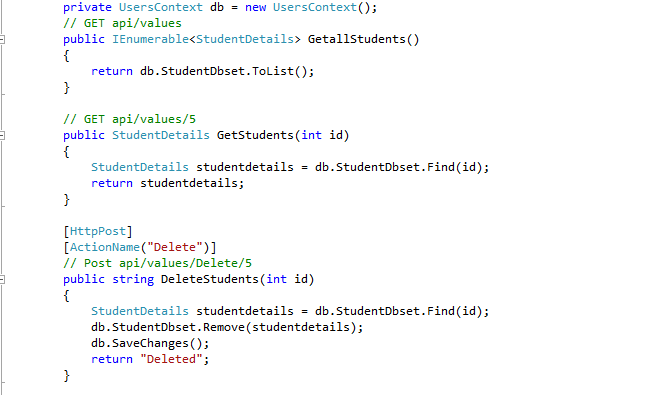
Screen clipping taken: 02-09-2016 18:44
The Above Api methods can be accessed using below URL,
http://localhost:16842/api/Values
http://localhost:16842/api/Values/5
http://localhost:16842/api/Values/Delete/5
The data can be returned as JSON,Xml or any other format depends on the attribute.
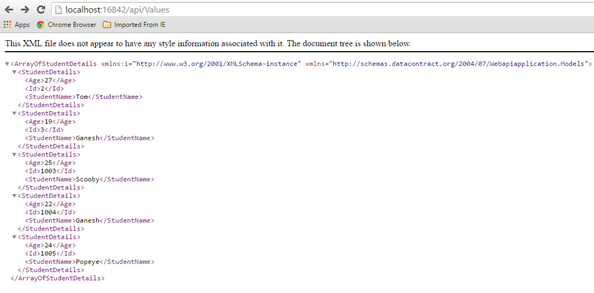
Create a new HTML page in the Solution as index.html
Put below code in Index.html,
| <!DOCTYPE html> <html xmlns=”http://www.w3.org/1999/xhtml”> <head> <title>Product App</title> </head> <body> <div> <h2>All Products</h2> <ul id=”products” /> </div> <div> <h2>Search by ID</h2> <input type=”text” id=”prodId” size=”5″ /> <input type=”button” value=”Search” onclick=”find();” /> <p id=”product” /> </div> <script src=”http://ajax.aspnetcdn.com/ajax/jQuery/jquery-2.0.3.min.js”></script> <script> var uri = ‘/api/values’; $(document).ready(function () { // Send an AJAX request $.getJSON(uri) .done(function (data) { // On success, ‘data’ contains a list of products. $.each(data, function (key, item) { // Add a list item for the product. $(‘<li>’, { text: formatItem(item) }).appendTo($(‘#products’)); }); }); }); function formatItem(item) { return item.studentName + ‘: $’ + item.Age; } function find() { var id = $(‘#prodId’).val(); $.getJSON(uri + ‘/’ + id) .done(function (data) { $(‘#product’).text(formatItem(data)); }) .fail(function (jqXHR, textStatus, err) { $(‘#product’).text(‘Error: ‘ + err); }); } </script> </body> </html> |
Now the MVC Application Works with Controller web api repository and a HTML page.
The output will be,
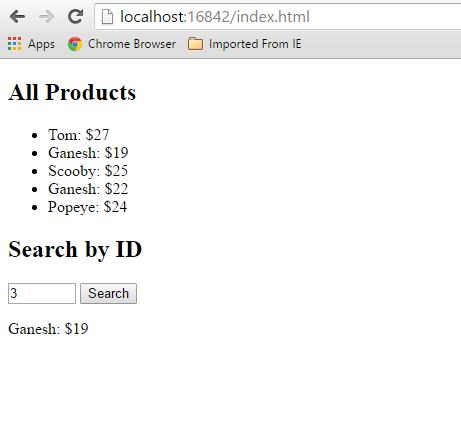
Click below to download the solution,
https://1drv.ms/u/s!ArddhCoxftkQg6hMmGfATxDIT2rtJw
Reference
http://www.asp.net/web-api/overview/getting-started-with-aspnet-web-api/tutorial-your-first-web-api
http://www.asp.net/web-api/overview/web-api-routing-and-actions/routing-in-aspnet-web-api
POCO Generator to generate Model Class files
Document by Ganesan – Ganesanva@hotmail.com – + 919600370429
Download POCO Generator EXE from the below URL.
It can be used for Reverse Engineering to change DB first approach to Code First Approach.

http://www.codeproject.com/Articles/892233/POCO-Generator
Connect to the DB.
Select the Table that you want to Generate POCO Classes.
You can even generate Required attribute and Error field as EF Code First annotation as highlighted below.
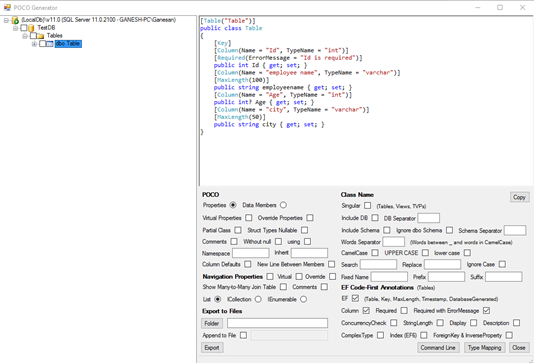
Areas in MVC
Document by Ganesan – ganesanva@hotmail.com – + 919600370429
-Create a MVC Application
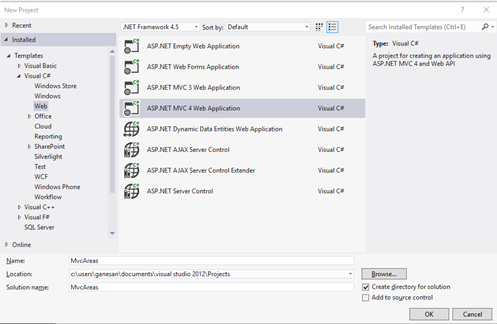
Click OK
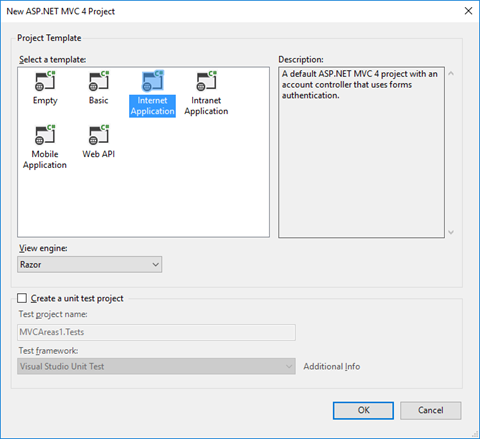
– Add Connection in web.config file as below,
| <connectionStrings> <add name=”TestConnection” connectionString=”Data Source=(LocalDb)\v11.0;Initial Catalog=TestDB;Integrated Security=True;Pooling=False” providerName=”System.Data.SqlClient” /> </connectionStrings> |
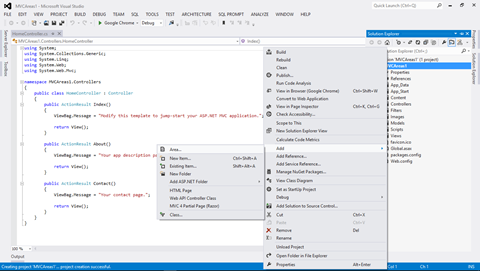
Add Area in the solution with name Admin
Create a Table in TestDB with AdminDetails Table as below.
| CREATE TABLE [dbo].AdminDetails ( [AdminId] INT NOT NULL PRIMARY KEY IDENTITY, [FirstName] VARCHAR(50) NOT NULL, [Lastname] VARCHAR(50) NOT NULL, [Email] VARCHAR(50) NULL, [Password] VARCHAR(50) NULL ) |
Create Employee Table in TestDB as below,
| CREATE TABLE [dbo].[Employee] ( [AdminId] INT NOT NULL, [employee name] VARCHAR (100) NULL, [Age] INT NULL, [Email] VARCHAR (50) NULL, PRIMARY KEY CLUSTERED ([AdminId] ASC) ); |
Add AdminDetails.cs in Admin Areas model as below,
AdminDetails.Cs snippet as below,
| public class AdminDetails { [Key] public int AdminId { get; set; } public string FirstName { get; set; } public string Lastname { get; set; } public string Email { get; set; } public string Password { get; set; } } public class AdminContext : DbContext { public AdminContext() : base(“TestConnection”) { } public DbSet<AdminDetails> AdminDetailsDB { get; set; } } |
Right Click on Controller and Add Controller as below,
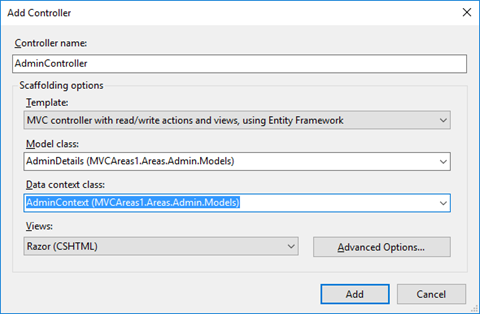
Now CRUD operation generated using Scaffolding.
Similarly Add Student Area by Right clicking on the solution and Add Areas.
Add StudentDetails.cs model in the Student Area.
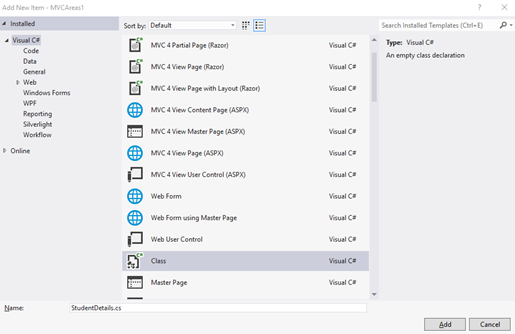
Copy the below snippet in StudentDetails.cs file,
| public class StudentDetails { [Key] public int Id { get; set; } public string StudentName { get; set; } public int? Age { get; set; } } public class StudentContext : DbContext { public StudentContext() : base(“TestConnection”) { } public DbSet<StudentDetails> StudentDetailsDB { get; set; } } |
Add Scaffolding for StudentController as below,
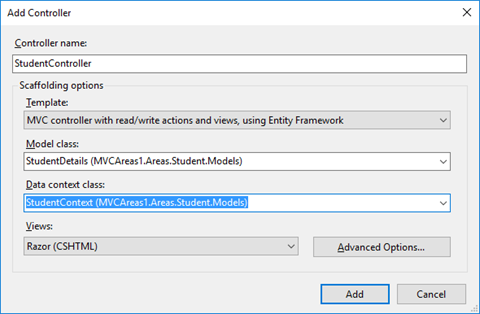
Now the Solution Explorer looks as below,
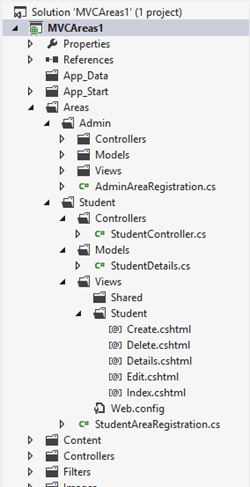
In AdminAreaRegistration and StudentAreaRegistration we can see the routing for Pages,
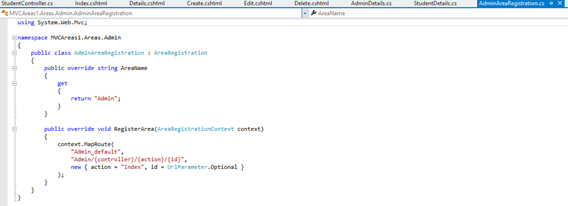
The OUTPUT for AREA Pages will be as below,
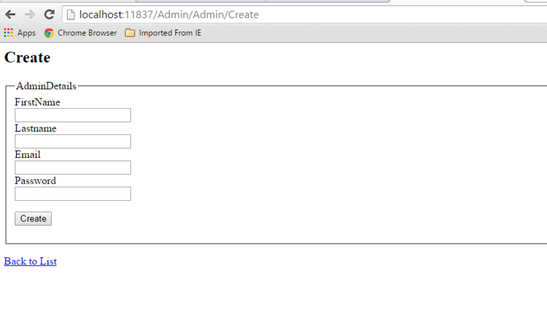
http://localhost:11837/Admin/Admin/Create
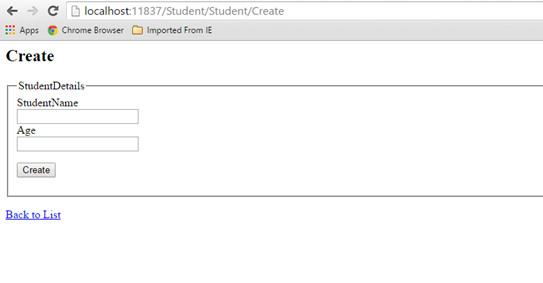
http://localhost:11837/Student/Student/Create
It allows to separate the modules in application development. This also helps for Link Building with relevant keywords.
Click below to download the solution,
https://1drv.ms/u/s!ArddhCoxftkQg6hXj8wspGLO_44ifQ
Windows Application CRUD Operation with ADO.net
Document by Ganesan – Ganesanva@hotmail.com – +919600370429
Create TestDB Database in Server Explorer
Create table UserDetails in TestDB with the below code snippet,
| CREATE TABLE [dbo].[UserDetails] ( [UserId] INT IDENTITY (1, 1) NOT NULL, [UserName] VARCHAR (100) NULL, [Password] VARCHAR (100) NULL, [City] VARCHAR (100) NULL, PRIMARY KEY CLUSTERED ([UserId] ASC) ); |
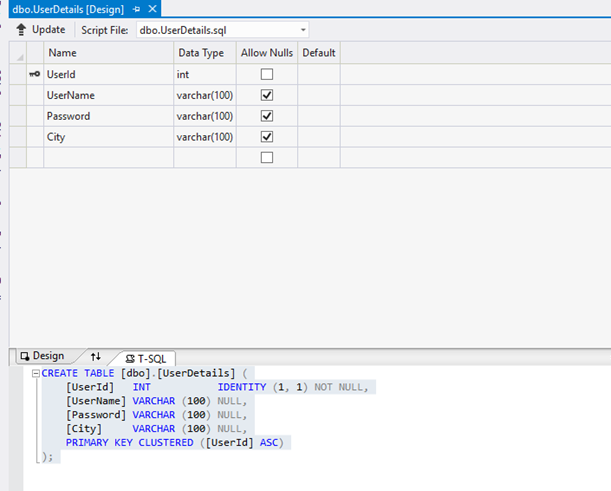
Add the below Connection string in app.config,
| <connectionStrings> <add name=”TestConnection” connectionString=”Data Source=(LocalDb)\v11.0;Initial Catalog=TestDB;Integrated Security=True;Pooling=False” providerName=”System.Data.SqlClient” /> </connectionStrings> |
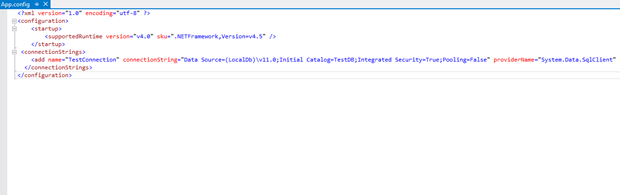
Design Form1 as below,
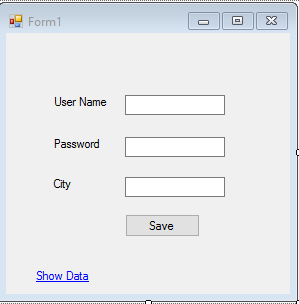
Textbox Properties
UserName Name – txtUserName
Password Name – txtPassword
City Name – txtCity
Save -btnSave
Show Data Link Name -linkLabel1
Events
btnSave OnClick =btnSave_Click
Show Data Link onClick= linkLabel1_LinkClicked
Add below Namespace in Form1.cs.
| Using System.Data.SqlClient; Using System.Configuration; |
Add Reference System.Configuration.DLL in the Project.
In Form1.cs (Replace) put the below Snippet,
| public partial class Form1 : Form { SqlConnection con = new SqlConnection(ConfigurationManager.ConnectionStrings[“TestConnection”].ConnectionString); public Form1() { InitializeComponent(); } private void btnSave_Click(object sender, EventArgs e) { con.Open(); SqlCommand cmd = new SqlCommand(“insert into UserDetails values(‘”+txtUserName.Text+”‘”+”,'”+txtPassword.Text +”‘,'”+txtCity.Text+”‘)”,con); int results=cmd.ExecuteNonQuery(); con.Close(); if (results > 0) { MessageBox.Show(“Inserted Successfully”); } } private void Clear() { txtUserName.Text = string.Empty; txtPassword.Text = string.Empty; txtCity.Text = string.Empty; } private void linkLabel1_LinkClicked(object sender, LinkLabelLinkClickedEventArgs e) { ShowData objShowData = new ShowData(); objShowData.Show(); this.Hide(); } } |
Add ShowData.cs form as below design,
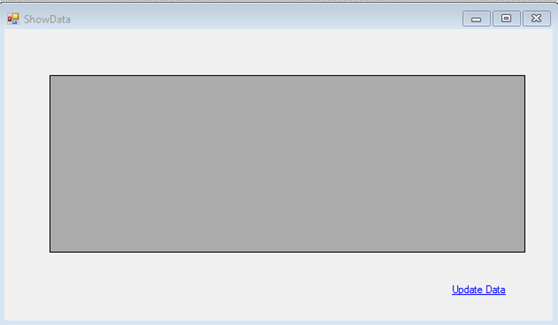
Properties
DataGrid Name – dgvGridData
Update Data Name – lnkUpdate
Events
lnkUpdate Link onClick Event – lnkUpdate_LinkClicked
ShowData Form OnLoad Event – ShowData_Load
Add below Namespace in ShowData .cs.
| Using System.Data.SqlClient; Using System.Configuration; |
In ShowData.cs (Replace) put the below Snippet,
| public partial class ShowData : Form { SqlConnection con = new SqlConnection(ConfigurationManager.ConnectionStrings[“TestConnection”].ConnectionString); public ShowData() { InitializeComponent(); } private void ShowData_Load(object sender, EventArgs e) { SqlCommand cmd = new SqlCommand(“select * from UserDetails”, con); SqlDataAdapter ada = new SqlDataAdapter(cmd); DataSet ds = new DataSet(); ada.Fill(ds); dgvGridData.DataSource = ds.Tables[0]; } private void lnkUpdate_LinkClicked(object sender, LinkLabelLinkClickedEventArgs e) { UpdateUserData objUpdateUserData = new UpdateUserData(); objUpdateUserData.Show(); this.Hide(); } } |
Add UpdateUserData.cs Form as below Design,
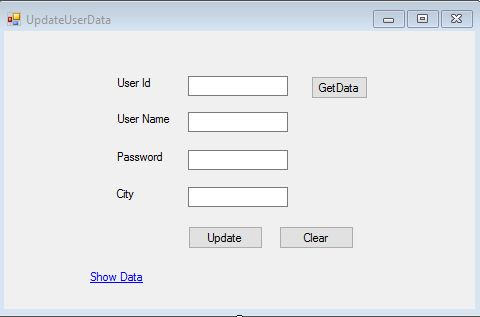
Properties
UserId textbox Name – txtUserId
UserName Textbox -txtUserName
Password Textbox – txtPassword
City Textbox – txtCity
Update button name -btnUpdate
Get Data button Name – btnGet
Clear button Name – btnClear
Show Data Link Name -linkLabel1
Event :
btnUpdate onClick =btnUpdate_Click
btnGet onClick= btnGet_Click
btnClear onClick =btnClear_Click
linkLabel1 onClick – linkLabel1_LinkClicked
Add below Namespace in UpdateUserData .cs.
| Using System.Data.SqlClient; Using System.Configuration; |
Put (Replace) the below snippet in UpdateUserData.cs ,
| public partial class UpdateUserData : Form { SqlConnection con = new SqlConnection(ConfigurationManager.ConnectionStrings[“TestConnection”].ConnectionString); public UpdateUserData() { InitializeComponent(); } private void btnUpdate_Click(object sender, EventArgs e) { con.Open(); SqlCommand cmd = new SqlCommand(“Update UserDetails Set UserName='” + txtUserName.Text + “‘,Password='” + txtPassword.Text + “‘,City='” + txtCity.Text + “‘ where UserId=” + txtUserId.Text, con); int results = cmd.ExecuteNonQuery(); con.Close(); if (results > 0) { MessageBox.Show(“Updated Successfully”); } Clear(); } private void Clear() { txtUserId.Text = string.Empty; txtUserName.Text = string.Empty; txtPassword.Text = string.Empty; txtCity.Text = string.Empty; btnGet.Enabled = true; } private void btnGet_Click(object sender, EventArgs e) { con.Open(); SqlCommand cmd = new SqlCommand(“select * from UserDetails where UserId=”+txtUserId.Text, con); SqlDataReader dr = cmd.ExecuteReader(); while (dr.Read()) { txtUserName.Text = dr[“UserName”].ToString(); txtPassword.Text = dr[“Password”].ToString(); txtCity.Text = dr[“City”].ToString(); } con.Close(); btnGet.Enabled = false; } private void linkLabel1_LinkClicked(object sender, LinkLabelLinkClickedEventArgs e) { ShowData objShowData = new ShowData(); objShowData.Show(); this.Hide(); } private void btnClear_Click(object sender, EventArgs e) { Clear(); } } |
The Output as below,
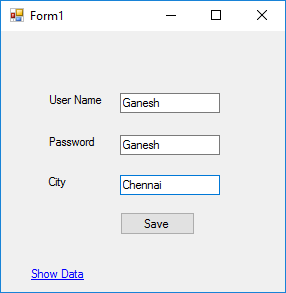
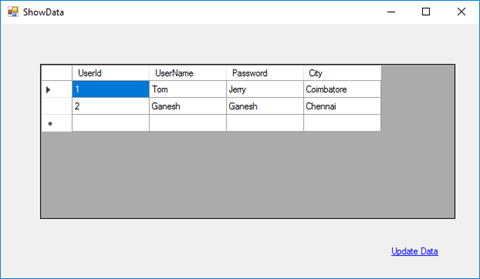

Table Data as below,
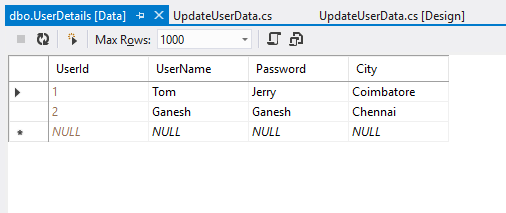
Click below to download the solution,
https://1drv.ms/u/s!ArddhCoxftkQg6khuXmrBnLklntXTA
Consume WCF application in MVC
Document by Ganesan – Ganesanva@hotmail.com – + 919600370429
Create a new MVC application.
Create Connection string in Web.config as below.
| <connectionStrings> <add name=”TestConnection” connectionString=”Data Source=(LocalDb)\v11.0;Initial Catalog=TestDB;Integrated Security=True;Pooling=False” providerName=”System.Data.SqlClient” /> </connectionStrings> |
Create StudentDetails.cs Class file as below.
| [DataContract] public class StudentDetails { [DataMember] public int Id { get; set; } [DataMember] public string StudentName { get; set; } [DataMember] public int? Age { get; set; } } |
Create DBContext.Cs file as below
| public class UsersContext : DbContext { public UsersContext() : base(“TestConnection”) { } public DbSet<StudentDetails> studentDbset { get; set; } } |
Create ScafFolding and autogenerate Views and controllers.
Make sure the Code now works in DB first approach. After this we are going to change the
data source to consume From WCF.
Create Service Reference as below,
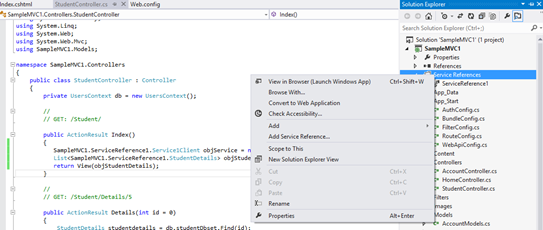
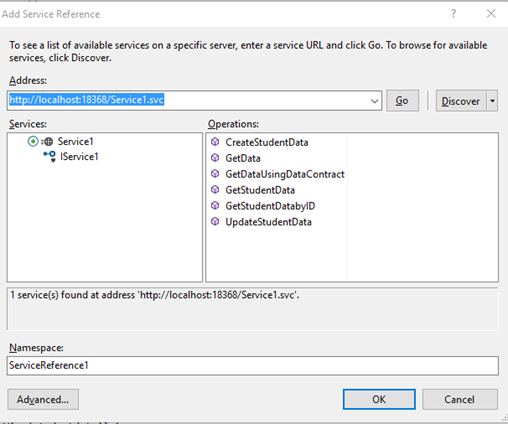
Click OK. Now the service reference will be added as below,
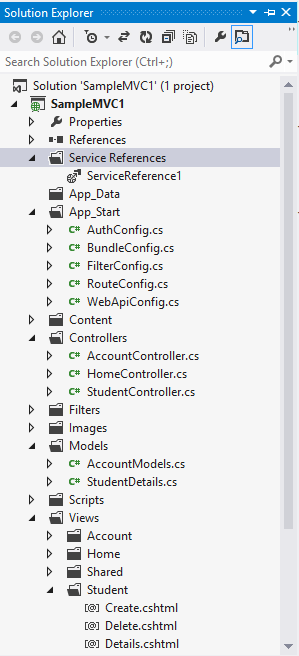
Replace the Controller methods for CRUD as below,
| public ActionResult Index() { SampleMVC1.ServiceReference1.Service1Client objService = new ServiceReference1.Service1Client(); List<SampleMVC1.ServiceReference1.StudentDetails> objStudentDetails= objService.GetStudentData(); return View(objStudentDetails); } [HttpPost] public ActionResult Create(SampleMVC1.ServiceReference1.StudentDetails studentdetails) { if (ModelState.IsValid) { SampleMVC1.ServiceReference1.Service1Client objService = new ServiceReference1.Service1Client(); string result= objService.CreateStudentData(studentdetails); return RedirectToAction(“Index”); } return View(studentdetails); } // // GET: /Student/Edit/5 public ActionResult Edit(int id = 0) { SampleMVC1.ServiceReference1.Service1Client objService = new ServiceReference1.Service1Client(); SampleMVC1.ServiceReference1.StudentDetails studentdetails = objService.GetStudentDatabyID(id); if (studentdetails == null) { return HttpNotFound(); } return View(studentdetails); } // // POST: /Student/Edit/5 [HttpPost] public ActionResult Edit(SampleMVC1.ServiceReference1.StudentDetails studentdetails) { if (ModelState.IsValid) { SampleMVC1.ServiceReference1.Service1Client objService = new ServiceReference1.Service1Client(); string result = objService.UpdateStudentData(studentdetails); return RedirectToAction(“Index”); } return View(studentdetails); } |
Replace the view First line I.E model reference to point to Service model

Similar for other pages too.
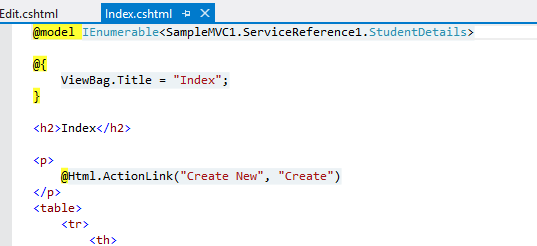
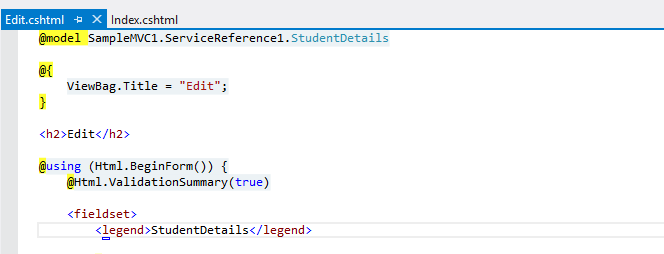
Now the pages will be like below
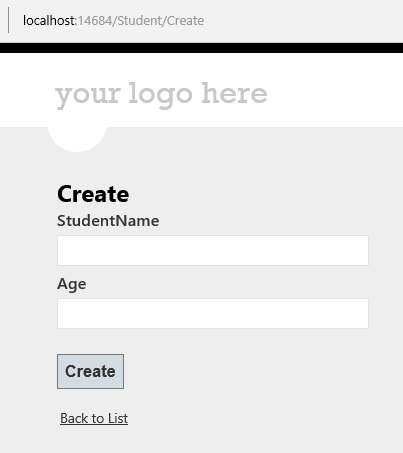

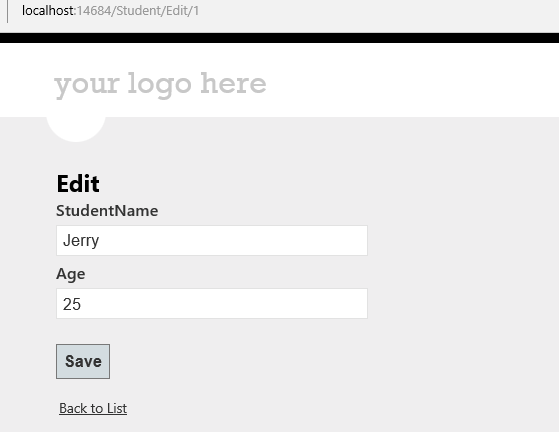
Click on the Link below to get the sample solution
https://1drv.ms/u/s!ArddhCoxftkQg6gdCJeDrlqBAJE0vg
Create wcf Application for CRUD operation
Document by Ganesan – Ganesanva@hotmail.com – + 919600370429
-Create StudentDetails Table in Local DB
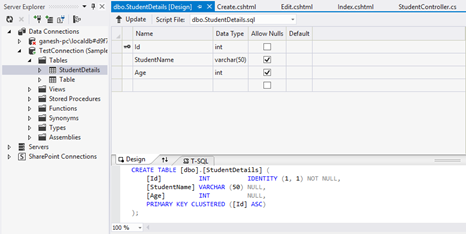
Right Click on the DB and Click Properties.
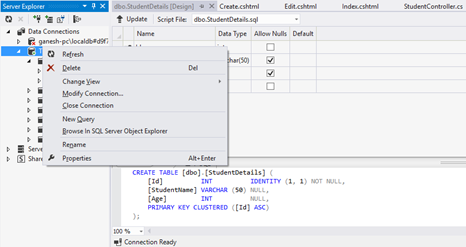
Connection String can be seen in Property window.
– Create a new WCF Service Application.
Put the connection string above in Web.config as in Snippet.
| <connectionStrings> <add name=”TestConnection” connectionString=”Data Source=(LocalDb)\v11.0;Initial Catalog=TestDB;Integrated Security=True;Pooling=False” providerName=”System.Data.SqlClient” /> </connectionStrings> |
Create StudentDetails.cs Class file as below.
| [DataContract] public class StudentDetails { [DataMember] public int Id { get; set; } [DataMember] public string StudentName { get; set; } [DataMember] public int? Age { get; set; } } |
Create DBContext.Cs file as below
| public class UsersContext : DbContext { public UsersContext() : base(“TestConnection”) { } public DbSet<StudentDetails> studentDbset { get; set; } } |
Open the default interface file IService1.cs
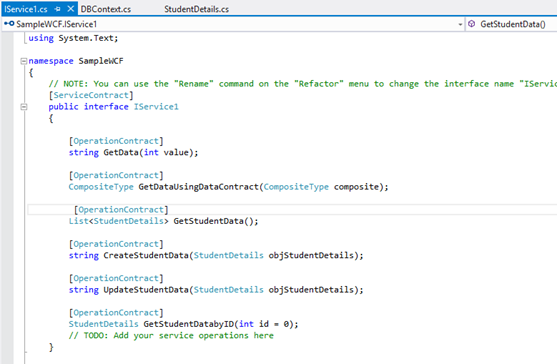
Insert the Snippet as below
| [OperationContract] List<StudentDetails> GetStudentData(); [OperationContract] string CreateStudentData(StudentDetails objStudentDetails); [OperationContract] string UpdateStudentData(StudentDetails objStudentDetails); [OperationContract] StudentDetails GetStudentDatabyID(int id = 0); |
Implement the below code in Service1.Svc.cs
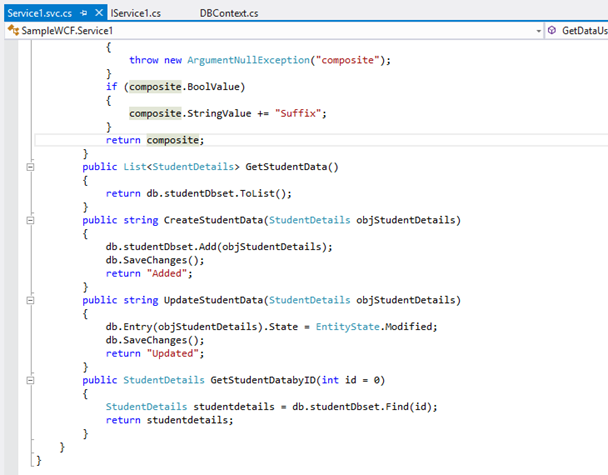
Code Snippet
| public List<StudentDetails> GetStudentData() { return db.studentDbset.ToList(); } public string CreateStudentData(StudentDetails objStudentDetails) { db.studentDbset.Add(objStudentDetails); db.SaveChanges(); return “Added”; } public string UpdateStudentData(StudentDetails objStudentDetails) { db.Entry(objStudentDetails).State = EntityState.Modified; db.SaveChanges(); return “Updated”; } public StudentDetails GetStudentDatabyID(int id = 0) { StudentDetails studentdetails = db.studentDbset.Find(id); return studentdetails; } |
Run the Service application as below

Click on the Link below to get the sample solution
https://1drv.ms/u/s!ArddhCoxftkQg6gdCJeDrlqBAJE0vg
Linq query with different data sources List, Array and SQL
Document by Ganesan – Ganesanva@hotmail.com – + 919600370429
Create StudentDetails Table in TestDB using the below snippet,
| CREATE TABLE [dbo].[StudentDetails] ( [Id] INT IDENTITY (1, 1) NOT NULL, [StudentName] VARCHAR (50) NULL, [Age] INT NULL, [inchargeStudentId] INT NULL, PRIMARY KEY CLUSTERED ([Id] ASC) ); |
– Create a Console Application
Use SQL to Linq Converter,
http://www.sqltolinq.com/
Click on Generate Linq to SQL Model Files,
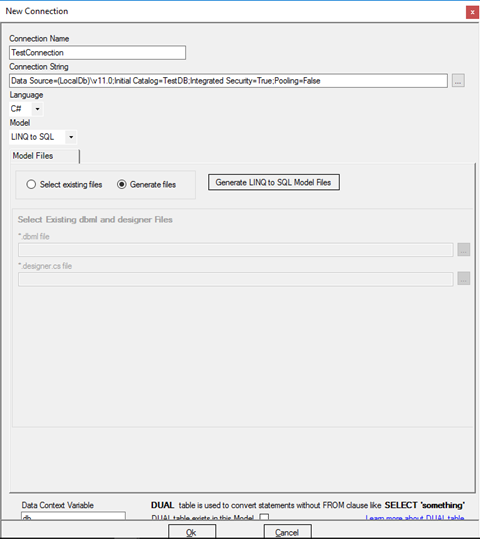
Browse a Folder and Click on OK.
Click on Generate Linq to SQL Files,
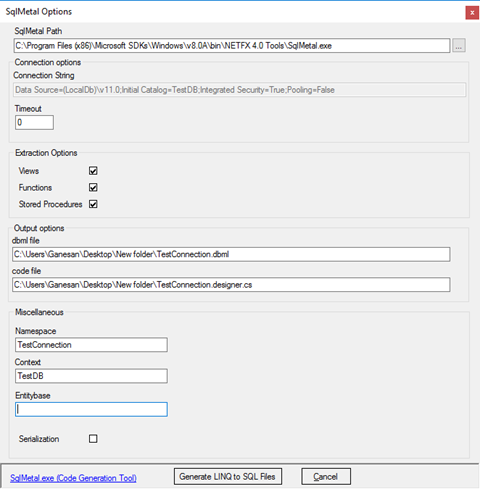
Convert SQL query to Linq as below,
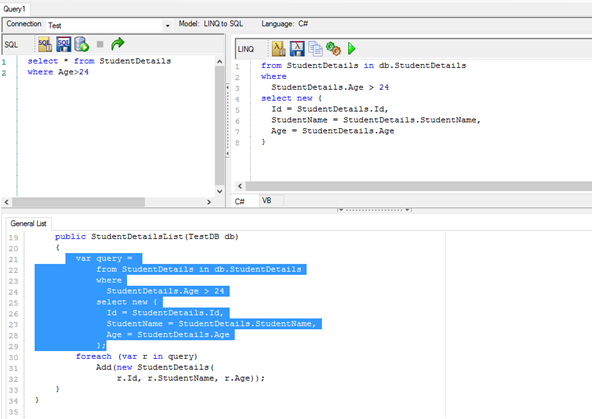
Age> 24 and StudentName contains ‘Sco’
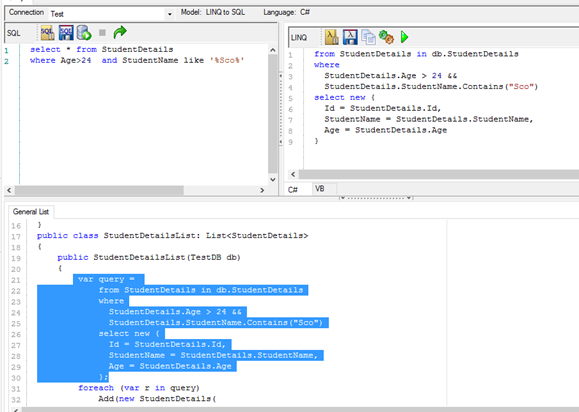
Screen clipping taken: 10-09-2016 19:21
Self Join in Linq
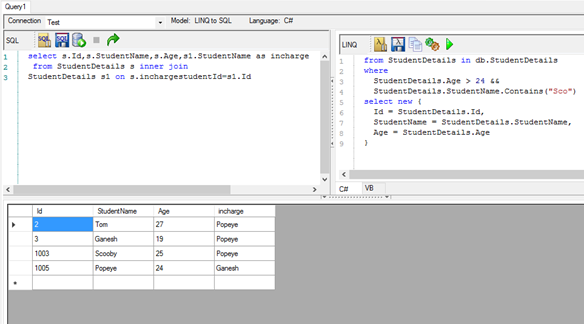
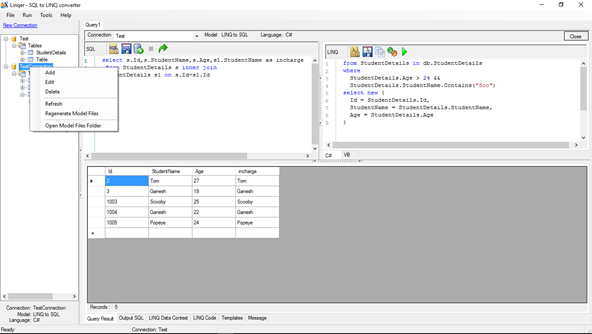
Right click on the table and select Regenerate Model Files.
Insert the connection below in App.config,
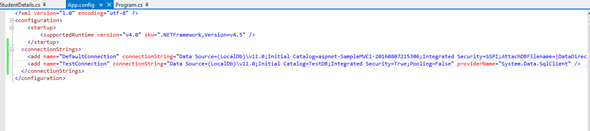
| <connectionStrings> <add name=”TestConnection” connectionString=”Data Source=(LocalDb)\v11.0;Initial Catalog=TestDB;Integrated Security=True;Pooling=False” providerName=”System.Data.SqlClient” /> </connectionStrings> |
Add StudentDetails.cs and data context file as below,
| public class StudentDetails { public int Id { get; set; } public string StudentName { get; set; } public int? Age { get; set; } public int? InchargeStudentId { get; set; } } public class UsersContext : DbContext { public UsersContext(): base(“TestConnection”) { } public DbSet<StudentDetails> studentDbset { get; set; } } |
Insert the below Code snippet in Console,
| class Program { private static UsersContext db = new UsersContext(); static void Main(string[] args) { /* Getting the Student Db Collection from DB */ List<StudentDetails> obj= db.studentDbset.ToList(); foreach (var item in obj) { Console.WriteLine(“Student Name” + “\t” + item.StudentName + “\t” + “Age:” + item.Age); } /* Getting the Student Db Collection for Age>24 from DB */ Console.WriteLine(“———————————————————-“); Console.WriteLine(“Printing Age > 24”); var query = from StudentDetails1 in db.studentDbset where StudentDetails1.Age > 24 select new { Id = StudentDetails1.Id, StudentName = StudentDetails1.StudentName, Age = StudentDetails1.Age }; foreach (var r in query) Console.WriteLine(“Student Name” + “\t” + r.StudentName + “\t” + “Age:” + r.Age); /* Getting the Student Db Collection for Age>24 from DB */ Console.WriteLine(“———————————————————-“); Console.WriteLine(“Printing Age > 24 && Student Name contains Sco”); var query1 = from StudentDetails1 in db.studentDbset where StudentDetails1.Age > 24 && StudentDetails1.StudentName.Contains(“Sco”) select new { Id = StudentDetails1.Id, StudentName = StudentDetails1.StudentName, Age = StudentDetails1.Age }; foreach (var r in query1) Console.WriteLine(“Student Name” + “\t” + r.StudentName + “\t” + “Age:” + r.Age); /* Getting the Student Db Collection for getting Incharge on Self join from DB */ Console.WriteLine(“———————————————————-“); Console.WriteLine(“Printing self join for Students Lead”); var query2 = from s in db.studentDbset join s1 in db.studentDbset on new { InchargeStudentId = s.InchargeStudentId.Value } equals new { InchargeStudentId = s1.Id } select new { s.Id, s.StudentName, s.Age, incharge = s1.StudentName }; foreach (var r in query2) Console.WriteLine(“Student Name” + “\t” + r.StudentName + “\t” + “Age:” + r.Age + “\t” + “Incharge:” + r.incharge); /* Getting the Collection from DB */ Console.WriteLine(“———————————————————-“); Console.WriteLine(“Printing from Array”); string[] ary = new string[] { “Jan”, “Feb”, “Mar”, “Apr”, “May”, “Jun”, “Jul”, “Aug”, “Sep”, “Oct”, “Nov”, “Dec” }; var res = from months in ary where months.StartsWith(“J”) select new { MonthStartWith_J = months }; foreach (var r in res) Console.WriteLine(“Month:” + “\t” + r.MonthStartWith_J); /* Getting the Collection from DB */ Console.WriteLine(“———————————————————-“); Console.WriteLine(“Printing from Collection”); List<string> objstring = new List<string>(); objstring.Add(“Yahooo”); objstring.Add(“Google”); objstring.Add(“HCL”); var obj1 = from company in objstring where company.StartsWith(“Goo”) select new { companyStartWith_Goo = company }; foreach (var r in obj1) Console.WriteLine(“Month:” + “\t” + r.companyStartWith_Goo); Console.ReadLine(); } } |
The Output as below,
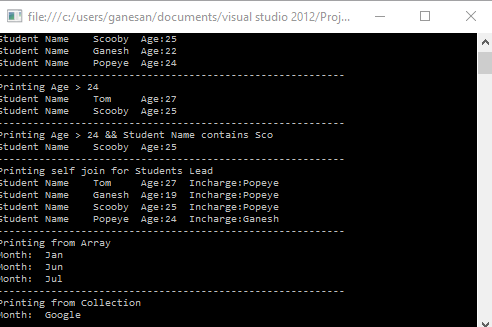
Screen clipping taken: 10-09-2016 21:34
Click below for download,
https://1drv.ms/u/s!ArddhCoxftkQg6hZlD6medX1rPn9pw
Reference
http://www.dotnetlearners.com/linq/linq-to-string-array-with-example.aspx
Asp.net Validation Controls
Document by Ganesan -ganesanva@hotmail.com – + 919600370429
List of Asp.net Validation available are as follows,
1.Required Field validator
2.Regular Expression validator
3.Range Validator
4.Custom Validator
5.Compare Validator
Create a new Asp.net Web application
File -> New Project
Right click on the solution and Add New web form page AddStudentDetails.aspx as below,

Replace the HTML Tag in AddStudentDetails.aspx with below snippet,
| <html xmlns=”http://www.w3.org/1999/xhtml”> <head runat=”server”> <title></title> </head> <body> <form id=”form1″ runat=”server”> <div> <table border=”0″ cellspacing=”2″ cellpadding=”2″> <tr> <td>Student Name </td> <td> <asp:TextBox ID=”txtStudentName” runat=”server”></asp:TextBox> <asp:RequiredFieldValidator ID=”RQStudentName” runat=”server” ControlToValidate=”txtStudentName” ErrorMessage=”Please enter Student Name” ForeColor=”Red”> </asp:RequiredFieldValidator> </td> </tr> <tr> <td> Date of Birth </td> <td> <asp:TextBox ID=”txtDOB” runat=”server”></asp:TextBox> <asp:RangeValidator ID=”Rvalid” runat=”server” ControlToValidate=”txtDOB” ErrorMessage=”Date of Birth should not be greater than current date” Type=”Date” ForeColor=”Red”></asp:RangeValidator> </td> </tr> <tr> <td> Age </td> <td> <asp:TextBox ID=”txtAge” runat=”server”></asp:TextBox> <asp:RequiredFieldValidator ID=”RqAge” runat=”server” ControlToValidate=”txtAge” ErrorMessage=”Please enter Student Age” ForeColor=”Red”> </asp:RequiredFieldValidator> <asp:RangeValidator ID=”RgAge” runat=”server” ControlToValidate=”txtAge” ErrorMessage=”Age should be greater than 18″ MinimumValue=”18″ ForeColor=”Red” MaximumValue=”2000″ Type=”Integer”></asp:RangeValidator> </td> </tr> <tr> <td> City </td> <td> <asp:DropDownList ID=”ddlCity” runat=”server”> <asp:ListItem Text=”–Select–” Value=”–Select–“></asp:ListItem> <asp:ListItem Text=”Chennai” Value=”Chennai”></asp:ListItem> <asp:ListItem Text=”Madurai” Value=”Madurai”></asp:ListItem> </asp:DropDownList> <asp:RequiredFieldValidator ID=”RqCity” runat=”server” InitialValue=”–Select–” ControlToValidate=”ddlCity” ErrorMessage=”Please enter Student City” ForeColor=”Red”> </asp:RequiredFieldValidator> </td> </tr> <tr> <td> Email Id </td> <td> <asp:TextBox ID=”txtEmailId” runat=”server”></asp:TextBox> <asp:RequiredFieldValidator ID=”RqEmailId” runat=”server” ControlToValidate=”txtEmailId” ErrorMessage=”Please enter Email ID” ForeColor=”Red”> </asp:RequiredFieldValidator> <asp:RegularExpressionValidator ID=”REVEmailId” runat=”server” ErrorMessage=”please enter correct email id” ControlToValidate=”txtEmailId” ValidationExpression=”\w+([-+.’]\w+)*@\w+([-.]\w+)*\.\w+([-.]\w+)*” ForeColor=”Red”></asp:RegularExpressionValidator> </td> </tr> <tr> <td> User Name </td> <td> <asp:TextBox ID=”txtUserName” runat=”server”></asp:TextBox> <asp:RequiredFieldValidator ID=”RequiredFieldValidator1″ runat=”server” ControlToValidate=”txtUserName” ErrorMessage=”Please enter UserName” ForeColor=”Red”> </asp:RequiredFieldValidator> <asp:CustomValidator ID=”CVUserName” runat=”server” ControlToValidate=”txtUserName” OnServerValidate=”CVUserName_ServerValidate” ErrorMessage=”UserName should not be greater than 15 digits” ForeColor=”Red”></asp:CustomValidator> </td> </tr> <tr> <td> Password </td> <td> <asp:TextBox ID=”txtPassword” runat=”server” TextMode=”Password”></asp:TextBox> <asp:RequiredFieldValidator ID=”RequiredFieldValidator2″ runat=”server” ControlToValidate=”txtPassword” ErrorMessage=”Please enter Password” ForeColor=”Red”> </asp:RequiredFieldValidator> </td> </tr> <tr> <td> Retype Password </td> <td> <asp:TextBox ID=”txtRetypePassword” runat=”server” TextMode=”Password”></asp:TextBox> <asp:RequiredFieldValidator ID=”RequiredFieldValidator3″ runat=”server” ControlToValidate=”txtRetypePassword” ErrorMessage=”Please enter Retype Password” ForeColor=”Red”> </asp:RequiredFieldValidator> <asp:CompareValidator ID=”cmpPasswordmatch” runat=”server” ControlToCompare=”txtPassword” ControlToValidate=”txtRetypePassword” ErrorMessage=”Password and Retype Password should not match” ForeColor=”Red”> </asp:CompareValidator> </td> </tr> <tr> <td></td> <td> <asp:Button ID=”btnSave” runat=”server” Text=”Save” CausesValidation=”true” OnClick=”btnSave_Click” /> </td> </tr> </table> </div> </form> </body> </html> |
Replace the AddStudentDetails.cs class with the below snippet,
| public partial class AddStudentDetails : System.Web.UI.Page { protected void Page_Load(object sender, EventArgs e) { Rvalid.MinimumValue = DateTime.MinValue.ToString(“dd-MM-yyyy”); Rvalid.MaximumValue = DateTime.Now.ToString(“dd-MM-yyyy”); } protected void CVUserName_ServerValidate(object source, ServerValidateEventArgs args) { args.IsValid = (args.Value.Length < 15); } protected void btnSave_Click(object sender, EventArgs e) { if (Page.IsValid) { Response.Write(“Saved”); } } } |
The Output as below,
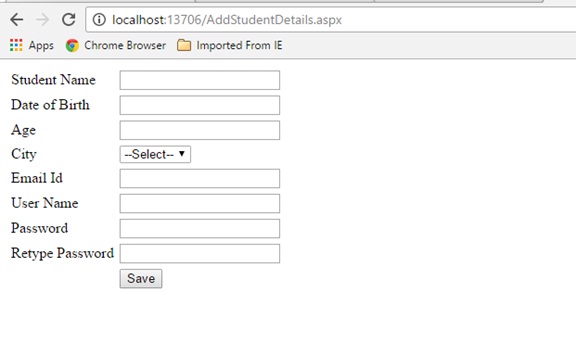
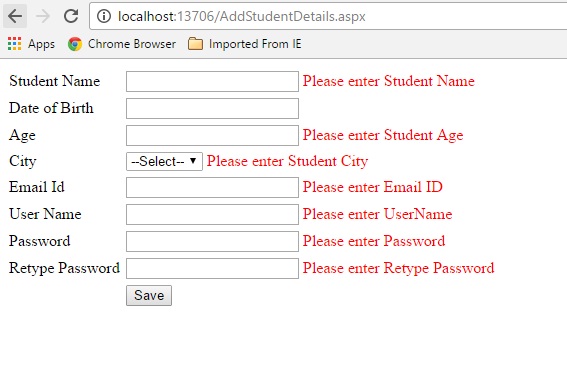
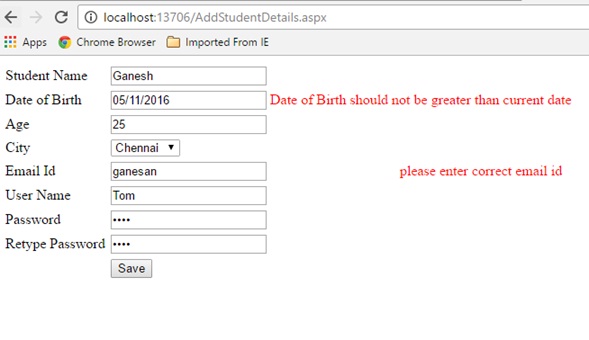
Custom Validation on server event,
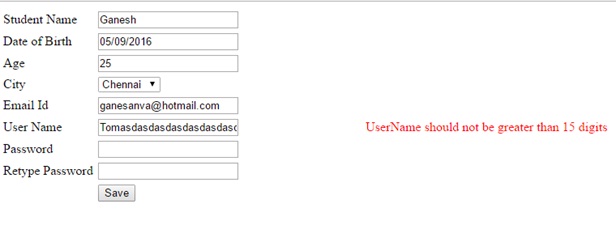
Click below to download the solution,
https://1drv.ms/u/s!ArddhCoxftkQg6kmic1tyrHNsIbXqA
Asp.net CRUD operation with Ado.net
Document by Ganesan – Ganesanva@hotmail.com – + 919600370429
– Create Database in SQL as “StudentDB”
– Create Table “StudentDetails” with the below snippet,
| CREATE TABLE [dbo].[StudentDetails] ( [Id] INT IDENTITY (1, 1) NOT NULL, [StudentName] VARCHAR (50) NULL, [Age] INT NULL, PRIMARY KEY CLUSTERED ([Id] ASC) ); |
You can see the DB created in local SQL express as below,
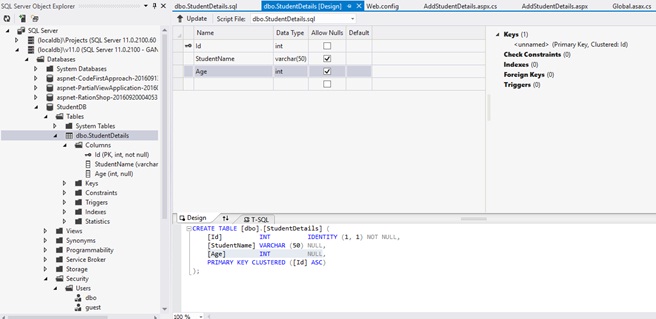
– Create a new Asp.net Web forms Application as below
File –> New Project
Add the Connection string in Web.config as below snippet,
| <connectionStrings> <add name=”DefaultConnection” providerName=”System.Data.SqlClient” connectionString=”Data Source=(localdb)\v11.0;Initial Catalog=StudentDB;Integrated Security=True;Connect Timeout=15;Encrypt=False;TrustServerCertificate=False” /> </connectionStrings> |
Add new Page as AddStudentDetails.aspx as below,
Replace the Below HTML code in AddStudentDetails.aspx file as below,
| <html xmlns=”http://www.w3.org/1999/xhtml”> <head runat=”server”> <title></title> </head> <body> <form id=”form1″ runat=”server”> <div> <table border=”0″ cellspacing=”2″ cellpadding=”2″> <tr> <td> <asp:Label ID=”lblStudentName” runat=”server” Text=”Student Name”></asp:Label> </td> <td> <asp:TextBox ID=”txtStudentName” runat=”server”></asp:TextBox> </td> </tr> <tr> <td> <asp:Label ID=”lblAge” runat=”server” Text=”Age”></asp:Label> </td> <td> <asp:TextBox ID=”txtAge” runat=”server”></asp:TextBox> </td> </tr> <tr> <td></td> <td> <asp:Button ID=”btnSubmit” runat=”server” Text=”Submit” OnClick=”btnSubmit_Click” /> <asp:Button ID=”btnUpdate” runat=”server” Text=”Update” OnClick=”btnUpdate_Click” /> <asp:Button ID=”btnClear” runat=”server” Text=”Clear” OnClick=”btnClear_Click” /> <asp:HiddenField ID=”hfId” runat=”server”></asp:HiddenField> </td> </tr> <tr> <td colspan=”2″> <asp:GridView ID=”grvStudentDetails” runat=”server” AutoGenerateColumns=”false”> <Columns> <asp:BoundField DataField=”Id” HeaderText=”Id” /> <asp:BoundField DataField=”StudentName” HeaderText=”StudentName” /> <asp:BoundField DataField=”Age” HeaderText=”Age” /> <asp:TemplateField> <ItemTemplate> <asp:Button ID=”btnEdit” runat=”server” Text=”Edit” OnClick=”btnEdit_Click” /> </ItemTemplate> </asp:TemplateField> </Columns> </asp:GridView> </td> </tr> </table> </div> </form> </body> </html> |
Replace the AddStudentDetails.aspx.cs file as below,
| public partial class AddStudentDetails : System.Web.UI.Page { SqlConnection con = new SqlConnection(ConfigurationManager.ConnectionStrings[“DefaultConnection”].ToString()); protected void Page_Load(object sender, EventArgs e) { if (!Page.IsPostBack) { BindGrid(); } } private void BindGrid() { btnSubmit.Visible = true; btnUpdate.Visible = false; SqlCommand cmd = new SqlCommand(“Select * from StudentDetails”, con); SqlDataAdapter ada = new SqlDataAdapter(cmd); DataSet ds = new DataSet(); ada.Fill(ds); grvStudentDetails.DataSource = ds.Tables[0]; grvStudentDetails.DataBind(); } protected void btnSubmit_Click(object sender, EventArgs e) { con.Open(); SqlCommand cmd = new SqlCommand(“insert into StudentDetails values(‘”+txtStudentName.Text+”‘,”+txtAge.Text+”)”, con); int result=cmd.ExecuteNonQuery(); if (result > 0) { Response.Write(“Inserted Successfully”); } con.Close(); BindGrid(); btnClear_Click(null, null); } protected void btnEdit_Click(object sender, EventArgs e) { Button btn = (Button)sender; //Get the row that contains this button GridViewRow gvr = (GridViewRow)btn.NamingContainer; hfId.Value = gvr.Cells[0].Text; txtStudentName.Text = gvr.Cells[1].Text; txtAge.Text = gvr.Cells[2].Text; btnSubmit.Visible = false; btnUpdate.Visible = true; } protected void btnUpdate_Click(object sender, EventArgs e) { con.Open(); SqlCommand cmd = new SqlCommand(“Update StudentDetails set StudentName='” + txtStudentName.Text + “‘,Age=” + txtAge.Text + ” where Id=”+hfId.Value, con); int result = cmd.ExecuteNonQuery(); if (result > 0) { Response.Write(“Updated Successfully”); } con.Close(); BindGrid(); btnClear_Click(null, null); } protected void btnClear_Click(object sender, EventArgs e) { txtStudentName.Text = string.Empty; txtAge.Text = string.Empty; hfId.Value = string.Empty; } } |
Run the solution.
The Output will be below,
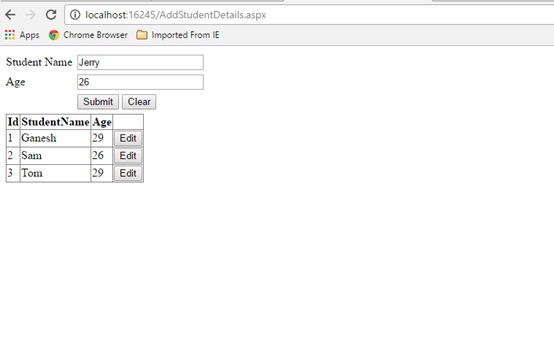
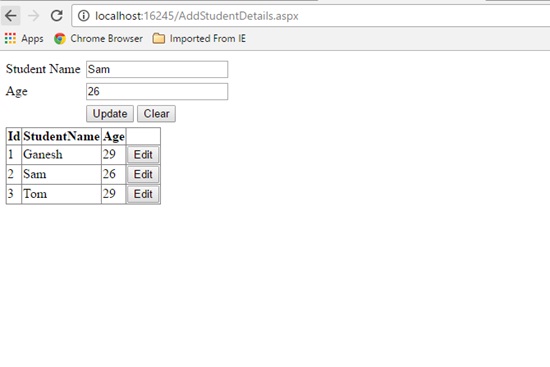
Click below to download the solution,
https://1drv.ms/u/s!ArddhCoxftkQg6h98mZAX_-Zv-6reQ
Identifying Dot Net Coaching Institutes in Chennai for Shaping the Skills
Dot net training is an essential one for those who get jobs in leading IT companies and other firms with better salaries. There are many organizations that recruit employees based on their experience and skills. Some even conduct tests for analyzing the potentials of a job seeker. It is an essential one to undergo a training program in a leading institute for shaping the potentials efficiently. However, it is necessary to find a right training center properly for choosing a course depending upon the needs. The internet is a best platform for this purpose because it helps to compare the services offered by various institutes easily. With dot net coaching, it is possible to develop the potentials to reach high levels in career.
Most training centers organize the classes based on the requirements of a person to shape his or her abilities with excellence. Besides that, they focus more on conduct the program with industry experts and live projects for achieving better results. Dot not training in Chennai is a suitable for students, job seekers and employees to develop their skills at different levels. It gives ways for learning the lessons in a comfortable environment to meet exact needs. Apart from that, it contributes a lot in augmenting the programming and other potentials with expert teaching faculties. Anyone interested in knowing more about the coaching classes can get ideas from a counselor for selecting a program which perfectly suits their requirements.
Some institutes even assist the students to apply for the jobs in reputed companies. On the other hand, it is necessary to go through the testimonials and reviews before choosing a course in a center. This will help a lot for learning the lessons in a comfortable environment. Different types of coaching programs are available for the students to augment their abilities. Dot net training institute in Chennai mainly aims at developing self confidence levels of students with different types of tasks. In fact, it gives ways for analyzing their skills with theory and practice classes. Satisfaction guarantee is the primary aim of a coaching center in Chennai while offering services to students. Online training is also available for those who want to augment their skills anywhere.
Dot net training is a perfect one for both employees and employers to complete a project with more accuracy. They can learn more about problem solving techniques to gain more benefits. It is an important one to consider certain important facts before choosing an institute. Study materials offered by the institutes are extremely useful for ensuring desired outputs when executing a new project. Many training institutes allow students to pay their fees with flexible options. Besides that, they conduct exams for the students to correct their mistakes as soon as possible. It is possible to learn more about the training programs from the internet for seeking admission into a right one. The students can undergo coaching classes in a center with the latest computer applications for meeting essential needs in the learning procedure.
Best Dot Net Training Institute in Chennai
Microsoft.net preparing can gain from your preferred dot net training institute in Chennai. The need to comprehend the general working can be clarified in this article. Microsoft confirmation matters a considerable measure when you are searching for a course like this one. The sole reason is on the grounds that the course is bit excessive and included details. You should be clear in your nuts and bolts before you dive in such confirmation. The foundation through which you plan to finish this course ought to likewise be known. One little wrong move can make enormous issues for your vocation.
Utilization of web should be possible to discover the dot net training in Chennai . There are various dot net training institute in Chennai through which you can take in this course. You have to research well concerning such prerequisites; there are sites of the establishments which offer such courses. Check these sites to know subtle elements like course information, charges, timings, choices of classes and learning. Points are imperative with regards to learning net instructional class. Check if the course has every one of the points or not, this will give you greatest inclination as far as thinking about the course.
You have to check as to notoriety in the best dot net training institute in Chennai. This should be possible when by checking the ex-understudies remarks on the site of the establishment. On the off chance that you get the chance to see negative and discourteous remarks then it’s ideal to see some other organization. Extra data can be picked up by reaching the understudies on the off chance that they have said their contact number. Each coin has two sides so it’s not going to be green the distance. Minor issues will keep on being available yet can be overlooked when your needs are set.
.net training in Chennai installment choices are likewise present when you wish to apply. On the off chance that you are making the complete installment in one go then expect some rebate on your last sum. If not this then there would be extra which can help in future learning. This sort of procedure is seen in a large portion of the .net training in Chennai.
Arrangement alternatives are likewise there that can give you the ideal help in your vocation. Finishing Microsoft.net preparing in this manner ends up being gainful and key over the long haul. You would have the ideal vocation in IT field. Continuously explore well with regards to online courses so you get most extreme advantages over the long haul.
Programming codes are not physical items. We can’t see the codes, yet the client can utilize the consequences of a running a coded program as a product application. The product applications so created have reclassified our ordinary encounters and made life so natural, be it controlling a flight or purchasing basic needs from a store. Learning dot net course chennai is along these lines a superb street to pick up livelihood and enhance a man’s vocation profile.
Looking for Dot Net Training in Chennai?
Today, dot net professionals are in great demand and many companies are willing to recruit them with high salaries. Dot net is a software framework used for a variety of applications to maintain accuracy levels. It plays a vital role in web development, communication, data access and other areas for carrying out a project work with more efficiency. There are several software training institutes that organize dot net classes for those who want to enhance their levels. On the other hand, it is an important one to evaluate them from the internet for identifying a right center accordingly. The dot net training programs mainly focus on increasing the programming, problem solving, analytic and other skills of job seekers with excellence.
It is also a suitable one for the employees to develop their abilities effectively to implement the latest techniques in the programming side. Dot net training in Chennai involves different levels that help a person to develop his or her abilities considerably. Those who want to build their career in dot net can participate in the coaching classes which help them to seek jobs in leading companies. However, the fees for the training program might vary with a center and one should know more about them for accomplishing goals in life. Dot net training institute in Chennai offers both online and classroom services for students and others to focus more on their skill sets with excellence for ensuring optimal results.
Experienced trainers will assist the students to upgrade their skills with real time projects. In addition to that, they show methods for them to become an expert in IT industry. It is possible to seek jobs in software and other industries with a best dot net training institute in Chennai for starting a bright career. Fresh graduates who come out from their college and university can benefit a lot with the training programs for meeting essential needs. Moreover, they can know the course details from the faculties to select a right program which exactly suits a student. The dot net training aims at preparing a student to overcome challenges in a project to achieve desired outputs. It makes feasible ways for increasing the efficiency levels with industry experts and workshops.
As software technologies are growing rapidly these days, it is necessary for an employee or a student to implement them in a project. Several employers give preference to candidates who have a strong technical background. Having a dot net certificate will help a person to make his or her dreams true one in the job search process. Dot net course Chennai makes feasible ways for starting a new journey with flying colors. It is a perfect choice for excelling in programming areas for meeting essential requirements. Students must read the reviews and testimonials of training institutes before selecting a training program. This will help in getting more ideas about the coaching classes for augmenting the skills with industry experts and others. Most training centers conduct training programs with study materials to learn the lessons with the latest techniques.
Recent Posts
Categories
- All
- Angularjs training in Chennai
- ASP.NET Core
- dot net training
- dot net training in chennai
- dotnet full stack developer
- Free dotnet training
- information on dotnet
- Learn Java in chennai
- Learn Python at Karaikudi
- learn python online
- learn python online from chennai
- Linq Queries in .net
- mutual funds
- MVC Training Tutorials
- PHP Training in Chennai
- pmp training online
- power apps online training
- Python Training Online
- share market
- Sharepoint framework online training
- SharePoint Freelancers in Chennai
- software testing
- spfx online training
- Stock market
- Uncategorized