Learn SQL online
Learn SQL online
In our increasingly digital economy, SQL abilities are highly valued. The demand for skilled experts to analyse all that data is increasing along with the number of companies gathering customer information.
An average learner should be able to acquire the fundamentals of SQL and begin using SQL databases in roughly two to three weeks. But you’ll need to become pretty fluent with them before you can start employing them successfully in everyday situations, and that takes time.
SQL is not a conventional programming language, where you would create a series of instructions that would be executed in a specific order. Instead, SQL is a “declarative” language, which means that when you write a query for it, you declare the data you want to get as a result but don’t specify how you want to get it.
SQL is commonly used to create, search for, change, and delete database entries. The more time you invest as a SQL practitioner, the more efficiently and creatively you can use the platform to find the answers your organisation need from the sea of data that is now available.
As we switch between applications, websites, and social media platforms every day, we leave a data trail that is mined by businesses for a variety of purposes. The lack of data analysts, however, renders raw data meaningless.
These experts organise and examine massive data collections using programming languages like SQL. They can then turn this information and correlations into business insights, which in turn can aid organisations in expanding their operations. Every second that goes by, this mountain of data gets bigger, and so does the need for SQL experts. That is the reason why SQL is so common and popular.
SQL is one of the most widely used programming languages in the world. It is used in a range of professions, such as Database administration, Data science, Software engineering, Business analytics and Journalism.
SQL proficiency is required for anyone who deals with data. This language is used by many domains and disciplines to communicate with relational databases.
SQL’s versatility is intended to allow you to query a database in a variety of ways using English-based commands. Because SQL is the most commonly used database language, practically every organisation that needs to store relational data, including big firms like Facebook, Amazon, Google, Uber, Netflix and etc rely on SQL.
SQL is utilised in many different sectors and professions. SQL is still a popular choice for software applications today because it is used by many relational database management systems. SQL offers a wide range of professional applications due to its adaptability and flexibility.
Most programming languages are only used for programming. SQL, on the other hand, is unusual in that it has applications that go beyond standard programming. SQL is used by those in sales and marketing to conduct queries on datasets, which allows them to recognise sales trends and track the success of various marketing campaigns. SQL also has uses in the finance sector. SQL is used by financial analysts to sort through vast amounts of financial data in order to save time. SQL is handy for dealing with vast amounts of structured data.
Top Reasons to Learn SQL:
SQL
- is simple to learn.
- is an effective troubleshooting tool.
- is incredibly flexible and standardised.
- makes it easier to mine your data.
- makes it simple to combine data sets from many sources.
- can handle enormous data sets.
- puts important information at your fingertips.
- demand is at an all-time high.
- developers earn a good living.
If you want to learn SQL, the good news is that there are currently a variety of in-person and online learning alternatives accessible for learners of all levels. We have a Training Centre in Karaikudi for people who like to study in a classroom setting. Furthermore, for individuals who prefer virtual learning, we provide online SQL courses, which are a terrific option. All courses include live tuition from a SQL professional.
Three Tier Architecture in MVC
Three Tier (Three Layer) Architecture
With a three-layer design, the project is divided into three layers: the user interface layer, the business layer, and the data layer (database), where we divide the UI, logic, and data into three groups. If a user wants to switch the user interface from a Windows computer to a smartphone, he or she simply needs to alter the UI layer; all other layers are unaffected. Like this, if a user wishes to change a database, he simply needs to update the data layer; everything else stays the same.
The widely used three-tier (or three-layer) architecture is a way to organise the codebase. This architecture divides the codebase into three distinct levels, each with a unique set of duties:

Presentation layer: This is the application’s user interface, which shows the user the features and data of the programme.
Business logic (or Application) layer: The business logic that powers the application’s essential features is contained in this layer. as processing the data moving between the other two layers and making judgements, calculations, and evaluations.
Data access layer (or Data) layer: To save and recover application data, this layer communicates with databases.
Advantages of using three-tier architecture are:
Accelerated development: Reducing product time to market and enabling developers to use the most current tools and layer appropriate languages.
Improved scalability: By deploying apps on many levels, each tier may always be scaled separately.
Improved Reliability: By using several tiers, you may execute additional components of your application on other servers and employ results that have been cached to improve reliability and availability.
Enhance security: By using a well-designed application layer as a private firewall to help avoid receptive weaknesses like SQL injection.
The package of different layers is as follows.
- Presentation Layer – controller package
- Business Logic Layer – service package
- Data Access Layer – repository package
Three Layer Architecture using MVC Sample:
Create an empty MVC web application project with Project name “WebApp” and solution name “TLA”. This WebApp project is the presentation layer.
In Solution TLA, add a new project to create business logic à Class library (.net framewok) à name the project as BusinessLayer.
Again, in Solution TLA, add a new project to create data access à Class library (.net framewok) à name the project as DataBaseLayer.
Add BusinessLayer & DataBaseLayer as reference in “WebApp”.
Add BusinessLayer as reference in “DataBaseLayer”.
In sql server explorer, add a new database with name “MYDB” and create a table with name “Registration”.
| CREATE TABLE [dbo].[Registration]( [RegId] [int] IDENTITY(1,1) NOT NULL, [FullName] varchar NULL, [Address] varchar NULL, [Gender] varchar NULL, [City] varchar NULL, [DoB] [date] NULL, [Cno] varchar NULL, PRIMARY KEY CLUSTERED ([RegId] ASC) |
In “DataBaseLayer”, add the model file using “ado.net entity data model”.
Once model is created, copy the connection string from app.config of “DataBaseLayer” and paste it in web.config of “WebApp”.
In “BusinessLayer”, create a class file with name “RegistrationModel” and replace with below snippet.
| public class RegistrationModel { public int RegId { get; set; } public string FullName { get; set; } public string Address { get; set; } public string Gender { get; set; } public string City { get; set; } public Nullable DoB { get; set; } public string Cno { get; set; } } |
In “DataBaseLayer”, add a new folder with name “DBOperation”, in it, add a class file with name “ManageRegistration” and replace with below snippet.
| public class ManageRegistration { public void AddReg(RegistrationModel regModel) { using (var DB = new MYDBEntities()) { Registration Reg = new Registration() { FullName = regModel.FullName, Address = regModel.Address, Gender = regModel.Gender, City = regModel.City, DoB = regModel.DoB, Cno = regModel.Cno }; DB.Registrations.Add(Reg); DB.SaveChanges(); } } } |
Then add EntityFramework.dll and EntityFramework.SqlServer.dll references in “WebApp”.
So now the business layer and data layer has been completely created.
Now, in WebApp (i. e. in presentation layer), add a new controller with name “Home controller” and replace with below snippet.
| public class HomeController : Controller { // GET: Home public ActionResult Index() { return View(); } ManageRegistration ManageReg = new ManageRegistration(); [HttpPost] public void AddReg(FormCollection Form) { RegistrationModel registrationModel = new RegistrationModel() { FullName = Form["txtName"], Address = Form["txtAddress"], Gender = Form["rdbGender"], City = Form["txtCity"], DoB = Convert.ToDateTime(Form["txtDoB"]), Cno = Form["txtCno"] }; ManageReg.AddReg(registrationModel); Response.Write("Saved"); } } |
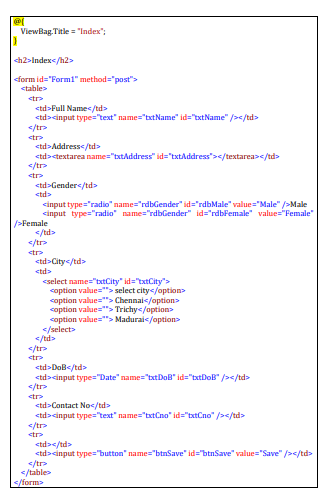
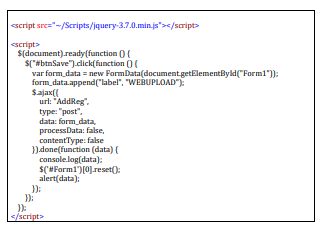
Add index view with empty without model and put the below html and ajax snippet in it
Run the program
Securing ASP.NET Core web application with Identity Framework
Securing ASP.NET Core web application with Identity Framework:
Web application security is more important than ever in today’s world. Identity Framework is one of the tools and features available in ASP.NET Core for securing web applications. Identity Framework is a membership system that provides the user interface, APIs, and features required for the creation and management of user accounts.
In this article, we’ll go over how to use Identity Framework to secure your ASP.NET Core web application.
Step 1: ASP.NET Core Web Application Creation:
The first step is to build an ASP.NET Core web app. You can accomplish this by taking the following steps:
Launch Visual Studio and select “New Project.”
Click “Next” after selecting “ASP.NET Core Web Application.”
Select a project template (such as MVC, Web API, or Razor Pages) and click “Create.”
Step 2: Identity Framework Installation:
Following the creation of the ASP.NET Core web application, the Identity Framework must be installed. You can accomplish this by including the following package in your project:
Microsoft.AspNetCore.Identity.EntityFrameworkCore
You can install this package using the NuGet Package Manager or by adding the following line to your.csproj file:
<PackageReference Include=”Microsoft.AspNetCore.Identity.EntityFrameworkCore” Version=”2.2.0″ />
Step 3: Identity Framework Configuration:
The following step is to set up Identity Framework. You can accomplish this by including the following code in the Startup.cs file’s ConfigureServices method:
services.AddIdentity<IdentityUser, IdentityRole>()
.AddEntityFrameworkStores<ApplicationDbContext>()
.AddDefaultTokenProviders();
This code instructs Identity Framework to use the IdentityUser and IdentityRole classes as the user and role entities, respectively, as well as the ApplicationDbContext as the database context.
Step 4: Database Creation:
The database will be created next. You can do this by running the following command in the Package Manager Console:
Update-Database
This command will populate the database with the necessary tables.
Step 5: Implement of Authentication and Authorization
The final step is to put authentication and authorization in place. This is accomplished by appending the [Authorize] attribute to the controllers or actions that require authorization. Policies can also be used to implement more complex authorization requirements.
Identity Framework’s SignInManager and UserManager classes can be used to implement authentication.
In Conclusion, we have discussed how to use Identity Framework to secure your ASP.NET Core web application in this article. We went over the steps for developing an ASP.NET Core web application, installing and configuring the Identity Framework, creating the database, and implementing authentication and authorization. You can create a secure ASP.NET Core web application that protects your users’ data and privacy by following these steps.
CRUD in ASP.net web application using Stored procedure
Document by Maria Academy – mariatrainingacademy@gmail.com – +919042710472
Create Database in SQL server as below,
| Create database StudentDB |
Create StudentDetails table using the below script,
| CREATE TABLE [dbo].[StudentDetails]( [StudentId] [int] IDENTITY(1,1) NOT NULL, [StudentName] [varchar](100) NULL, [Age] [int] NULL ) ON [PRIMARY] |
Run the below Stored Procedures in SQL Server,
| create Proc [dbo].[Ins_StudentDetails] @StudentName varchar(100), @Age int as begin INSERT INTO [StudentDetails] ([StudentName] ,[Age]) VALUES (@StudentName ,@Age) |
| create Proc [dbo].[Select_StudentDetails] as begin select * from StudentDetails end |
| create Proc [dbo].[Update_StudentDetails] @StudentId int, @StudentName varchar(100), @Age int as begin UPDATE [StudentDetails] SET [StudentName] = @StudentName ,[Age] = @Age WHERE StudentId=@StudentId end |
Create a new Asp.net web application CRUDinProcedure as below,
File -> New Project
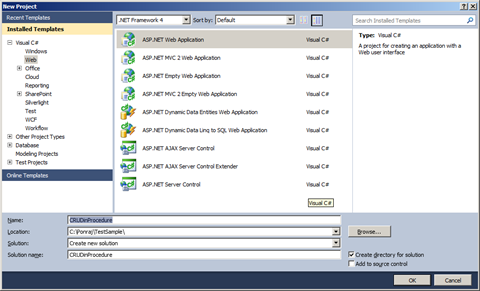
Click OK.
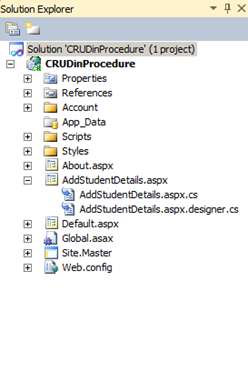
Solution Explorer as below,
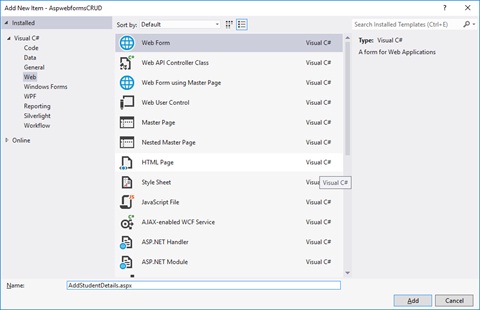
Add new Page AddStudentDetails.aspx
Put / Replace the below code in AddStudentDetails.aspx
| <html xmlns=”http://www.w3.org/1999/xhtml”> <head id=”Head1″ runat=”server”> <title></title> </head> <body> <form id=”form1″ runat=”server”> <div> <table border=”0″ cellspacing=”2″ cellpadding=”2″> <tr> <td> <asp:Label ID=”lblStudentName” runat=”server” Text=”Student Name”></asp:Label> </td> <td> <asp:TextBox ID=”txtStudentName” runat=”server”></asp:TextBox> </td> </tr> <tr> <td> <asp:Label ID=”lblAge” runat=”server” Text=”Age”></asp:Label> </td> <td> <asp:TextBox ID=”txtAge” runat=”server”></asp:TextBox> </td> </tr> <tr> <td></td> <td> <asp:Button ID=”btnSubmit” runat=”server” Text=”Submit” OnClick=”btnSubmit_Click” /> <asp:Button ID=”btnUpdate” runat=”server” Text=”Update” OnClick=”btnUpdate_Click” /> <asp:Button ID=”btnClear” runat=”server” Text=”Clear” OnClick=”btnClear_Click” /> <asp:HiddenField ID=”hfId” runat=”server”></asp:HiddenField> </td> </tr> <tr> <td colspan=”2″> <asp:GridView ID=”grvStudentDetails” runat=”server” AutoGenerateColumns=”false”> <Columns> <asp:BoundField DataField=”StudentId” HeaderText=”StudentId” /> <asp:BoundField DataField=”StudentName” HeaderText=”StudentName” /> <asp:BoundField DataField=”Age” HeaderText=”Age” /> <asp:TemplateField> <ItemTemplate> <asp:Button ID=”btnEdit” runat=”server” Text=”Edit” OnClick=”btnEdit_Click” /> </ItemTemplate> </asp:TemplateField> </Columns> </asp:GridView> </td> </tr> </table> </div> </form> </body> </html> |
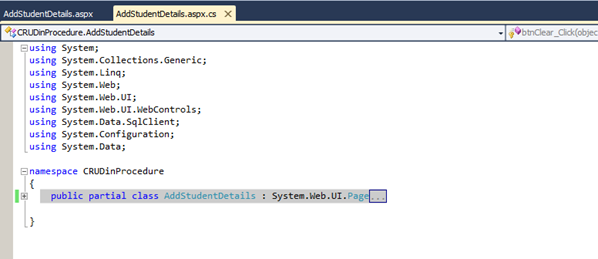
Replace the below code in AddStudentDetails.aspx.cs,
| public partial class AddStudentDetails : System.Web.UI.Page { SqlConnection con = new SqlConnection(ConfigurationManager.ConnectionStrings[“DefaultConnection”].ToString()); protected void Page_Load(object sender, EventArgs e) { if (!Page.IsPostBack) { BindGrid(); } } private void BindGrid() { btnSubmit.Visible = true; btnUpdate.Visible = false; SqlCommand cmd = new SqlCommand(“Select_StudentDetails”, con); cmd.CommandType = CommandType.StoredProcedure; SqlDataAdapter ada = new SqlDataAdapter(cmd); DataSet ds = new DataSet(); ada.Fill(ds); grvStudentDetails.DataSource = ds.Tables[0]; grvStudentDetails.DataBind(); } protected void btnSubmit_Click(object sender, EventArgs e) { con.Open(); SqlCommand cmd = new SqlCommand(“Ins_StudentDetails”, con); cmd.CommandType = CommandType.StoredProcedure; cmd.Parameters.Add(“@StudentName”, SqlDbType.VarChar).Value = txtStudentName.Text; cmd.Parameters.Add(“@Age”, SqlDbType.Int).Value = txtAge.Text; int result = cmd.ExecuteNonQuery(); if (result > 0) { Response.Write(“Inserted Successfully”); } con.Close(); BindGrid(); btnClear_Click(null, null); } protected void btnEdit_Click(object sender, EventArgs e) { Button btn = (Button)sender; //Get the row that contains this button GridViewRow gvr = (GridViewRow)btn.NamingContainer; hfId.Value = gvr.Cells[0].Text; txtStudentName.Text = gvr.Cells[1].Text; txtAge.Text = gvr.Cells[2].Text; btnSubmit.Visible = false; btnUpdate.Visible = true; } protected void btnUpdate_Click(object sender, EventArgs e) { con.Open(); SqlCommand cmd = new SqlCommand(“Update_StudentDetails”, con); cmd.CommandType = CommandType.StoredProcedure; cmd.Parameters.Add(“@StudentId”, SqlDbType.Int).Value = hfId.Value; cmd.Parameters.Add(“@StudentName”, SqlDbType.VarChar).Value = txtStudentName.Text; cmd.Parameters.Add(“@Age”, SqlDbType.Int).Value = txtAge.Text; int result = cmd.ExecuteNonQuery(); if (result > 0) { Response.Write(“Updated Successfully”); } con.Close(); BindGrid(); btnClear_Click(null, null); } protected void btnClear_Click(object sender, EventArgs e) { txtStudentName.Text = string.Empty; txtAge.Text = string.Empty; hfId.Value = string.Empty; } } |
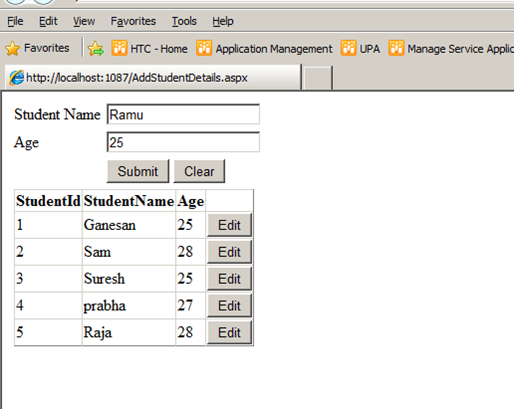
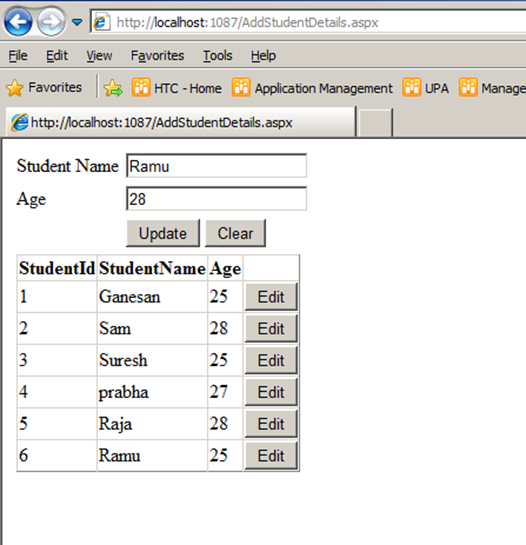
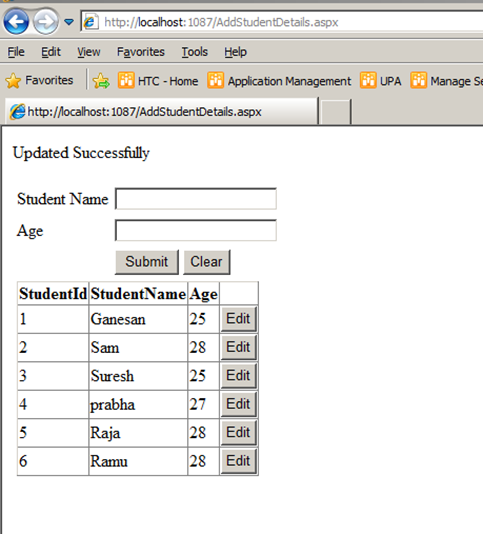
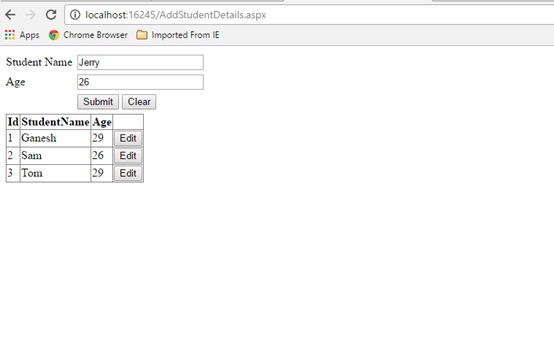
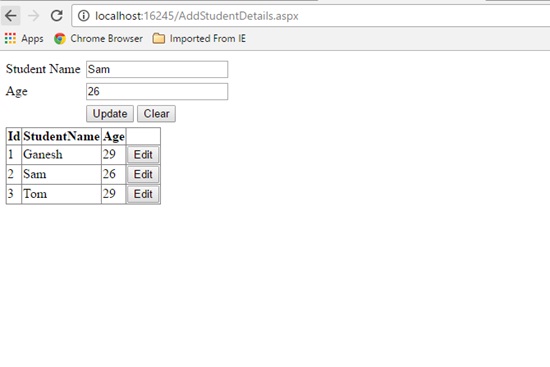
Screenshot as below,
The Output will be as below,

Click below to download the solution,
https://1drv.ms/u/s!ArddhCoxftkQg6of7HjHOGOkB8IMXA
Asp.net Validation Controls
Document by Ganesan -ganesanva@hotmail.com – + 919600370429
List of Asp.net Validation available are as follows,
1.Required Field validator
2.Regular Expression validator
3.Range Validator
4.Custom Validator
5.Compare Validator
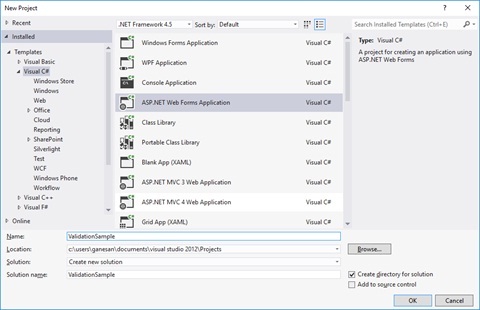
Create a new Asp.net Web application
File -> New Project
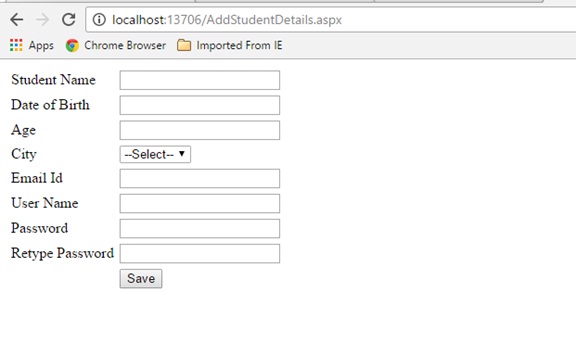
Right click on the solution and Add New web form page AddStudentDetails.aspx as below,

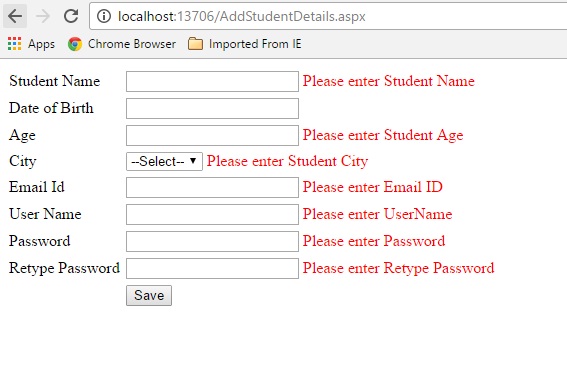
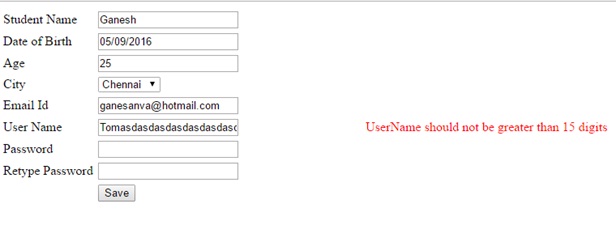
Replace the HTML Tag in AddStudentDetails.aspx with below snippet,
| <html xmlns=”http://www.w3.org/1999/xhtml”> <head runat=”server”> <title></title> </head> <body> <form id=”form1″ runat=”server”> <div> <table border=”0″ cellspacing=”2″ cellpadding=”2″> <tr> <td>Student Name </td> <td> <asp:TextBox ID=”txtStudentName” runat=”server”></asp:TextBox> <asp:RequiredFieldValidator ID=”RQStudentName” runat=”server” ControlToValidate=”txtStudentName” ErrorMessage=”Please enter Student Name” ForeColor=”Red”> </asp:RequiredFieldValidator> </td> </tr> <tr> <td> Date of Birth </td> <td> <asp:TextBox ID=”txtDOB” runat=”server”></asp:TextBox> <asp:RangeValidator ID=”Rvalid” runat=”server” ControlToValidate=”txtDOB” ErrorMessage=”Date of Birth should not be greater than current date” Type=”Date” ForeColor=”Red”></asp:RangeValidator> </td> </tr> <tr> <td> Age </td> <td> <asp:TextBox ID=”txtAge” runat=”server”></asp:TextBox> <asp:RequiredFieldValidator ID=”RqAge” runat=”server” ControlToValidate=”txtAge” ErrorMessage=”Please enter Student Age” ForeColor=”Red”> </asp:RequiredFieldValidator> <asp:RangeValidator ID=”RgAge” runat=”server” ControlToValidate=”txtAge” ErrorMessage=”Age should be greater than 18″ MinimumValue=”18″ ForeColor=”Red” MaximumValue=”2000″ Type=”Integer”></asp:RangeValidator> </td> </tr> <tr> <td> City </td> <td> <asp:DropDownList ID=”ddlCity” runat=”server”> <asp:ListItem Text=”–Select–” Value=”–Select–“></asp:ListItem> <asp:ListItem Text=”Chennai” Value=”Chennai”></asp:ListItem> <asp:ListItem Text=”Madurai” Value=”Madurai”></asp:ListItem> </asp:DropDownList> <asp:RequiredFieldValidator ID=”RqCity” runat=”server” InitialValue=”–Select–” ControlToValidate=”ddlCity” ErrorMessage=”Please enter Student City” ForeColor=”Red”> </asp:RequiredFieldValidator> </td> </tr> <tr> <td> Email Id </td> <td> <asp:TextBox ID=”txtEmailId” runat=”server”></asp:TextBox> <asp:RequiredFieldValidator ID=”RqEmailId” runat=”server” ControlToValidate=”txtEmailId” ErrorMessage=”Please enter Email ID” ForeColor=”Red”> </asp:RequiredFieldValidator> <asp:RegularExpressionValidator ID=”REVEmailId” runat=”server” ErrorMessage=”please enter correct email id” ControlToValidate=”txtEmailId” ValidationExpression=”\w+([-+.’]\w+)*@\w+([-.]\w+)*\.\w+([-.]\w+)*” ForeColor=”Red”></asp:RegularExpressionValidator> </td> </tr> <tr> <td> User Name </td> <td> <asp:TextBox ID=”txtUserName” runat=”server”></asp:TextBox> <asp:RequiredFieldValidator ID=”RequiredFieldValidator1″ runat=”server” ControlToValidate=”txtUserName” ErrorMessage=”Please enter UserName” ForeColor=”Red”> </asp:RequiredFieldValidator> <asp:CustomValidator ID=”CVUserName” runat=”server” ControlToValidate=”txtUserName” OnServerValidate=”CVUserName_ServerValidate” ErrorMessage=”UserName should not be greater than 15 digits” ForeColor=”Red”></asp:CustomValidator> </td> </tr> <tr> <td> Password </td> <td> <asp:TextBox ID=”txtPassword” runat=”server” TextMode=”Password”></asp:TextBox> <asp:RequiredFieldValidator ID=”RequiredFieldValidator2″ runat=”server” ControlToValidate=”txtPassword” ErrorMessage=”Please enter Password” ForeColor=”Red”> </asp:RequiredFieldValidator> </td> </tr> <tr> <td> Retype Password </td> <td> <asp:TextBox ID=”txtRetypePassword” runat=”server” TextMode=”Password”></asp:TextBox> <asp:RequiredFieldValidator ID=”RequiredFieldValidator3″ runat=”server” ControlToValidate=”txtRetypePassword” ErrorMessage=”Please enter Retype Password” ForeColor=”Red”> </asp:RequiredFieldValidator> <asp:CompareValidator ID=”cmpPasswordmatch” runat=”server” ControlToCompare=”txtPassword” ControlToValidate=”txtRetypePassword” ErrorMessage=”Password and Retype Password should not match” ForeColor=”Red”> </asp:CompareValidator> </td> </tr> <tr> <td></td> <td> <asp:Button ID=”btnSave” runat=”server” Text=”Save” CausesValidation=”true” OnClick=”btnSave_Click” /> </td> </tr> </table> </div> </form> </body> </html> |
Replace the AddStudentDetails.cs class with the below snippet,
| public partial class AddStudentDetails : System.Web.UI.Page { protected void Page_Load(object sender, EventArgs e) { Rvalid.MinimumValue = DateTime.MinValue.ToString(“dd-MM-yyyy”); Rvalid.MaximumValue = DateTime.Now.ToString(“dd-MM-yyyy”); } protected void CVUserName_ServerValidate(object source, ServerValidateEventArgs args) { args.IsValid = (args.Value.Length < 15); } protected void btnSave_Click(object sender, EventArgs e) { if (Page.IsValid) { Response.Write(“Saved”); } } } |
The Output as below,
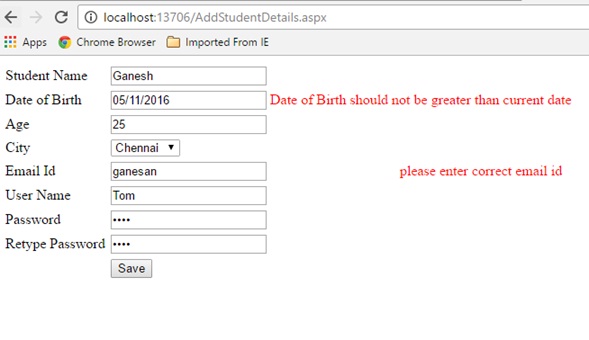
Custom Validation on server event,
Click below to download the solution,
https://1drv.ms/u/s!ArddhCoxftkQg6kmic1tyrHNsIbXqA
Asp.net CRUD operation with Ado.net
Document by Ganesan – Ganesanva@hotmail.com – + 919600370429
– Create Database in SQL as “StudentDB”
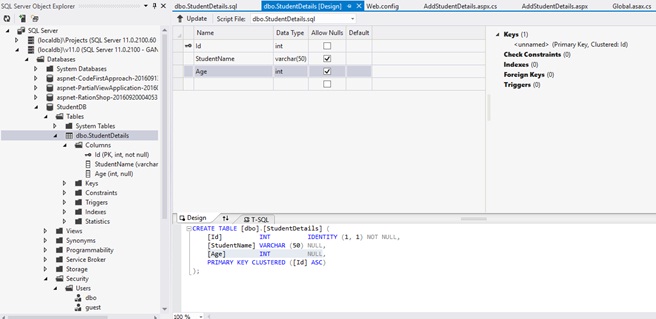
– Create Table “StudentDetails” with the below snippet,
| CREATE TABLE [dbo].[StudentDetails] ( [Id] INT IDENTITY (1, 1) NOT NULL, [StudentName] VARCHAR (50) NULL, [Age] INT NULL, PRIMARY KEY CLUSTERED ([Id] ASC) ); |
You can see the DB created in local SQL express as below,
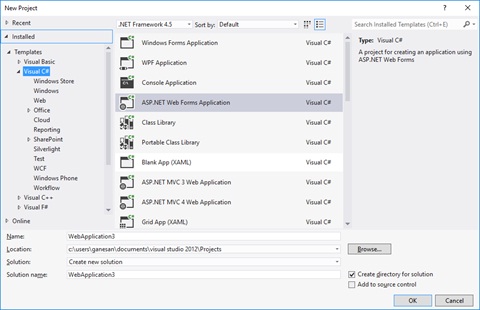
– Create a new Asp.net Web forms Application as below
File –> New Project
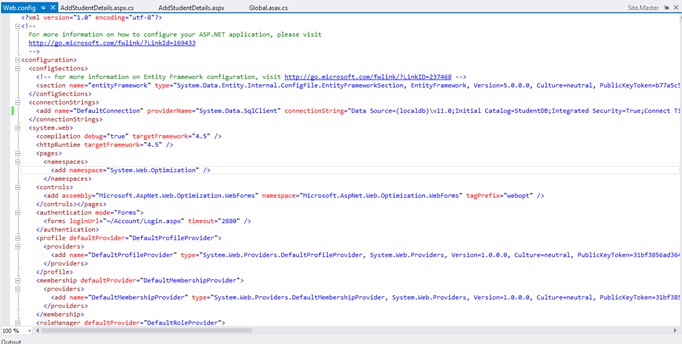
Add the Connection string in Web.config as below snippet,
| <connectionStrings> <add name=”DefaultConnection” providerName=”System.Data.SqlClient” connectionString=”Data Source=(localdb)\v11.0;Initial Catalog=StudentDB;Integrated Security=True;Connect Timeout=15;Encrypt=False;TrustServerCertificate=False” /> </connectionStrings> |
Add new Page as AddStudentDetails.aspx as below,
Replace the Below HTML code in AddStudentDetails.aspx file as below,
| <html xmlns=”http://www.w3.org/1999/xhtml”> <head runat=”server”> <title></title> </head> <body> <form id=”form1″ runat=”server”> <div> <table border=”0″ cellspacing=”2″ cellpadding=”2″> <tr> <td> <asp:Label ID=”lblStudentName” runat=”server” Text=”Student Name”></asp:Label> </td> <td> <asp:TextBox ID=”txtStudentName” runat=”server”></asp:TextBox> </td> </tr> <tr> <td> <asp:Label ID=”lblAge” runat=”server” Text=”Age”></asp:Label> </td> <td> <asp:TextBox ID=”txtAge” runat=”server”></asp:TextBox> </td> </tr> <tr> <td></td> <td> <asp:Button ID=”btnSubmit” runat=”server” Text=”Submit” OnClick=”btnSubmit_Click” /> <asp:Button ID=”btnUpdate” runat=”server” Text=”Update” OnClick=”btnUpdate_Click” /> <asp:Button ID=”btnClear” runat=”server” Text=”Clear” OnClick=”btnClear_Click” /> <asp:HiddenField ID=”hfId” runat=”server”></asp:HiddenField> </td> </tr> <tr> <td colspan=”2″> <asp:GridView ID=”grvStudentDetails” runat=”server” AutoGenerateColumns=”false”> <Columns> <asp:BoundField DataField=”Id” HeaderText=”Id” /> <asp:BoundField DataField=”StudentName” HeaderText=”StudentName” /> <asp:BoundField DataField=”Age” HeaderText=”Age” /> <asp:TemplateField> <ItemTemplate> <asp:Button ID=”btnEdit” runat=”server” Text=”Edit” OnClick=”btnEdit_Click” /> </ItemTemplate> </asp:TemplateField> </Columns> </asp:GridView> </td> </tr> </table> </div> </form> </body> </html> |
Replace the AddStudentDetails.aspx.cs file as below,
| public partial class AddStudentDetails : System.Web.UI.Page { SqlConnection con = new SqlConnection(ConfigurationManager.ConnectionStrings[“DefaultConnection”].ToString()); protected void Page_Load(object sender, EventArgs e) { if (!Page.IsPostBack) { BindGrid(); } } private void BindGrid() { btnSubmit.Visible = true; btnUpdate.Visible = false; SqlCommand cmd = new SqlCommand(“Select * from StudentDetails”, con); SqlDataAdapter ada = new SqlDataAdapter(cmd); DataSet ds = new DataSet(); ada.Fill(ds); grvStudentDetails.DataSource = ds.Tables[0]; grvStudentDetails.DataBind(); } protected void btnSubmit_Click(object sender, EventArgs e) { con.Open(); SqlCommand cmd = new SqlCommand(“insert into StudentDetails values(‘”+txtStudentName.Text+”‘,”+txtAge.Text+”)”, con); int result=cmd.ExecuteNonQuery(); if (result > 0) { Response.Write(“Inserted Successfully”); } con.Close(); BindGrid(); btnClear_Click(null, null); } protected void btnEdit_Click(object sender, EventArgs e) { Button btn = (Button)sender; //Get the row that contains this button GridViewRow gvr = (GridViewRow)btn.NamingContainer; hfId.Value = gvr.Cells[0].Text; txtStudentName.Text = gvr.Cells[1].Text; txtAge.Text = gvr.Cells[2].Text; btnSubmit.Visible = false; btnUpdate.Visible = true; } protected void btnUpdate_Click(object sender, EventArgs e) { con.Open(); SqlCommand cmd = new SqlCommand(“Update StudentDetails set StudentName='” + txtStudentName.Text + “‘,Age=” + txtAge.Text + ” where Id=”+hfId.Value, con); int result = cmd.ExecuteNonQuery(); if (result > 0) { Response.Write(“Updated Successfully”); } con.Close(); BindGrid(); btnClear_Click(null, null); } protected void btnClear_Click(object sender, EventArgs e) { txtStudentName.Text = string.Empty; txtAge.Text = string.Empty; hfId.Value = string.Empty; } } |
Run the solution.
The Output will be below,
Click below to download the solution,
https://1drv.ms/u/s!ArddhCoxftkQg6h98mZAX_-Zv-6reQ
Recent Posts
Categories
- All
- Angularjs training in Chennai
- ASP.NET Core
- dot net training
- dot net training in chennai
- dotnet full stack developer
- Free dotnet training
- information on dotnet
- Learn Java in chennai
- Learn Python at Karaikudi
- learn python online
- learn python online from chennai
- Linq Queries in .net
- mutual funds
- MVC Training Tutorials
- PHP Training in Chennai
- pmp training online
- power apps online training
- Python Training Online
- share market
- Sharepoint framework online training
- SharePoint Freelancers in Chennai
- software testing
- spfx online training
- Stock market
- Uncategorized