5 Points to Check Before Enrolling in Dot Net Courses and Training in Chennai
Do you want to learn the basic to advance level dot Net syllabus to become a proficient dot Net developer in the future? If yes, you should join the best dot Net training programs or courses offered by the leading software learning and training institutions in Chennai. In the city, you will find many reputed software training and course institutions, where students can join a variety of software courses and training programs in different IT languages like dot Net, Java, XML, HTML, CSS, and more. Among all such courses, many students are joining the dot Net training and courses in Chennai-based institutions. Nowadays, there is huge demand seen for dot Net developers in the I.T. industry. The students have good command over dot Net language and its coding skills, they can get high salary jobs in the top I.T. companies in India and abroad as well. Hence, it is a good career option for tech-savvy to join the best dot Net training programs and courses available at the recognized software institutions in Chennai.
If you are willing to join the best dot Net courses in Chennai, you need to check some relevant points about the institution and its dot Net training program as follows:
- Recognition of Institution
It is advised to join the dot Net training program or courses in Chennai-based institutions which have government recognition first. Make sure, the software learning institute has a good reputation in the industry and has a proven track record of providing good and career-oriented software courses and dot Net training or live project programs for fresher and experienced candidates.
- Best Dot Net Courses and Training Programs
You should check with an IT or software institution in Chennai that provides the best industry-based dot Net courses and training programs for students. Make sure, the institution provides the best courses and training programs for dot Net language to learn from scratch and enhance programming skills too. Besides, the syllabus of dot Net courses should include all basic to advance lessons of the language to guide the main framework of the software development life cycle to the students.
- Training on Live Projects
At the best software institutions in Chennai, India, you will get the opportunity to get training on the live dot Net projects. However, it will help the students to explore good coding skills and practice them well to use on live dot Net software projects under the guidance of trained dot Net trainers and developers.
- Experienced Dot Net Faculty and Trainers
You should also check with software learning institutions in Chennai that it includes the best dot net faculties and trainers in the industry. Make sure, the faculty and trainers have a vast knowledge of all types of dot Net lessons and courses to guide the students. Also, they must be experienced in teaching dot Net courses to the students and help them in live training projects too.
- Dot Net Course Fees
Finally, you should compare the fee structure of dot Net courses and training programs at the top software learning institutions in Chennai. You should join the dot Net course in the best institution which provides such courses at affordable charges.
Thus, you need to check all the above points before joining the dot Net training courses or getting services of the dot Net freelancers in Chennai, India.
Dot net CRUD operation with Ms access database
Save the MS access db as db1.mdb file (Access 2000 Database file format) as shown below.
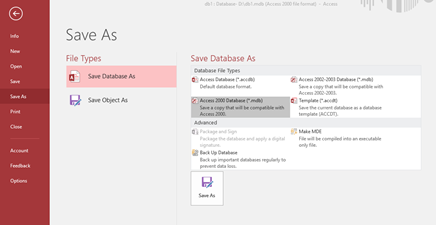
-
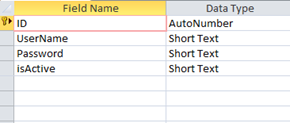
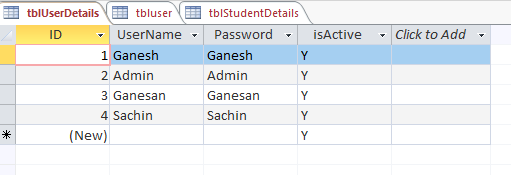
Create a table tblUserDetails in MS access with below columns.
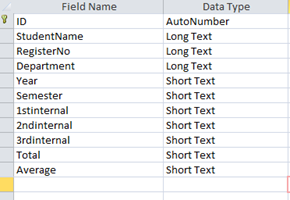
Create a table tblStudentDetails with the below columns.
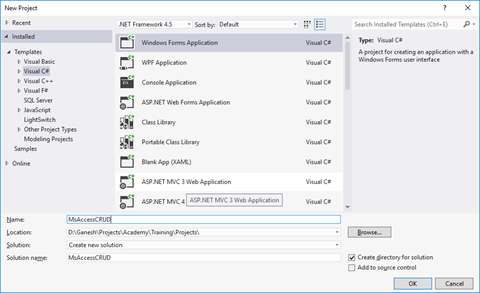
Create a new windows Application project MsAccessCRUD
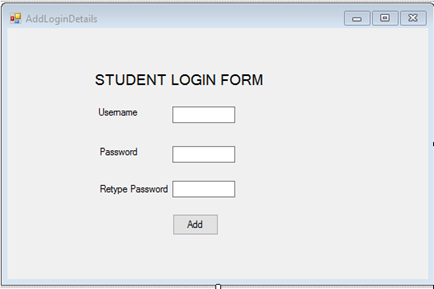
Add a windows form AddLoginDetails.cs
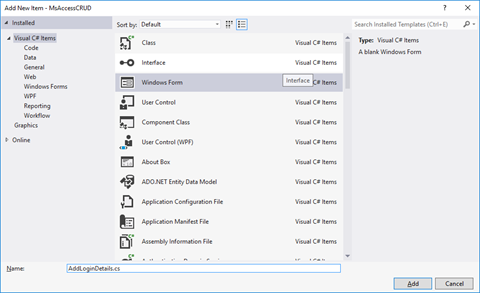
Design the form as below,
Replace the AddLoginDetails class file as below,
| public partial class AddLoginDetails : Form { public AddLoginDetails() { InitializeComponent(); } private void btnLogin_Click(object sender, EventArgs e) { System.Data.OleDb.OleDbConnection conn = new System.Data.OleDb.OleDbConnection(); conn.ConnectionString = @”Provider=Microsoft.Jet.OLEDB.4.0;” + @”Data source= D:\db1.mdb”; OleDbCommand cmd = new OleDbCommand(); cmd.CommandType = CommandType.Text; cmd.CommandText = @”Insert Into tblUserDetails(UserName,[Password])VALUES(‘”+txtUserName.Text+”‘,'”+txtPassword.Text+”‘)”; cmd.Connection = conn; conn.Open(); cmd.ExecuteNonQuery(); System.Windows.Forms.MessageBox.Show(“Record Successfully Created”); StudentLogin objStudentLogin = new StudentLogin(); objStudentLogin.Show(); this.Hide(); conn.Close(); } } |
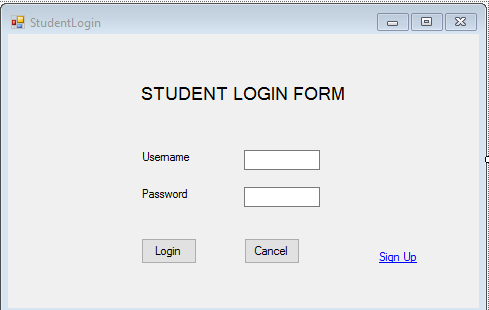
Add New form StudentLogin.cs and design as below,
Replace the StudentLogin Class with below code,
| public partial class StudentLogin : Form { public StudentLogin() { InitializeComponent(); } private void Button2_Click(object sender, EventArgs e) { // txtUserName.Text System.Data.OleDb.OleDbConnection conn = new System.Data.OleDb.OleDbConnection(); conn.ConnectionString = @”Provider=Microsoft.Jet.OLEDB.4.0;” + @”Data source= D:\db1.mdb”; OleDbCommand cmd = new OleDbCommand(); cmd.CommandType = CommandType.Text; cmd.CommandText = @”select * from tblUserDetails where Password='” +txtPassword.Text +”‘”; cmd.Connection = conn; conn.Open(); OleDbDataReader OleDBDR = cmd.ExecuteReader(); while (OleDBDR.Read()) { string value= OleDBDR[0].ToString(); System.Windows.Forms.MessageBox.Show(“Login Successful”); ShowStudentDetails objform = new ShowStudentDetails(); objform.Show(); this.Hide(); } conn.Close(); } private void Button1_Click(object sender, EventArgs e) { } private void linkLabel1_LinkClicked(object sender, LinkLabelLinkClickedEventArgs e) { AddLoginDetails obj = new AddLoginDetails(); obj.Show(); this.Hide(); } } |
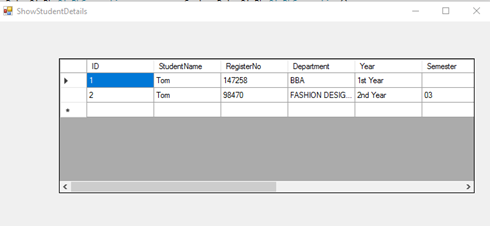
Add a new form ShowStudentDetails.cs and design the form as below,
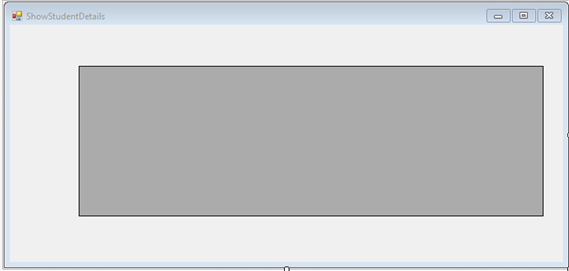
Replace the ShowStudentDetails.cs class file with below code,
| public partial class ShowStudentDetails : Form { public ShowStudentDetails() { InitializeComponent(); } private void ShowStudentDetails_Load(object sender, EventArgs e) { System.Data.OleDb.OleDbConnection conn = new System.Data.OleDb.OleDbConnection(); conn.ConnectionString = @”Provider=Microsoft.Jet.OLEDB.4.0;” + @”Data source= D:\db1.mdb”; OleDbCommand cmd = new OleDbCommand(); cmd.CommandType = CommandType.Text; cmd.CommandText = @”select * from tblStudentDetails”; cmd.Connection = conn; conn.Open(); OleDbDataAdapter ada = new OleDbDataAdapter(cmd); DataSet ds = new DataSet(); ada.Fill(ds); dgvStudentdetails.DataSource = ds.Tables[0]; conn.Close(); } } |
The solution explorer will look as below,
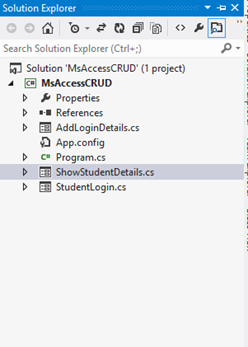
Replace the connection string for Ms access database before running the solution, now its d:\db1.mdb
The Output as below,
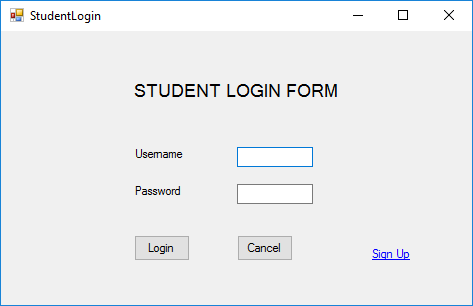
Click on Sign Up,

Click Add.
Ms Access DB as below,
Click below to download the solution,
Send mail to users from gmail account using c#.net
Document by Alagappan -ganesanva@hotmail.com – + 919042710472
Click on File –> New Project in Visual Studio. Enter the solution name as MailUser.
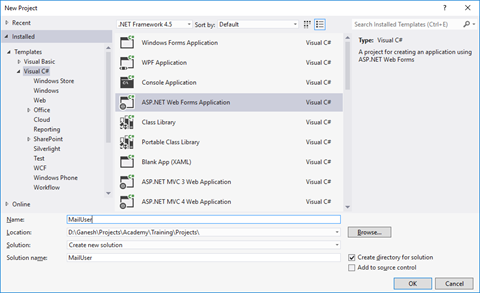
Click OK
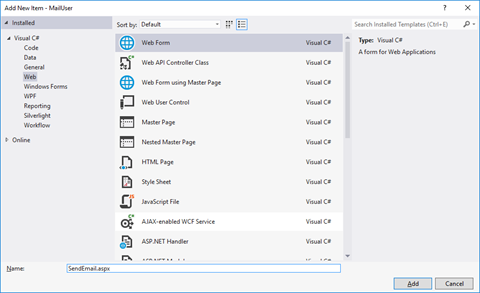
Right Click on the Project and add new item.
Add new form with name SendEmail.aspx
Put / Replace the below code in SendEmail.aspx
| <!DOCTYPE html> <html xmlns=”http://www.w3.org/1999/xhtml”> <head runat=”server”> <title></title> </head> <body> <form id=”form1″ runat=”server”> <div> <table border=”0″ cellspacing=”2″ cellpadding=”2″> <tr> <td> Email To </td> <td> <asp:TextBox ID=”txtMailTo” runat=”server”></asp:TextBox> </td> </tr> <tr> <td> Subject </td> <td> <asp:TextBox ID=”txtSubject” runat=”server”></asp:TextBox> </td> </tr> <tr> <td> Body </td> <td> <asp:TextBox ID=”txtBody” runat=”server” TextMode=”MultiLine”></asp:TextBox> </td> </tr> <tr> <td> </td> <td> <asp:Button ID=”btnSend” runat=”server” Text=”Send” OnClick=”btnSend_Click” /> </td> </tr> </table> </div> </form> </body> </html> |
Put / Replace the below code In SendEmail.aspx.cs
| public partial class SendEmail : System.Web.UI.Page { protected void Page_Load(object sender, EventArgs e) { } protected void btnSend_Click(object sender, EventArgs e) { string result=SendEmailtousers(txtMailTo.Text, txtSubject.Text, txtBody.Text); Response.Write(result); } protected string SendEmailtousers(string toAddress, string subject, string body) { string result = “Message Sent Successfully..!!”; string senderID = WebConfigurationManager.AppSettings[“SenderID”];// use sender’s email id here.. string senderPassword = WebConfigurationManager.AppSettings[“SenderPassword”]; // sender password here… try { SmtpClient smtp = new SmtpClient { Host = “smtp.gmail.com”, Port = 587, EnableSsl = true, DeliveryMethod = SmtpDeliveryMethod.Network, Credentials = new System.Net.NetworkCredential(senderID, senderPassword), Timeout = 30000, }; MailMessage message = new MailMessage(senderID, toAddress, subject, body); message.CC.Add(WebConfigurationManager.AppSettings[“CCMail”]); smtp.Send(message); } catch (Exception ex) { result = “Error sending email.!!!””; } return result; } } |
Add the below code in web.config below Connectionstrings tag
| <appSettings> <add key=”SenderID” value=”ganesvija@gmail.com”/> <add key=”SenderPassword” value=”*****”/> <add key=”CCMail” value=”ganesanva@hotmail.com”/> </appSettings> |
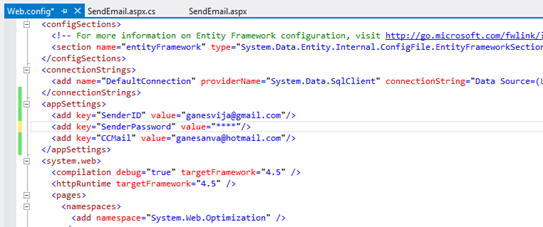
Replace **** with actual password in key SenderPassword.
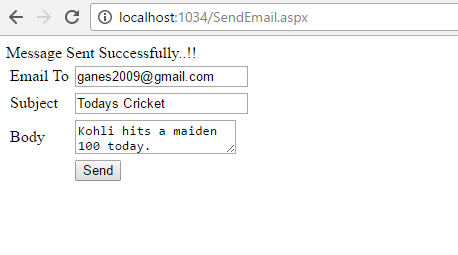
Run the solution.
The Output as below,
GMAIL inbox,

Note:
In order to trigger mail from client, Enable this on the From Address Gmail account.
Turn on Allow for Less Secure apps.
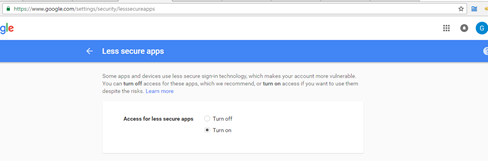
https://www.google.com/settings/security/lesssecureapps
Reference:
https://support.google.com/accounts/answer/6010255?hl=en
Click below to download the solution,
https://1drv.ms/u/s!ArddhCoxftkQg7UPuVICB-batxhXag
State management in Asp.net
Document by Vairavan – Ganesanva@hotmail.com – +919042710472
There are 2 types of state management
1.Server side
2.Client Side
Client Side
- View State
- Hidden Fields
- Cookies
- Query strings
Server Side
- Application state
- Session state
View state
It allows to maintain the value with in the page
Hidden Fields
It is the control in Asp.net used to store value with in the page. It does not shows visibility in the page.
Cookies
It is the small amount of data stored in client browser session
Query string
IT allows to pass the data from one page to another in the browser URL.
Application state:
Asp.net allows to save values using Application state in HttpApplicationstate class.
Session State:
It allows to store data in the server side using HttpSessionState class.
Create a new Project File –>New Project in Visual studio
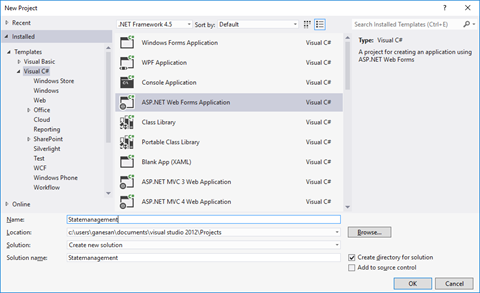
Click ok.
Right Click on the solution and Add New Item.
Select Web form and Name GetValues.aspx.

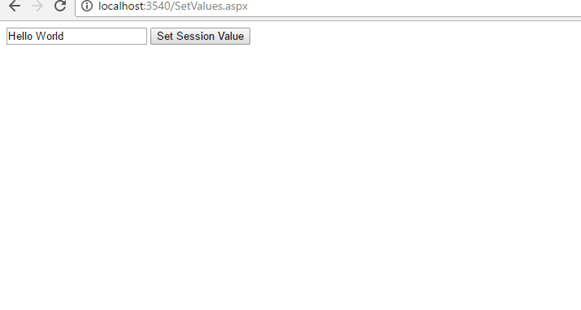
Add one another form as SetValues.aspx
Put / Replace the below HTML in SetValues.aspx
| <!DOCTYPE html> <html xmlns=”http://www.w3.org/1999/xhtml”> <head runat=”server”> <title></title> </head> <body> <form id=”form1″ runat=”server”> <div> <asp:TextBox ID=”txtsessionvalue” runat=”server”></asp:TextBox> <asp:Button ID=”btnSetSession” runat=”server” Text=”Set Session Value” OnClick=”btnSetSession_Click” /> </div> </form> </body> </html> |
Put / Replace the below code in SetValues.aspx.cs
| public partial class SetValues : System.Web.UI.Page { protected void Page_Load(object sender, EventArgs e) { } protected void btnSetSession_Click(object sender, EventArgs e) { Session[“Uservalue”] = txtsessionvalue.Text; Response.Redirect(“GetValues.aspx?ID=2”); } } |
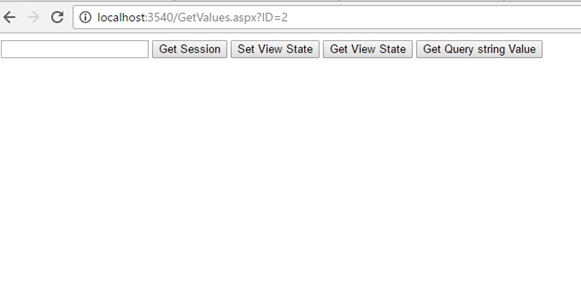
Put / Replace the below HTML in GetValues.aspx
| <!DOCTYPE html> <html xmlns=”http://www.w3.org/1999/xhtml”> <head runat=”server”> <title></title> </head> <body> <form id=”form1″ runat=”server”> <div> <asp:TextBox ID=”txtviewstate” runat=”server”></asp:TextBox> <asp:Button ID=”btnGetSession” runat=”server” Text=”Get Session” OnClick=”btnGetSession_Click” /> <asp:Button ID=”btnSetViewState” runat=”server” Text=”Set View State” OnClick=”btnSetViewState_Click” /> <asp:Button ID=”btnGetViewState” runat=”server” Text=”Get View State” OnClick=”btnGetViewState_Click” /> <asp:Button ID=”btnGetQuerystringvalue” runat=”server” Text=”Get Query string Value” OnClick=”btnGetQuerystringvalue_Click” /> </div> </form> </body> </html> |
Put / Replace the below code in GetValues.aspx.cs
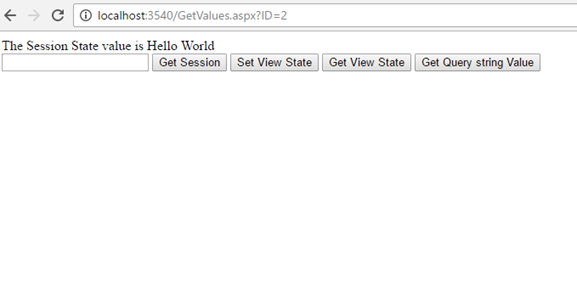
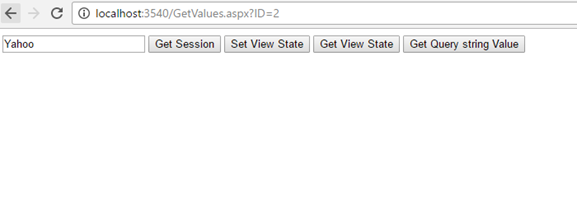
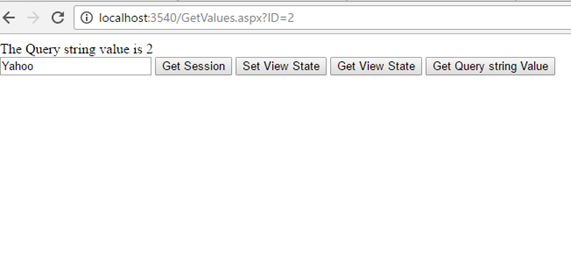
| public partial class GetValues : System.Web.UI.Page { protected void Page_Load(object sender, EventArgs e) { } protected void btnGetSession_Click(object sender, EventArgs e) { string sessionvalue = (string)Session[“Uservalue”]; Response.Write(“The Session State value is ” + sessionvalue); } protected void btnSetViewState_Click(object sender, EventArgs e) { ViewState[“data”] = txtviewstate.Text; } protected void btnGetViewState_Click(object sender, EventArgs e) { string viewstatevalue = (string)ViewState[“data”]; Response.Write(“The view State value is “+viewstatevalue); } protected void btnGetQuerystringvalue_Click(object sender, EventArgs e) { string QueryStringvalue = (string)Request.QueryString[“ID”]; Response.Write(“The Query string value is ” + QueryStringvalue); } } |
The Output as below,

Click below to download the solution,
https://1drv.ms/u/s!ArddhCoxftkQg617pH3vPsuhyrHvDA
Asp.net MVC Course content
Document by Vairavan – enquiry@softwaretraininginchennai.com – + 919042710472
- MVC Architecture
- Benefits of Asp.net MVC
- Explanation on Model, View and Controller.
- Filters in MVC
- View models
- JQuery and JavaScript
- Entity Framework with Asp.net
- Code First Approach
- Database First Approach
- POCO Generator
- Data Annotation in MVC
- Custom Data Annotation
- Textbox, Option button ,List box ,Dropdown controls in MVC
- Ajax call in MVC
- Dependency Injection
- MVC with Bootstrap controls
- Layered Architecture in MVC
- Working with Areas
- Partial Views
- Working with Web api
- WCF Consumption in ASP.net MVC
- Convert Asp.net web application to MVC application
- MVC with Angular JS
- Sample Project on MVC
Recent Posts
Categories
- All
- Angularjs training in Chennai
- ASP.NET Core
- dot net training
- dot net training in chennai
- dotnet full stack developer
- Free dotnet training
- information on dotnet
- Learn Java in chennai
- Learn Python at Karaikudi
- learn python online
- learn python online from chennai
- Linq Queries in .net
- mutual funds
- MVC Training Tutorials
- PHP Training in Chennai
- pmp training online
- power apps online training
- Python Training Online
- share market
- Sharepoint framework online training
- SharePoint Freelancers in Chennai
- software testing
- spfx online training
- Stock market
- Uncategorized