Software Testing
Testing:
The process of testing involves running a program to look for errors. The software must be error-free to function properly. The software will be free of all errors if testing is successful.
Guidelines for Testing:
- The client requirements should be met by all testing.
- software should be tested by a third party.
- It is not possible to conduct elaborative testing. Because we need the least amount of testing possible based on the application’s risk assessment.
- All tests should be planned before they are carried out.
- Test small parts first, then progress to larger parts.
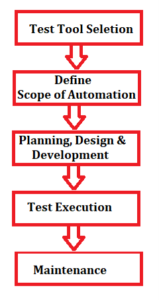
Types of testing:
- Manual Testing
- Automatic Testing
Manual Testing:
Manual testing is a method of software testing in which test cases are executed manually rather than using an automated tool. Manual testing is one of the most fundamental testing processes because it can trace both visible and hidden software defects. All test cases are manually executed by the tester from the perspective of the end user. Test case reports are manually created.
Types of Manual Testing
o White Box Testing – Developers perform white box testing, which involves checking every line of code before passing it to the Test Engineer. Because the code is visible to the developer during testing, it is also known as white box testing.
o Black Box Testing – The Test Engineer performs black box testing to ensure that an application or software meets the needs of the customer or client. The code is not visible while testing, which is why it is referred to as black-box testing.
o Gray Box Testing – Gray box testing is a hybrid of white box and black box testing methods. It can be done by someone who is familiar with both coding and testing. Gray box testing is used when a single person performs both white box and black box testing for an application.
Why is Manual Testing preferred?
- It doesn’t require any programming knowledge and easy to learn for new testers.
- It ensures that the software is a hundred percent bug-free and a cost-effective method
- It is used to test GUI designs that change dynamically
- The Tester interacts with software as a real user
Drawbacks of Manual Testing:
- It generally requires a large amount of human resources and a very time consuming method.
- It does not test for all aspects of testing.
Automatic Testing
Automated testing is a technique in which the tester writes their own scripts and uses appropriate software or an automation tool to test the software.
It is a manual process that has been automated. It Allows repetitive tasks to be completed without the intervention of a Manual Tester.
Automation Testing Process:
Some Popular Automation Tools are Selenium, QTP, TestNG, etc
Advantages of Automation Testing:
- Simplifies the execution of test cases
- Increases the Reliability of Tests
- Minimizes Human Interaction
- It saves both time and money.
- increases the number of tests covered
Selenium automation testing:
Selenium is a free (open source), popular automated web application testing framework. It is a browser-based automation framework that simulates and automates user actions. Selenium is a collection of tools that serve a variety of Selenium automation testing needs. Selenium automation testing is a test that is run using the Selenium framework.
Selenium Test Scripts can be written in a variety of programming languages, including Java, C#, and Python.
Selenium is simple to install on platforms such as Windows, Linux, Solaris, and Macintosh. Furthermore, it supports operating systems (OS) for mobile applications such as iOS, Windows Mobile, and Android.
Selenium supports Internet Explorer, Mozilla Firefox, Google Chrome, and Safari browsers.
Selenium can be used to automate functional tests and is compatible with automation testing tools like Maven, Jenkins, and Docker to achieve continuous testing. It can also be used in conjunction with tools like TestNG and JUnit to manage test cases and generate reports.
CRUD in ASP.net web application using Stored procedure
Document by Maria Academy – mariatrainingacademy@gmail.com – +919042710472
Create Database in SQL server as below,
| Create database StudentDB |
Create StudentDetails table using the below script,
| CREATE TABLE [dbo].[StudentDetails]( [StudentId] [int] IDENTITY(1,1) NOT NULL, [StudentName] [varchar](100) NULL, [Age] [int] NULL ) ON [PRIMARY] |
Run the below Stored Procedures in SQL Server,
| create Proc [dbo].[Ins_StudentDetails] @StudentName varchar(100), @Age int as begin INSERT INTO [StudentDetails] ([StudentName] ,[Age]) VALUES (@StudentName ,@Age) |
| create Proc [dbo].[Select_StudentDetails] as begin select * from StudentDetails end |
| create Proc [dbo].[Update_StudentDetails] @StudentId int, @StudentName varchar(100), @Age int as begin UPDATE [StudentDetails] SET [StudentName] = @StudentName ,[Age] = @Age WHERE StudentId=@StudentId end |
Create a new Asp.net web application CRUDinProcedure as below,
File -> New Project
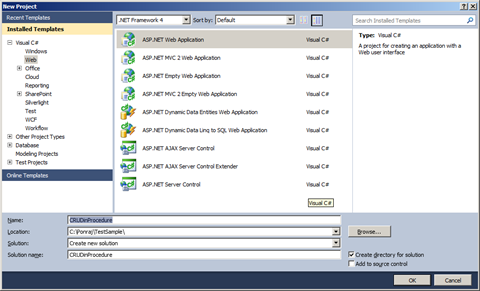
Click OK.
Solution Explorer as below,
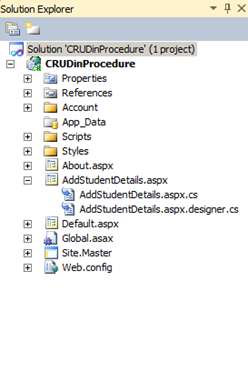
Add new Page AddStudentDetails.aspx
Put / Replace the below code in AddStudentDetails.aspx
| <html xmlns=”http://www.w3.org/1999/xhtml”> <head id=”Head1″ runat=”server”> <title></title> </head> <body> <form id=”form1″ runat=”server”> <div> <table border=”0″ cellspacing=”2″ cellpadding=”2″> <tr> <td> <asp:Label ID=”lblStudentName” runat=”server” Text=”Student Name”></asp:Label> </td> <td> <asp:TextBox ID=”txtStudentName” runat=”server”></asp:TextBox> </td> </tr> <tr> <td> <asp:Label ID=”lblAge” runat=”server” Text=”Age”></asp:Label> </td> <td> <asp:TextBox ID=”txtAge” runat=”server”></asp:TextBox> </td> </tr> <tr> <td></td> <td> <asp:Button ID=”btnSubmit” runat=”server” Text=”Submit” OnClick=”btnSubmit_Click” /> <asp:Button ID=”btnUpdate” runat=”server” Text=”Update” OnClick=”btnUpdate_Click” /> <asp:Button ID=”btnClear” runat=”server” Text=”Clear” OnClick=”btnClear_Click” /> <asp:HiddenField ID=”hfId” runat=”server”></asp:HiddenField> </td> </tr> <tr> <td colspan=”2″> <asp:GridView ID=”grvStudentDetails” runat=”server” AutoGenerateColumns=”false”> <Columns> <asp:BoundField DataField=”StudentId” HeaderText=”StudentId” /> <asp:BoundField DataField=”StudentName” HeaderText=”StudentName” /> <asp:BoundField DataField=”Age” HeaderText=”Age” /> <asp:TemplateField> <ItemTemplate> <asp:Button ID=”btnEdit” runat=”server” Text=”Edit” OnClick=”btnEdit_Click” /> </ItemTemplate> </asp:TemplateField> </Columns> </asp:GridView> </td> </tr> </table> </div> </form> </body> </html> |
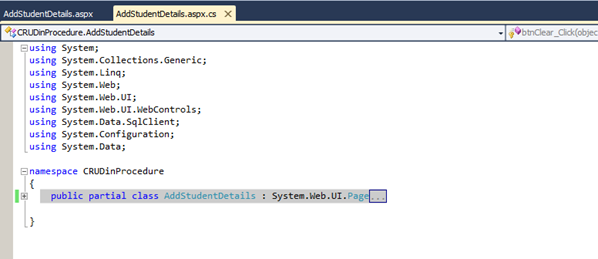
Replace the below code in AddStudentDetails.aspx.cs,
| public partial class AddStudentDetails : System.Web.UI.Page { SqlConnection con = new SqlConnection(ConfigurationManager.ConnectionStrings[“DefaultConnection”].ToString()); protected void Page_Load(object sender, EventArgs e) { if (!Page.IsPostBack) { BindGrid(); } } private void BindGrid() { btnSubmit.Visible = true; btnUpdate.Visible = false; SqlCommand cmd = new SqlCommand(“Select_StudentDetails”, con); cmd.CommandType = CommandType.StoredProcedure; SqlDataAdapter ada = new SqlDataAdapter(cmd); DataSet ds = new DataSet(); ada.Fill(ds); grvStudentDetails.DataSource = ds.Tables[0]; grvStudentDetails.DataBind(); } protected void btnSubmit_Click(object sender, EventArgs e) { con.Open(); SqlCommand cmd = new SqlCommand(“Ins_StudentDetails”, con); cmd.CommandType = CommandType.StoredProcedure; cmd.Parameters.Add(“@StudentName”, SqlDbType.VarChar).Value = txtStudentName.Text; cmd.Parameters.Add(“@Age”, SqlDbType.Int).Value = txtAge.Text; int result = cmd.ExecuteNonQuery(); if (result > 0) { Response.Write(“Inserted Successfully”); } con.Close(); BindGrid(); btnClear_Click(null, null); } protected void btnEdit_Click(object sender, EventArgs e) { Button btn = (Button)sender; //Get the row that contains this button GridViewRow gvr = (GridViewRow)btn.NamingContainer; hfId.Value = gvr.Cells[0].Text; txtStudentName.Text = gvr.Cells[1].Text; txtAge.Text = gvr.Cells[2].Text; btnSubmit.Visible = false; btnUpdate.Visible = true; } protected void btnUpdate_Click(object sender, EventArgs e) { con.Open(); SqlCommand cmd = new SqlCommand(“Update_StudentDetails”, con); cmd.CommandType = CommandType.StoredProcedure; cmd.Parameters.Add(“@StudentId”, SqlDbType.Int).Value = hfId.Value; cmd.Parameters.Add(“@StudentName”, SqlDbType.VarChar).Value = txtStudentName.Text; cmd.Parameters.Add(“@Age”, SqlDbType.Int).Value = txtAge.Text; int result = cmd.ExecuteNonQuery(); if (result > 0) { Response.Write(“Updated Successfully”); } con.Close(); BindGrid(); btnClear_Click(null, null); } protected void btnClear_Click(object sender, EventArgs e) { txtStudentName.Text = string.Empty; txtAge.Text = string.Empty; hfId.Value = string.Empty; } } |
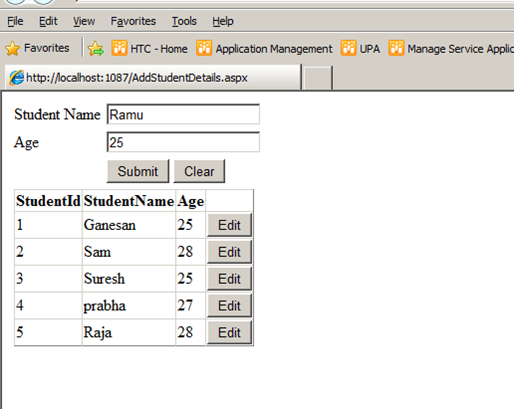
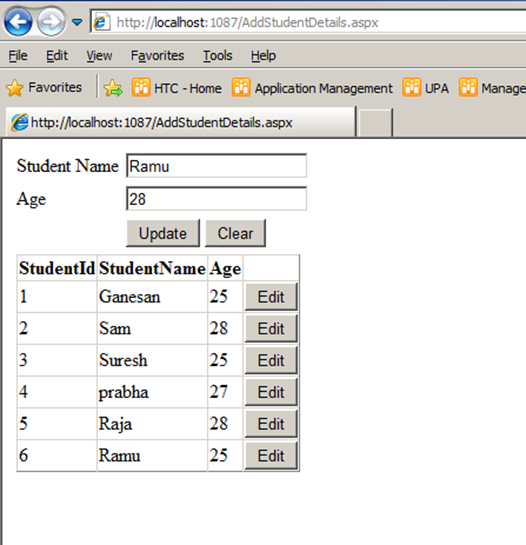
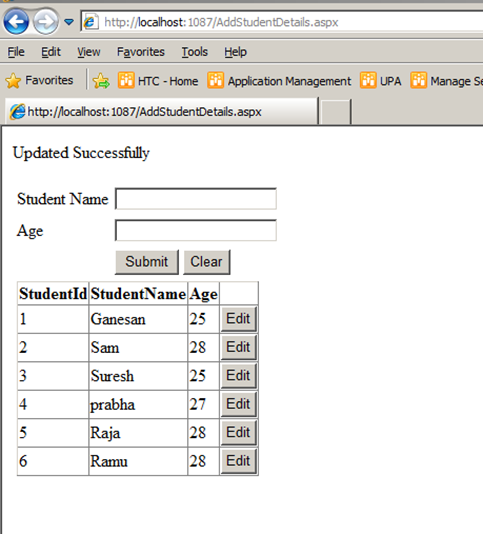
Screenshot as below,
The Output will be as below,

Click below to download the solution,
https://1drv.ms/u/s!ArddhCoxftkQg6of7HjHOGOkB8IMXA
Recent Posts
Categories
- All
- Angularjs training in Chennai
- ASP.NET Core
- dot net training
- dot net training in chennai
- dotnet full stack developer
- Free dotnet training
- information on dotnet
- Learn Java in chennai
- Learn Python at Karaikudi
- learn python online
- learn python online from chennai
- Linq Queries in .net
- mutual funds
- MVC Training Tutorials
- PHP Training in Chennai
- pmp training online
- power apps online training
- Python Training Online
- share market
- Sharepoint framework online training
- SharePoint Freelancers in Chennai
- software testing
- spfx online training
- Stock market
- Uncategorized