Why Industry-oriented Software Training Courses are preferred in Chennai
In an era defined by rapid technological evolution and digital transformation, the demand for highly skilled software professionals has surged exponentially. Both fresh graduates and seasoned professionals in Chennai are increasingly recognizing the imperative of pursuing industry-oriented software training courses to stay competitive, relevant, and future-ready. Among the numerous options available, Maria Academy stands as a distinguished leader, offering meticulously curated programs designed to bridge the skill gap between academia and industry demands.
The Imperative for Industry-Aligned Software Training
Traditional academic programs, while foundational, often fall short in equipping learners with the practical competencies required by contemporary IT enterprises. This discrepancy has catalyzed a shift towards software training courses and institutes in Chennai that emphasize real-world application, technical proficiency, and emerging technologies. Industry-aligned training enables learners to:
- Acquire hands-on experience with cutting-edge software tools, frameworks, and platforms
- Engage in live projects simulating real-world business challenges
- Develop problem-solving acumen and agile methodologies prevalent in software development cycles
- Enhance employability through targeted skill sets aligned with market requirements
- Cultivate soft skills and professional readiness for seamless workplace integration
For students embarking on their careers, such training significantly accelerates their transition from academic theory to professional excellence. For working professionals, it offers a strategic pathway for upskilling, career advancement, and role diversification in a rapidly shifting tech landscape.
Chennai: A Thriving Ecosystem for Software Education and Careers
Chennai’s stature as a prominent IT hub in India underpins its vibrant ecosystem of software training institutions. The city’s robust software industry, comprising multinational corporations, startups, and innovation centers, creates an ongoing demand for proficient talent. This ecosystem provides:
- Rich opportunities for experiential learning and internships within the local tech community
- Access to seasoned industry practitioners who bring invaluable insights to training programs
- Flexible course structures catering to the diverse needs of full-time students and working professionals
- Strong placement networks facilitating direct recruitment by leading IT firms
Maria Academy: Championing Industry-Centric Software Education in Chennai
What distinguishes Maria Academy from other software training institutes in Chennai is its unwavering commitment to delivering industry-centric education that empowers learners to excel in real-world environments.
- Curriculum Designed in Collaboration with Industry Experts: Ensures alignment with the latest technological advancements and employer expectations.
- Experienced Faculty with Professional Industry Backgrounds: Facilitates mentorship that blends theory with practical insights.
- Project-Centric Pedagogy: Enables learners to work on comprehensive projects that replicate challenges faced by software professionals.
- Flexible Learning Modalities: Offers weekday, weekend, and online training options to accommodate diverse learner schedules.
- Dedicated Placement Assistance: Leverages extensive industry partnerships to secure internships and job placements for graduates.
Strategic Benefits for Learners
For students, Maria Academy’s programs provide a competitive advantage, equipping them with the skills and confidence to navigate rigorous recruitment processes and excel in entry-level roles.
For working professionals, the academy serves as a catalyst for career growth, enabling skill augmentation in emerging domains such as Artificial Intelligence, Cloud Computing, Data Analytics, and DevOps, thereby opening avenues for promotions and lateral career shifts.
In both cases, the comprehensive support system encompassing mentorship, career counseling, and networking fosters sustained professional development.
Conclusion
The paradigm of software education is shifting decisively towards practical, industry-relevant training. For those aspiring to thrive in Chennai’s competitive IT landscape, selecting the right software training courses and institute in Chennai is a strategic decision that shapes career trajectories. Maria Academy exemplifies excellence in this domain, offering a robust platform for learners to acquire market-ready skills, engage with industry challenges, and achieve meaningful career outcomes.
Embark on your journey to professional excellence with Maria Academy — where industry expertise meets educational innovation.
Keywords: software training courses and institute in Chennai, industry-oriented software courses, Maria Academy, software training Chennai, professional software training, upskilling for IT professionals, software career development Chennai.
software training courses and training institute in chennai
Solid Principles in C#.net
In C#, the SOLID principles are a set of guidelines that help developers design software that is modular, maintainable, and extensible. SOLID is an acronym that stands for:
S – Single Responsibility Principle (SRP)
O – Open-Closed Principle (OCP)
L – Liskov Substitution Principle (LSP)
I – Interface Segregation Principle (ISP)
D – Dependency Inversion Principle (DIP)
Single Responsibility Principle (SRP):
A class should have only one reason to change. It states that a class should have only one responsibility or job. This principle helps to keep classes focused, maintainable, and easier to understand.
| public interface INotificationService { void SendNotification(string message); } public class EmailNotificationService : INotificationService { public void SendNotification(string message) { // Code to send an email notification } } public class SMSNotificationService : INotificationService { public void SendNotification(string message) { // Code to send an SMS notification } } public class NotificationSender { private readonly INotificationService _notificationService; public NotificationSender(INotificationService notificationService) { _notificationService = notificationService; } public void SendNotification(string message) { _notificationService.SendNotification(message); }} |
In this example, the FileManager class has the responsibility of reading and saving files, while the FileParser class is responsible for parsing files. Each class has a single responsibility, making it easier to understand and maintain.
Open-Closed Principle (OCP):
Software entities (classes, modules, functions, etc.) should be open for extension but closed for modification. This principle encourages designing modules that can be extended without modifying their existing code, reducing the risk of introducing bugs and making it easier to add new features.
| public abstract class Shape { public abstract double CalculateArea(); } public class Rectangle : Shape { public double Width { get; set; } public double Height { get; set; } public override double CalculateArea() { return Width * Height; }} public class Circle : Shape { public double Radius { get; set; } public override double CalculateArea() { return Math.PI * Radius * Radius; }} |
In this example, the Shape class is open for extension, as new shapes can be added by creating new subclasses of Shape. The existing code is closed for modification, as the Shape class and its existing subclasses do not need to be changed when adding new shapes.
Liskov Substitution Principle (LSP):
Objects of a superclass should be able to be replaced with objects of their subclass without breaking the behavior of the system. In other words, derived classes should be substitutable for their base classes, and they should honor the contracts defined by the base class.
| public class Vehicle { public virtual void Start() { Console.WriteLine(“Starting the vehicle”); } } public class Car : Vehicle { public override void Start() { Console.WriteLine(“Starting the car”); } } public class Motorcycle : Vehicle { public override void Start() { Console.WriteLine(“Starting the motorcycle”); } } |
In this example, the Car and Motorcycle classes are subclasses of Vehicle, and they can be substituted for Vehicle without breaking the behavior of the system. The Start method is overridden in each subclass, providing specific implementations for starting a car and starting a motorcycle.
Interface Segregation Principle (ISP):
Clients should not be forced to depend on interfaces they do not use. This principle encourages the creation of small, specific interfaces instead of large general-purpose interfaces. It helps to avoid forcing clients to implement methods they don’t need and promotes decoupling and flexibility.
| public interface IOrder { void ProcessOrder(); } public interface IShipping { void ShipOrder(); } public class OnlineOrder : IOrder, IShipping { public void ProcessOrder() { Console.WriteLine(“Processing online order”); } public void ShipOrder() { Console.WriteLine("Shipping online order"); }} public class OfflineOrder : IOrder { public void ProcessOrder() { Console.WriteLine(“Processing offline order”); } } |
In this example, we have two interfaces: IOrder and IShipping. The OnlineOrder class implements both interfaces, as it can process an order and ship it. The OfflineOrder class only implements the IOrder interface because it doesn’t involve shipping. This segregation of interfaces ensures that classes only depend on the methods they actually need.
Dependency Inversion Principle (DIP):
High-level modules should not depend on low-level modules; both should depend on abstractions. Abstractions should not depend on details; details should depend on abstractions. This principle promotes loose coupling between modules, promotes modular design, and enables easier testing and maintainability.
| public interface INotificationService { void SendNotification(string message); } public class EmailNotificationService : INotificationService { public void SendNotification(string message) { // Code to send an email notification } } public class SMSNotificationService : INotificationService { public void SendNotification(string message) { // Code to send an SMS notification } } public class NotificationSender { private readonly INotificationService _notificationService; public NotificationSender(INotificationService notificationService) { _notificationService = notificationService; } public void SendNotification(string message) { _notificationService.SendNotification(message); }} |
In this example, the NotificationSender class depends on the INotificationService interface rather than concrete implementations. This allows different notification services to be injected at runtime, promoting loose coupling. The high-level module (NotificationSender) depends on the abstraction (INotificationService) rather than the low-level modules (EmailNotificationService, SMSNotificationService).
By adhering to these principles, developers can create code that is easier to understand, maintain, and modify, leading to more robust and scalable software systems.
C# Web API
C# Web API
Asp.net Web API is a framework that is provided by Microsoft and used to create HTTP services.
ASP.NET Web API is an easy-to-build HTTP web service. To reach a range of clients, including browsers, mobile applications, desktop applications, and IOTs.
The Asp.net web API has two layers.
1.client layer
2.server layer
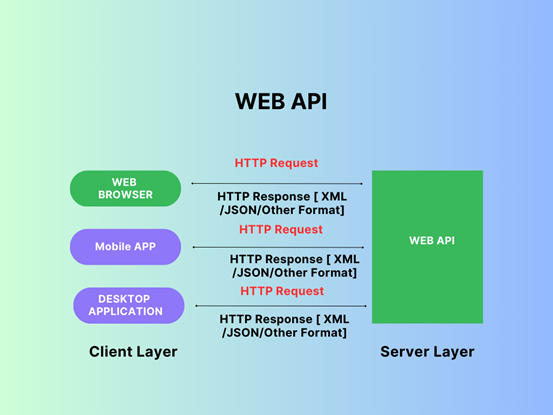
It is accessed by a wide range of clients, including web browsers, mobile applications, and desktop applications, when the client layer makes a request to the web API to get an output response in different formats like JSON or XML.
| Http Request = http://servername/apiname?id=101 Http Response = {“Name”,ABC,”Age”:”54”} |
| What is HTTP? HTTP – Hyper Text Transfer Protocol means the user gets a different device to get a request, but the output gets the same response server, also called HTTP. HTTP Is used more than providing web page and also strong foundation for the developing API. HTTP is a essential and pervasive protocol |
Why to choose ASP.NET Web API?
- Web API is light weight framework for API Development
- Web API has built-in support for standard formats like JSON and XML., and Other Formats.
- Web API is a Content Negotiation
- c#.net Web API maps HTTP Verbs to method names
Features of Web API
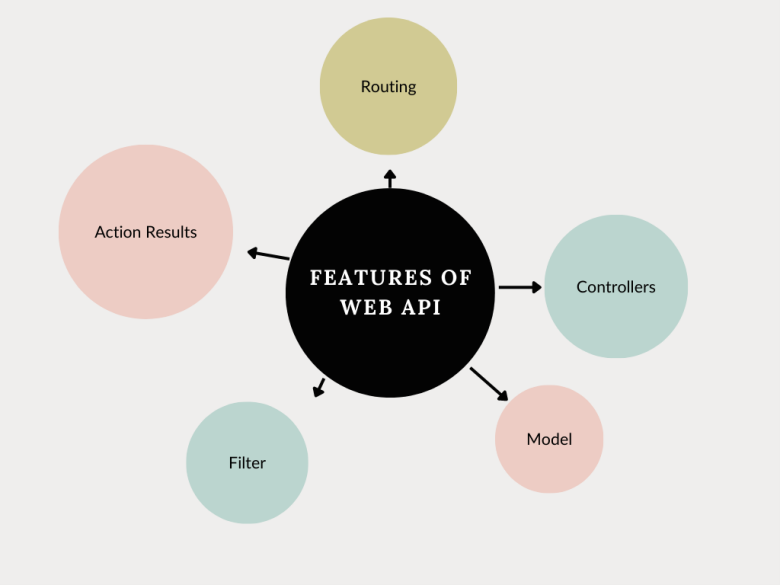
| Filter: It gives filters to the web application. Action Result: It can keep the action logos client, such as information recovery. Routing: It makes a difference in routing through different APIs. Controller: It gives useful capabilities to the web application. Model: It gives the basic capabilities of the web application. |
Types of Web API in C#
- public
- partner
- private
- Composite
Public APIs
A public API is open and available for use by outside developers or businesses; its application, Data, will develop and offer a public API. also called public APIs or external APIs.
Partner APIs
Partner APIs can interface the internal client information system with those outside groups no other APIs are allowed. APIs are generally stronger authentication, authorization, and security machines.
private APIs
Private APIs are used by enterprises to connect system and data APIs for internal use at certain security levels.
Composite APIs
Composite APIs generally combine two or more APIs’ interdependent operations. Composite APIs sometimes improve speed and performance.
C# Web API Sample Programming
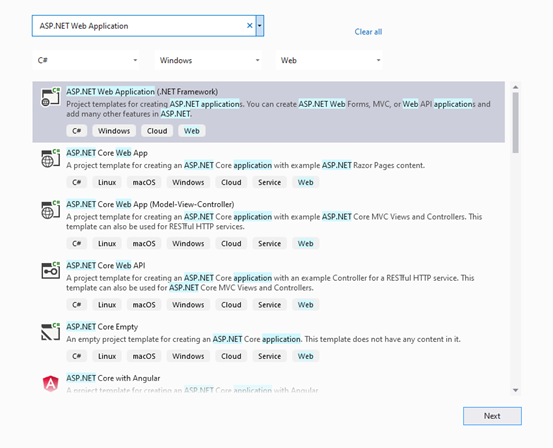
Open Visual Studio 2019 > Click Create a new project > Alt+s > ASP.NET Web Application (.NET Framework) > ProjectName ASP.NET MVC Web API
Create a new Models.cs Application Snapshot as below ,
Models Folder Right click > Add > Click Class > Reference Name Empolyee.cs
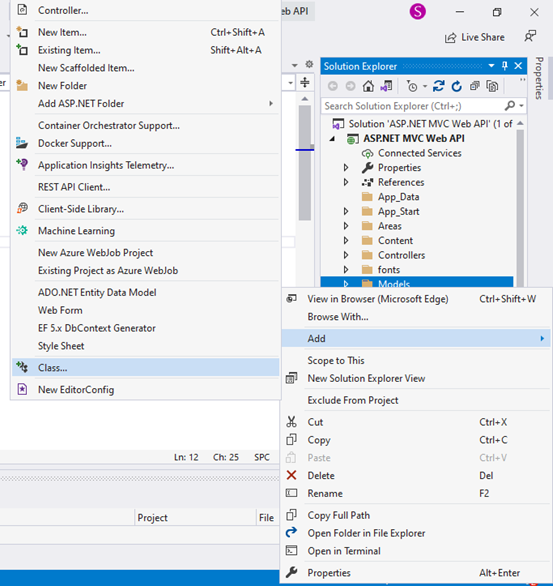
Replace the Empolyee.cs Class with below snippet,
| using System; using System.Collections.Generic; using System.Linq; using System.Web; namespace ASP.NET_MVC_Web_API.Models { public class Empolyee { public int ID { get; set; } public string Name { get; set; } public DateTime JoiningDate { get; set; } public int Age { get; set; } } } |
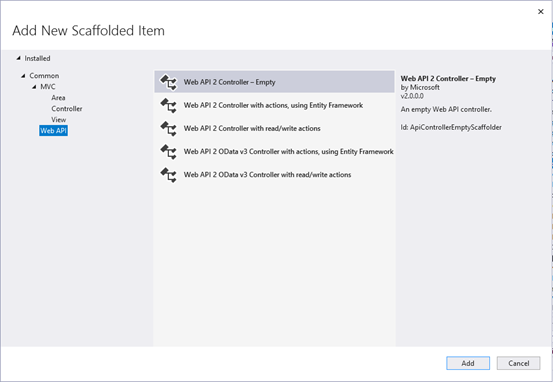
Controller Folder Right click > Add > Click Controller > Click Web API
> Click Web API 2 Controller Empty> ControllerName EmpolyeeController.cs
Create a new Controller.cs Application Snapshot as below
Replace the EmpolyeeController.cs With below Snippet ,
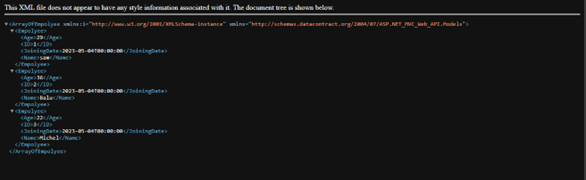
| using System; using System.Collections.Generic; using System.Linq; using System.Web.Http; using ASP.NET_MVC_Web_API.Models; namespace ASP.NET_MVC_Web_API.Controllers { public class EmpolyeeController : ApiController { Empolyee[] employees = new Empolyee[] { new Empolyee { ID = 1, Name = “sam”, JoiningDate = DateTime.Parse(DateTime.Today.ToString()), Age = 29 }, new Empolyee { ID = 2, Name = “Balu”, JoiningDate = DateTime.Parse(DateTime.Today.ToString()), Age = 36 }, new Empolyee { ID = 3, Name = “Michel”, JoiningDate = DateTime.Parse(DateTime.Today.ToString()), Age = 22 } }; public IEnumerable<Empolyee> GetAllEmployees() { return employees; } public IHttpActionResult GetEmployee(int id) { var employee = employees.FirstOrDefault((p) => p.ID == id); if (employee == null) { return NotFound(); } return Ok(employee); } } } |
Run the Application and Replace the Url

Output :
OOPs Concepts
OOPs Concepts:
It is a programming paradigm that focuses on the use of objects to represent data and behaviors in software applications.
It is based on the concept of “classes” and “objects”.
The main principles of OOPs are Encapsulation, Inheritance, Polymorphism & Abstraction
Classes:
A class is a blueprint for creating objects. It defines the properties and methods that an object of that class will have. For example, a class called “Person” might have properties such as “name”, “age”, and “gender”, and methods such as “walk” and “talk”.
In C#, classes are a fundamental building block of object-oriented programming (OOP). A class is a blueprint or a template that defines the structure and behaviour of a particular type of object.
Here’s an example of a class in C#:
public class Person
{
public string Name { get; set; }
public int Age { get; set; }
public string Address { get; set; }
public void PrintDetails()
{
Console.WriteLine($”Name: {Name}, Age: {Age}, Address: {Address}”);
}
}
In this example, we have defined a class called Person that has three properties: Name, Age, and Address. These properties are defined using auto-implemented properties, which are shorthand for defining a private field and public getter/setter methods.
The PrintDetails method is a behaviour of the Person class. It is a public method that can be called on an instance of the Person class to print out the person’s details.
To create an instance of the Person class and set its properties, we can do the following:
Person person = new Person();
person.Name = “John”;
person.Age = 30;
person.Address = “123 Main St.”;
And to call the PrintDetails method on the person instance:
person.PrintDetails(); // Output: Name: John, Age: 30, Address: 123 Main St.
In this way, classes in C# allow us to define the structure and behaviour of our objects and create instances of those objects with specific properties and methods.
Objects:
An object is an instance of a class. It represents a specific instance of the class and has its own set of values for the properties defined by the class. For example, an object created from the “Person” class might have a name of “John”, an age of 25, and a gender of “Male”.
In C#, an object is an instance of a class. When we create an instance of a class using the new keyword, we are creating an object of that class.
Here’s an example of creating an object of the Person class we defined earlier:
Person person = new Person();
In this example, person is an object of the Person class. We can access its properties and call its methods using the dot notation:
person.Name = “John”;
person.Age = 30;
person.Address = “123 Main St.”;
person.PrintDetails(); // Output: Name: John, Age: 30, Address: 123 Main St.
Each object of a class has its own set of properties and can have different values for those properties. For example, we can create another object of the Person class with different values for its properties:
Person person2 = new Person();
person2.Name = “Jane”;
person2.Age = 25;
person2.Address = “456 Elm St.”;
person2.PrintDetails(); // Output: Name: Jane, Age: 25, Address: 456 Elm St.
In this way, objects in C# allow us to create multiple instances of a class, each with its own set of properties and values. We can use these objects to represent real-world entities or concepts in our programs and manipulate them by calling their methods and accessing their properties.
Encapsulation:
One of the key features of OOP is encapsulation, which is the concept of bundling data and methods that operate on that data within a single unit. This makes it easier to manage and maintain the code and helps to prevent the data from being accessed or modified by code outside of the class.
Encapsulation is one of the core principles of object-oriented programming (OOP) and refers to the practice of bundling data and the methods that operate on that data within a single unit, called a class, and restricting access to the inner workings of that class from the outside world.
In C#, encapsulation is achieved through access modifiers, which are keywords that determine the level of access that other code has to a particular class member (i.e., fields, properties, methods). C# provides four access modifiers:
public: The member is accessible from any code.
private: The member is accessible only within the same class.
protected: The member is accessible within the same class and any derived classes.
internal: The member is accessible within the same assembly.
Here’s an example of using encapsulation to hide the implementation details of a Person class:
public class Person
{
private string name;
private int age;
private string address;
public string Name
{
get { return name; }
set { name = value; }
}
public int Age
{
get { return age; }
set { age = value; }
}
public string Address
{
get { return address; }
set { address = value; }
}
public void PrintDetails()
{
Console.WriteLine($”Name: {Name}, Age: {Age}, Address: {Address}”);
}
}
In this example, the fields name, age, and address are marked as private, which means they can only be accessed from within the Person class. However, we’ve also defined public properties Name, Age, and Address that provide access to these fields from outside the class. By using properties, we can control the access to the fields and add logic to the getter/setter methods if necessary.
The PrintDetails method is also a public method that can be called from outside the class to print out the person’s details. However, it does not provide direct access to the internal fields.
By using encapsulation in this way, we can ensure that the internal state of a class is not accidentally or intentionally modified from outside the class, and that changes to the internal implementation of the class do not affect the external code that uses it.
Inheritance:
Inheritance allows a new class to be based on an existing class, inheriting its properties and methods. This can save time and effort in development, as the new class can reuse the code of the existing class.
Inheritance is another core principle of object-oriented programming (OOP) and refers to the ability of a class to inherit properties and behaviours from a parent class. In C#, inheritance is achieved through the : symbol followed by the name of the parent class.
Here’s an example of using inheritance to create a Student class that inherits from the Person class:
public class Student : Person
{
public int GradeLevel { get; set; }
public string SchoolName { get; set; }
public void PrintSchoolInfo()
{
Console.WriteLine($”School: {SchoolName}, Grade: {GradeLevel}”);
}
}
In this example, the Student class inherits from the Person class using the: symbol. This means that the Student class has access to all of the public and protected members of the Person class, including its fields, properties, and methods.
In addition to the inherited members, the Student class defines two new properties, GradeLevel and SchoolName, and a new method, PrintSchoolInfo.
We can create an object of the Student class and set its properties just like we did with the Person class:
Student student = new Student();
student.Name = “John”;
student.Age = 15;
student.Address = “123 Main St.”;
student.GradeLevel = 9;
student.SchoolName = “High School”;
And we can call methods from both the Person and Student classes on the student object:
student.PrintDetails(); // Output: Name: John, Age: 15, Address: 123 Main St.
student.PrintSchoolInfo(); // Output: School: High School, Grade: 9
By using inheritance in this way, we can reuse code from existing classes and create more specialized classes that add new properties and behaviours on top of the existing ones. It also allows us to create a hierarchy of related classes, where each class builds on the properties and behaviours of the classes above it in the hierarchy.
Polymorphism:
Polymorphism allows objects of different classes to be treated as if they are of the same class, by using a common interface. This makes it easier to write code that works with multiple objects, as the code can be written to work with the interface rather than the specific classes.
Polymorphism is another core principle of object-oriented programming (OOP) and refers to the ability of objects of different classes to be used interchangeably in the same context. In C#, polymorphism is achieved through inheritance and interfaces.
There are two main types of polymorphism in C#: compile-time polymorphism and runtime polymorphism.
Compile-time polymorphism, also known as method overloading, refers to the ability of a method to have multiple definitions with different parameter lists. The correct method to call is determined at compile time based on the number and types of arguments passed to the method.
Here’s an example of method overloading in C#:
public class Calculator
{
public int Add(int x, int y)
{
return x + y;
}
public float Add(float x, float y)
{
return x + y;
}
}
In this example, the Calculator class defines two Add methods with different parameter types (int and float). Depending on the arguments passed to the Add method, the compiler will choose the appropriate overload at compile time.
Runtime polymorphism, also known as method overriding, refers to the ability of a subclass to provide a different implementation of a method that is already defined in its parent class. The correct method to call is determined at runtime based on the type of the object that the method is called on.
Here’s an example of method overriding in C#:
public class Animal
{
public virtual void MakeSound()
{
Console.WriteLine(“The animal makes a sound.”);
}
}
public class Dog : Animal
{
public override void MakeSound()
{
Console.WriteLine(“The dog barks.”);
}
}
In this example, the Animal class defines a virtual MakeSound method that can be overridden by its subclasses. The Dog class overrides the MakeSound method and provides a different implementation that prints “The dog barks.” to the console.
We can create objects of both the Animal and Dog classes and call the MakeSound method on them:
Animal animal = new Animal();
Dog dog = new Dog();
animal.MakeSound(); // Output: The animal makes a sound.
dog.MakeSound(); // Output: The dog barks.
By using polymorphism in this way, we can write code that is more flexible and adaptable to different types of objects, without having to know the exact type of the object at compile time. This makes our code more modular and easier to maintain over time.
Abstraction:
Abstraction is the concept of hiding unnecessary details and complexity from the user, while still providing the necessary functionality. This can make the code easier to use and maintain, as well as improve performance.
Abstraction is a core principle of object-oriented programming (OOP) that refers to the ability to hide the implementation details of a class from the outside world and expose only the relevant features and behaviours through a simplified interface. In C#, abstraction is achieved using abstract classes and interfaces.
An abstract class is a class that cannot be instantiated directly and can only be used as a base class for other classes. It may contain abstract methods, which are declared but not implemented in the abstract class. The subclasses of an abstract class must implement all its abstract methods to be instantiated.
Here’s an example of an abstract class in C#:
public abstract class Shape
{
public abstract float GetArea();
}
In this example, the Shape class is declared as abstract, which means that it cannot be instantiated directly. It contains an abstract GetArea method, which is declared but not implemented in the abstract class.
Subclasses of the Shape class must provide their own implementation of the GetArea method in order to be instantiated. Here’s an example of a Rectangle class that extends the Shape class and implements the GetArea method:
public class Rectangle : Shape
{
public float Width { get; set; }
public float Height { get; set; }
public override float GetArea()
{
return Width * Height;
}
}
In this example, the Rectangle class extends the Shape class and provides its own implementation of the GetArea method, which calculates the area of a rectangle based on its width and height.
An interface is a contract that specifies a set of methods and properties that a class must implement. It does not contain any implementation code, but rather defines a set of public members that must be implemented by any class that implements the interface.
Here’s an example of an interface in C#:
public interface IPlayable
{
void Play();
void Pause();
void Stop();
}
In this example, the IPlayable interface defines three methods (Play, Pause, and Stop) that must be implemented by any class that implements the interface.
Classes that implement the IPlayable interface must provide their own implementation of these three methods. Here’s an example of a MediaPlayer class that implements the IPlayable interface:
public class MediaPlayer : IPlayable
{
public void Play()
{
Console.WriteLine(“Playing…”);
}
public void Pause()
{
Console.WriteLine(“Paused.”);
}
public void Stop()
{
Console.WriteLine(“Stopped.”);
}
}
In this example, the MediaPlayer class implements the IPlayable interface and provides its own implementation of the Play, Pause, and Stop methods. Any class that implements the IPlayable interface can be used interchangeably with the MediaPlayer class in any context that requires an IPlayable object.
By using abstraction in this way, we can create classes that are more flexible, modular, and easier to maintain over time. We can also create a hierarchy of related classes and interfaces that define a set of common behaviours and features that can be reused and extended in different contexts.
Differences between ASP.NET Core and ASP.NET Framework
ASP.NET Core and ASP.NET Framework are both web application frameworks developed by Microsoft, but there are some significant differences between the two. Here are some of the key differences between ASP.NET Core and ASP.NET Framework:
- Open-source and community-driven: ASP.NET Core is open-source and community-driven, with contributions from developers around the world. ASP.NET Framework is also open-source, but Microsoft is the primary contributor.
- Cross-platform support: ASP.NET Core is designed to be cross-platform and can run on Windows, macOS, and Linux. ASP.NET Framework, on the other hand, is designed to run only on Windows.
- Modular design: ASP.NET Core has a modular design, with a lightweight and customizable architecture that allows developers to choose only the components they need. ASP.NET Framework has a monolithic design and includes a large set of pre-built components, which can result in larger and slower applications.
- Performance: ASP.NET Core is optimized for performance and can handle a larger number of requests per second than ASP.NET Framework. This is due to its lightweight design, which reduces overhead and allows it to run more efficiently.
- Dependency Injection: ASP.NET Core includes built-in support for Dependency Injection, which makes it easier to manage dependencies and improve code maintainability. ASP.NET Framework does not include built-in support for Dependency Injection, although it is possible to implement it using third-party libraries.
- Target platforms: ASP.NET Core is designed to target multiple platforms, including cloud, mobile, and desktop, while ASP.NET Framework is primarily targeted at web applications.
In summary, ASP.NET Core and ASP.NET Framework are both powerful web application frameworks, but they have some significant differences in terms of cross-platform support, open-source and community-driven development, modular design, performance, and target platforms. The choice between the two depends on the requirements of the project and the preferences of the developer.
Software Testing
Testing:
The process of testing involves running a program to look for errors. The software must be error-free to function properly. The software will be free of all errors if testing is successful.
Guidelines for Testing:
- The client requirements should be met by all testing.
- software should be tested by a third party.
- It is not possible to conduct elaborative testing. Because we need the least amount of testing possible based on the application’s risk assessment.
- All tests should be planned before they are carried out.
- Test small parts first, then progress to larger parts.
Types of testing:
- Manual Testing
- Automatic Testing
Manual Testing:
Manual testing is a method of software testing in which test cases are executed manually rather than using an automated tool. Manual testing is one of the most fundamental testing processes because it can trace both visible and hidden software defects. All test cases are manually executed by the tester from the perspective of the end user. Test case reports are manually created.
Types of Manual Testing
o White Box Testing – Developers perform white box testing, which involves checking every line of code before passing it to the Test Engineer. Because the code is visible to the developer during testing, it is also known as white box testing.
o Black Box Testing – The Test Engineer performs black box testing to ensure that an application or software meets the needs of the customer or client. The code is not visible while testing, which is why it is referred to as black-box testing.
o Gray Box Testing – Gray box testing is a hybrid of white box and black box testing methods. It can be done by someone who is familiar with both coding and testing. Gray box testing is used when a single person performs both white box and black box testing for an application.
Why is Manual Testing preferred?
- It doesn’t require any programming knowledge and easy to learn for new testers.
- It ensures that the software is a hundred percent bug-free and a cost-effective method
- It is used to test GUI designs that change dynamically
- The Tester interacts with software as a real user
Drawbacks of Manual Testing:
- It generally requires a large amount of human resources and a very time consuming method.
- It does not test for all aspects of testing.
Automatic Testing
Automated testing is a technique in which the tester writes their own scripts and uses appropriate software or an automation tool to test the software.
It is a manual process that has been automated. It Allows repetitive tasks to be completed without the intervention of a Manual Tester.
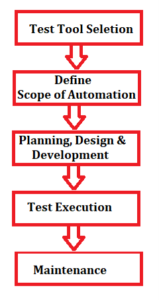
Automation Testing Process:
Some Popular Automation Tools are Selenium, QTP, TestNG, etc
Advantages of Automation Testing:
- Simplifies the execution of test cases
- Increases the Reliability of Tests
- Minimizes Human Interaction
- It saves both time and money.
- increases the number of tests covered
Selenium automation testing:
Selenium is a free (open source), popular automated web application testing framework. It is a browser-based automation framework that simulates and automates user actions. Selenium is a collection of tools that serve a variety of Selenium automation testing needs. Selenium automation testing is a test that is run using the Selenium framework.
Selenium Test Scripts can be written in a variety of programming languages, including Java, C#, and Python.
Selenium is simple to install on platforms such as Windows, Linux, Solaris, and Macintosh. Furthermore, it supports operating systems (OS) for mobile applications such as iOS, Windows Mobile, and Android.
Selenium supports Internet Explorer, Mozilla Firefox, Google Chrome, and Safari browsers.
Selenium can be used to automate functional tests and is compatible with automation testing tools like Maven, Jenkins, and Docker to achieve continuous testing. It can also be used in conjunction with tools like TestNG and JUnit to manage test cases and generate reports.
Recent Posts
- Banking Sector: Tackling Security and Data Integrity Challenges with .NET Skills
- How Data Analytics Helps Manufacturers in Bangalore Reduce Production Downtime
- Understanding ASP.NET MVC Architecture with Real Examples
- Common Challenges in Learning Programming and How Python Makes It Easier
- Why Companies Are Hiring More React Developers Than Ever Before
Categories
- All
- Angularjs training in Chennai
- ASP.NET Core
- Data Analytics
- Dot Net Development Course
- dot net training
- dot net training in chennai
- dotnet full stack developer
- Free dotnet training
- information on dotnet
- Learn Java in chennai
- Learn Python at Karaikudi
- learn python online
- learn python online from chennai
- Linq Queries in .net
- mutual funds
- MVC Training Tutorials
- PHP Training in Chennai
- pmp training online
- power apps online training
- Power platofrm
- Python Training Online
- React Full Stack Development
- React training
- ReactJs
- share market
- Sharepoint framework online training
- SharePoint Freelancers in Chennai
- software testing
- spfx online training
- SQL Course Details
- Stock market
- Uncategorized