Three Tier Architecture in MVC
Three Tier (Three Layer) Architecture
With a three-layer design, the project is divided into three layers: the user interface layer, the business layer, and the data layer (database), where we divide the UI, logic, and data into three groups. If a user wants to switch the user interface from a Windows computer to a smartphone, he or she simply needs to alter the UI layer; all other layers are unaffected. Like this, if a user wishes to change a database, he simply needs to update the data layer; everything else stays the same.
The widely used three-tier (or three-layer) architecture is a way to organise the codebase. This architecture divides the codebase into three distinct levels, each with a unique set of duties:

Presentation layer: This is the application’s user interface, which shows the user the features and data of the programme.
Business logic (or Application) layer: The business logic that powers the application’s essential features is contained in this layer. as processing the data moving between the other two layers and making judgements, calculations, and evaluations.
Data access layer (or Data) layer: To save and recover application data, this layer communicates with databases.
Advantages of using three-tier architecture are:
Accelerated development: Reducing product time to market and enabling developers to use the most current tools and layer appropriate languages.
Improved scalability: By deploying apps on many levels, each tier may always be scaled separately.
Improved Reliability: By using several tiers, you may execute additional components of your application on other servers and employ results that have been cached to improve reliability and availability.
Enhance security: By using a well-designed application layer as a private firewall to help avoid receptive weaknesses like SQL injection.
The package of different layers is as follows.
- Presentation Layer – controller package
- Business Logic Layer – service package
- Data Access Layer – repository package
Three Layer Architecture using MVC Sample:
Create an empty MVC web application project with Project name “WebApp” and solution name “TLA”. This WebApp project is the presentation layer.
In Solution TLA, add a new project to create business logic à Class library (.net framewok) à name the project as BusinessLayer.
Again, in Solution TLA, add a new project to create data access à Class library (.net framewok) à name the project as DataBaseLayer.
Add BusinessLayer & DataBaseLayer as reference in “WebApp”.
Add BusinessLayer as reference in “DataBaseLayer”.
In sql server explorer, add a new database with name “MYDB” and create a table with name “Registration”.
| CREATE TABLE [dbo].[Registration]( [RegId] [int] IDENTITY(1,1) NOT NULL, [FullName] varchar NULL, [Address] varchar NULL, [Gender] varchar NULL, [City] varchar NULL, [DoB] [date] NULL, [Cno] varchar NULL, PRIMARY KEY CLUSTERED ([RegId] ASC) |
In “DataBaseLayer”, add the model file using “ado.net entity data model”.
Once model is created, copy the connection string from app.config of “DataBaseLayer” and paste it in web.config of “WebApp”.
In “BusinessLayer”, create a class file with name “RegistrationModel” and replace with below snippet.
| public class RegistrationModel { public int RegId { get; set; } public string FullName { get; set; } public string Address { get; set; } public string Gender { get; set; } public string City { get; set; } public Nullable DoB { get; set; } public string Cno { get; set; } } |
In “DataBaseLayer”, add a new folder with name “DBOperation”, in it, add a class file with name “ManageRegistration” and replace with below snippet.
| public class ManageRegistration { public void AddReg(RegistrationModel regModel) { using (var DB = new MYDBEntities()) { Registration Reg = new Registration() { FullName = regModel.FullName, Address = regModel.Address, Gender = regModel.Gender, City = regModel.City, DoB = regModel.DoB, Cno = regModel.Cno }; DB.Registrations.Add(Reg); DB.SaveChanges(); } } } |
Then add EntityFramework.dll and EntityFramework.SqlServer.dll references in “WebApp”.
So now the business layer and data layer has been completely created.
Now, in WebApp (i. e. in presentation layer), add a new controller with name “Home controller” and replace with below snippet.
| public class HomeController : Controller { // GET: Home public ActionResult Index() { return View(); } ManageRegistration ManageReg = new ManageRegistration(); [HttpPost] public void AddReg(FormCollection Form) { RegistrationModel registrationModel = new RegistrationModel() { FullName = Form["txtName"], Address = Form["txtAddress"], Gender = Form["rdbGender"], City = Form["txtCity"], DoB = Convert.ToDateTime(Form["txtDoB"]), Cno = Form["txtCno"] }; ManageReg.AddReg(registrationModel); Response.Write("Saved"); } } |
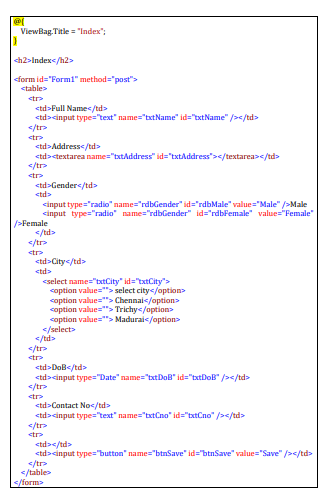
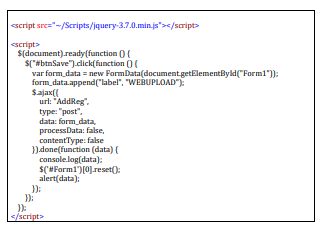
Add index view with empty without model and put the below html and ajax snippet in it
Run the program
Social tagging: .net training in Chennai > Asp.net Training in chennaiRecent Posts
- Banking Sector: Tackling Security and Data Integrity Challenges with .NET Skills
- How Data Analytics Helps Manufacturers in Bangalore Reduce Production Downtime
- Understanding ASP.NET MVC Architecture with Real Examples
- Common Challenges in Learning Programming and How Python Makes It Easier
- Why Companies Are Hiring More React Developers Than Ever Before
Categories
- All
- Angularjs training in Chennai
- ASP.NET Core
- Data Analytics
- Dot Net Development Course
- dot net training
- dot net training in chennai
- dotnet full stack developer
- Free dotnet training
- information on dotnet
- Learn Java in chennai
- Learn Python at Karaikudi
- learn python online
- learn python online from chennai
- Linq Queries in .net
- mutual funds
- MVC Training Tutorials
- PHP Training in Chennai
- pmp training online
- power apps online training
- Power platofrm
- Python Training Online
- React Full Stack Development
- React training
- ReactJs
- share market
- Sharepoint framework online training
- SharePoint Freelancers in Chennai
- software testing
- spfx online training
- SQL Course Details
- Stock market
- Uncategorized