Microsoft SharePoint:
Microsoft SharePoint:
Microsoft SharePoint is a web-based collaboration system that enables corporate teams to collaborate using workflow applications, “list” databases, other web elements, and security features. SharePoint also enables the organisation using the platform to manage information access and streamline workflows between business units.
Microsoft SharePoint is a platform for document management and collaboration that aids a business in managing archives, documents, reports, and other content that is essential to its operational procedures. Enterprise content management features of SharePoint are beneficial to businesses in all sectors and in every division within a company.
SharePoint configuration is done through a web browser. It offers most of its features through web applications and a web user interface (UI). SharePoint is used to monitor analytics, create, and remove sites, enable, and disable product features, edit content, and site layout, and create and delete sites.
SharePoint Online: There are numerous additional integration options available with other cloud services in the Microsoft Cloud version of SharePoint, called SharePoint Online. With an Office 365 or Microsoft 365 licence, it functions in combination with many of the other services Microsoft provides.
The most recent version of SharePoint is 2019. The version of SharePoint that is included with Office 365 is called SharePoint Online. For businesses who prefer to retain their data in-house for compliance or security concerns, Microsoft also provides an on-premises version.
SharePoint Server: SharePoint Server is a programme that runs on a local machine within a corporate network, such as an internal web server. It gives you more control over teams and groups, as well as additional site customization. If the intranet is hosted behind a local firewall, it may also provide additional security. Because SharePoint Server is hosted locally, it necessitates additional hardware, additional administration, and manual updates. As a result, SharePoint Server is typically used for enterprise applications that require more customization and security.
SharePoint App: Apps in Microsoft SharePoint are integrations that add features to the platform’s standard collaboration spaces. Some apps are included with the platform out of the box, but many others add features and options that are not included with the standard SharePoint platform. These can range from a library where users can store and share documents and files to calendar plug-ins and powerful workflow apps like Nintex, which make it easy to perform many repeatable logical actions in SharePoint.
Benefits of Using SharePoint:
SharePoint boosts the productivity and visibility of information workers in all industries, large and small. SharePoint’s features revolve around an intranet-based cross collaboration experience that enables secure sharing, content management, and workflow collaboration, among other things.
SharePoint is an easy-to-maintain website-based collaboration platform that business users can understand at a basic level. It is also infinitely customizable and massively scalable, so businesses can use it in a variety of ways to increase productivity and return on investment.
You can use Microsoft SharePoint on your PC, Mac, or mobile device to:
-
Create intranet sites, including pages, document libraries, and lists.
-
Add web parts to your content to make it more personalised.
-
Use a team or communication site to display important visuals, news, and updates.
-
Discover, follow, and search for sites, files, and people throughout your organisation.
-
Workflows, forms, and lists can help you manage your daily tasks.
-
Sync and save your files to the cloud so that anyone can securely collaborate with you.
-
With the mobile app, you can stay up to date on the latest news while on the go.
Join the Best SharePoint Framework Training Courses Online
Are you interested in learning the Sharepoint framework to build competitive apps for your business clients? If yes, you need to join the best Sharepoint framework online training programs or certification courses offered by the best IT institutions in Chennai, India. The city is full of reputed IT training and learning institutions, where students will get the best education in all kinds of IT courses like software, dot net framework, JavaScript, HTML, XML, SharePoint framework, and so on. The students will get good theoretical sessions and live training classes at the top institutions in Chennai. Also, the students will learn basic to advance concepts of desired IT subjects from subject matter experts available at IT institutions in Chennai.
What is SharePoint Framework?
SharePoint framework is client-side programming that is used to develop and provides full support to the clients to develop user-friendly web pages and run them well. Also, this framework helps in developing pages that will be easy to access, responsive, and mobile-friendly as well. The contents developed using SharePoint will run inside the context of a SharePoint page.
You can deploy extensions to SharePoint pages that help to access it online. Also, you can use JavaScript tools and libraries to develop customized SharePoint pages. You can learn how to use the SharePoint framework for developing useful client-side pages under the best SharePoint framework training and courses available at the best IT colleges and learning centers in Chennai, India.
SharePoint Framework Training in Chennai
Are you aspiring to become a successful SharePoint framework developer, you should join the best SharePoint framework training in top IT colleges and institutions in Chennai. At the best institutions, you will get proper guidance and practical training on SharePoint application development and learn the right programming skills for the same. The students can join the regular and part-time courses for SharePoint framework from online or offline mode from trusted IT institutions in Chennai. The students seeking to join Spfx online training, need to contact the best software training institutions in Chennai. Such institutions will provide the best arrangements for distant students to join Spfx framework courses through online classes that will be conducted by trained faculty or IT professionals.
Before you join SharePoint framework training or courses in Chennai-based institutions, you should check some valid points as follows:
- You should join the best SharePoint framework training at the authorized or government-accredited IT institutions only. Also, you may take a look at the reputation and previous track record of the learning institute which should be impressive too.
- Check for availability of certification and diploma level SharePoint framework courses and live training classes available at the best IT institutions in Chennai.
- Make sure, you find the best faculty or tutors for learning the SharePoint framework course. There should be experienced faculty for teaching the SharePoint syllabus at the institution. Hence, the students will get the right guidance about SharePoint frame development and application programming to develop useful apps for business clients.
- There should be a practical session for Spfx framework training online from websites of top institutions in Chennai.
- Finally, you should check for SharePoint framework course fees and training costs at the IT institutions.
Thus, you need to acknowledge all the points before enrolling in the SharePoint framework courses or training programs in Chennai.
Top Reasons to Join the SharePoint Framework Trainings in Chennai, India
Do you want to learn about the SharePoint framework to build a useful model for customization on the SharePoint platform? If yes, you should join the best SharePoint framework training program or spfx online training courses offered by the leading IT institutions in the world. You will find many IT training institutions, where you will find skilled SharePoint training faculties and trainers. They specialize in developing useful SharePoint applications and frameworks which are useful for client-side solutions and support the SharePoint UX too. You will find some top-notch IT training and software learning institutions in Chennai, India. At the recognized software learning institutions in Chennai, you will find skilled software trainers and faculties, which can help students to understand the concepts of the SharePoint framework and provide live training facilities as well. So, you can join the basic to advance level SharePoint framework course or training program from trusted IT institutions in Chennai and become a SharePoint frame developer in the future.
Why Join Sharepoint Framework Training and Courses in India?
If you are keen to learn about the SharePoint framework from scratch, you are advised to enrol in the best SharePoint framework learning courses and training programs in India-based IT institutions. For betterment, you can approach the leading IT and software learning centres in Chennai. The city is a hub of some reputed software learning and training institutions, where students do like to join the short-term and long-term software courses and training programs as well. Also, you will witness some good scope to learn new-edge IT technologies, digital marketing, and software training programs at the trusted IT institutions in Chennai, India.
Here are some key reasons, which woo global students to join the SharePoint framework in Chennai based institutions:
- Recognized IT and Software Institutions
In Chennai, you will find many recognized IT and software learning institutions, which offer a wide variety of software courses and training programs for global students. The courses offered by such institutions are valid and have good recognition in major institutions in the world. If you will join and pass the SharePoint framework training programs and courses from top IT and software learning centres in Chennai, you will get the first recommendation to get hired by top IT companies in the world.
- Online Learning Programs
During this pandemic time, many students are studying online and covering up their courses and software training through remote classes. You will also get the best spfx online training and learning facilities from websites of leading IT and software learning institutions in Chennai, India. No matter where you reside in the world, you can continue your SharePoint frame learning and training process by joining online SharePoint framework classes offered by IT institutions in Chennai.
- Skilled Faculty and Trainers
In the reputed IT and software training institutions in Chennai, you will find the industry’s best SharePoint frame training experts and faculties who can guide all basic to advance level concepts of the SharePoint framework. The experts will give you a thorough knowledge and practical training about how SharePoint frameworks for client-side solutions help online customers to interact with business websites and take avail themselves of their benefits.
- Affordable Fees
You can join the basic to advance level SharePoint frame training programs in top IT institutions in Chennai at affordable fees. But, you need to check the website of the institution first and grab all details about the course and its fee structure in advance.
Thus, you may consider all the above points to join the SharePoint framework classes and training programs in Chennai, India.
Create Search Service application in SharePoint
Document by Ganesanva@hotmail.com – + 919042710472
Go to Central Administration
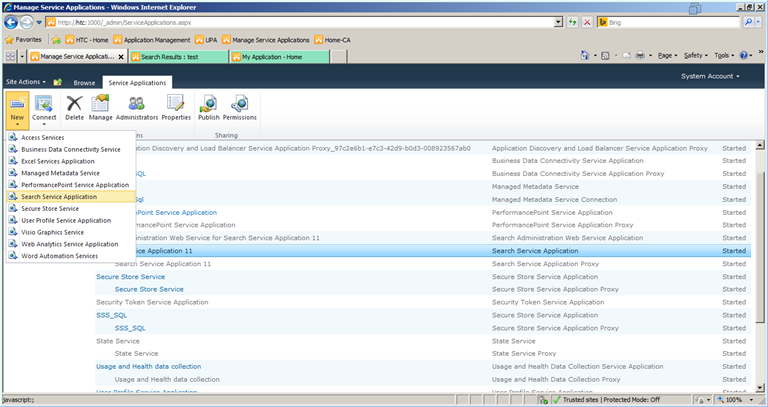
Navigate to Application Management -> Manage Service Applications
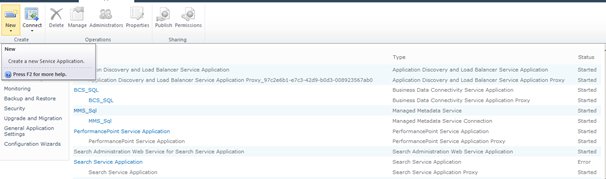
Click on New -> Search Service Application as shown
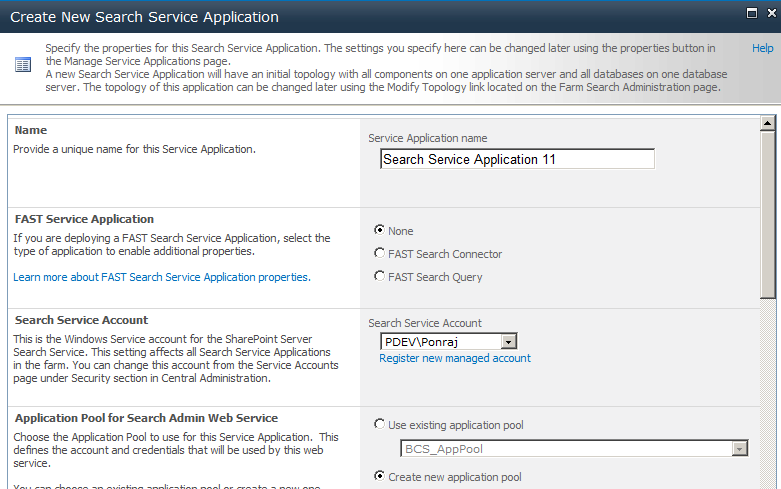
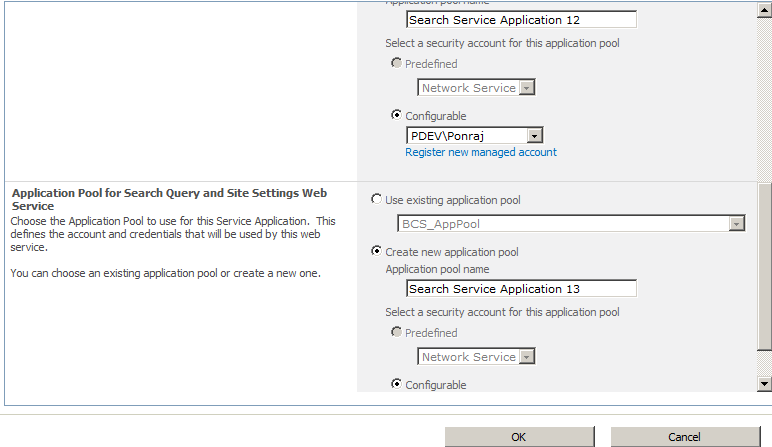
Fill the Pop up as shown below.
Search Service Application 11 will be created as shown below.
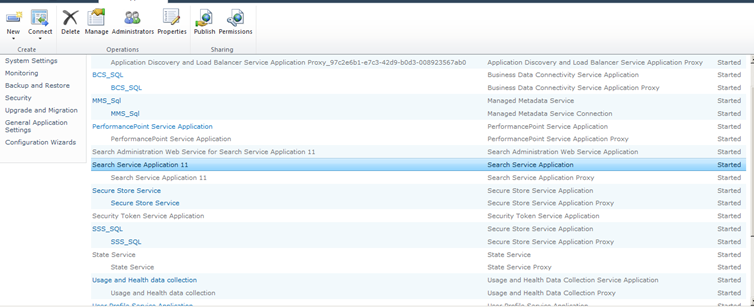
Select the “Search Service Application” and Click on “Manage” in top ribbon.
Next -> Click on Content Sources.
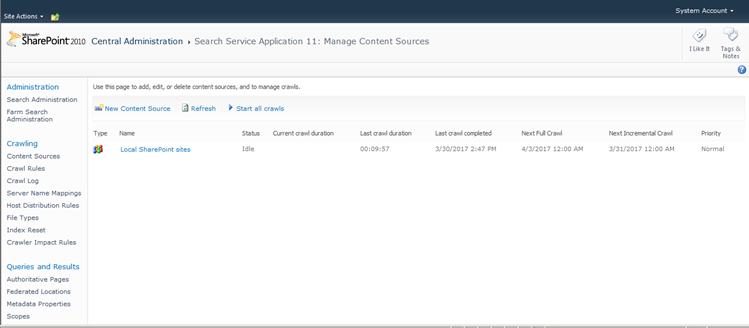
Click on the link “Local SharePoint Sites”.
Type the web application that need to be crawled in the Start Addresses text box.

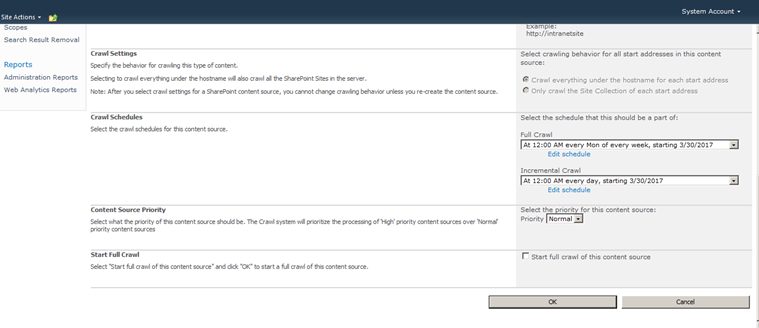
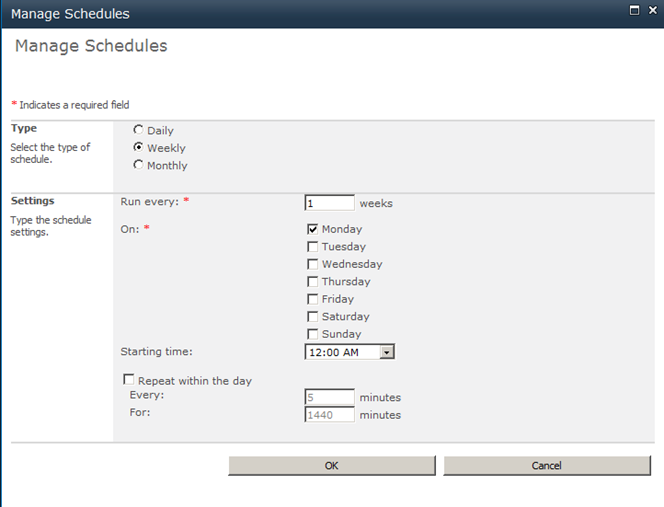
Click on Create Schedule on Full Crawl.
Enter the schedule details as below.
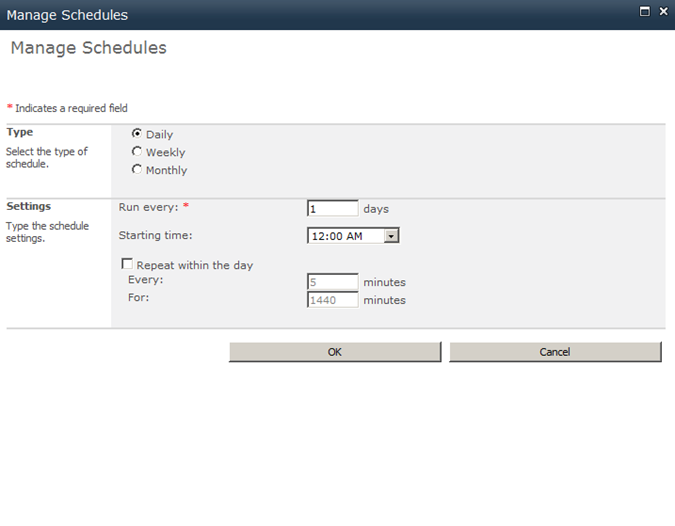
Click on Create Schedule in Incremental Crawl. Enter the details as below.
Check box the Start Full Crawl of this Content Source.
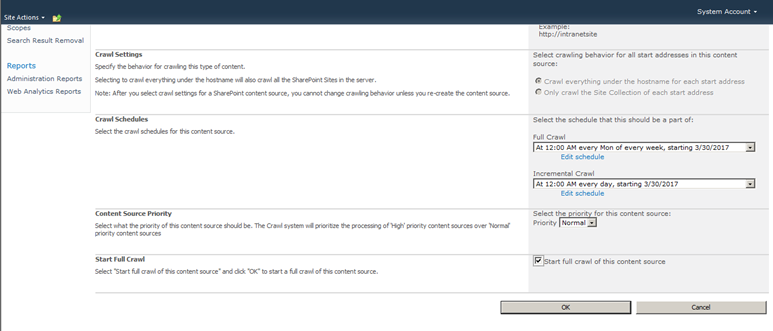
Click OK.
The site will now get crawled and all the Search content in Content database will be now moved on to the Search database.
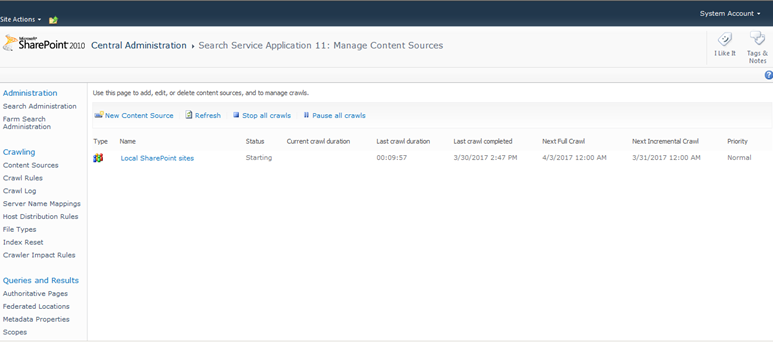
Once the Crawling gets completed, the status will change to “Idle”.
Go on to the site that is crawled and in Home page you can find the search box which allows to search based on Crawling.
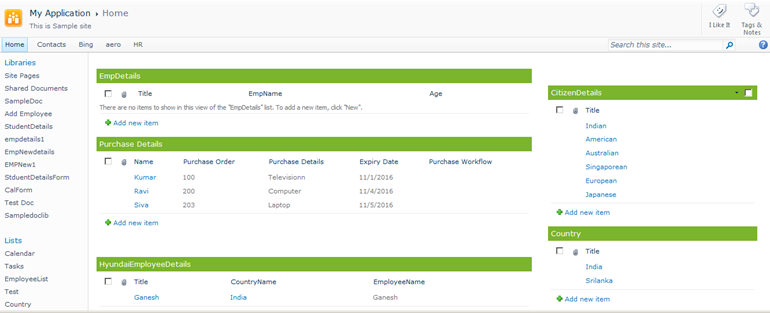
Enter employee in Search this site text box and press enter.
The search result will be shown as below in “/_layouts/OSSSearchResults.aspx” URL.
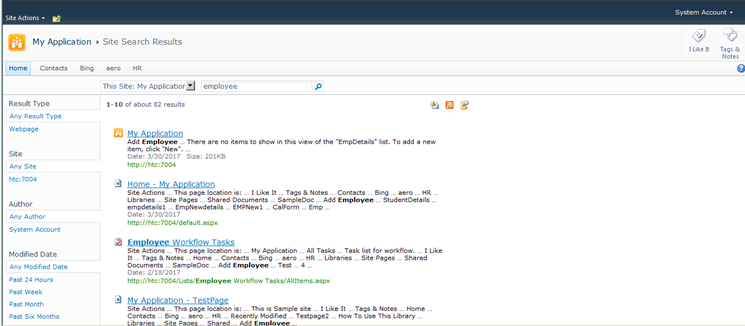
It allows to filter the search in various options and allow to create Custom scope for the search within the site collection.
CRUD operation in share point using JSOM
Document by Ganesanva@hotmail.com – + 919042710472
This blogs shows you an example for JavaScript Client side object model.
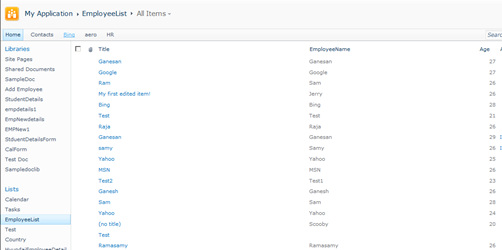
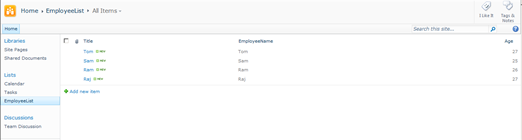
Create a List “EmployeeList” with below columns,
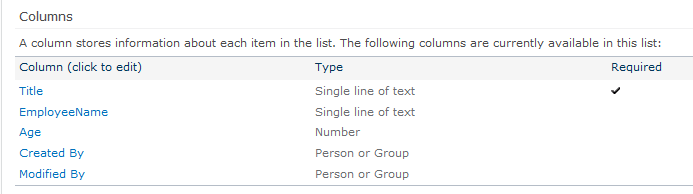
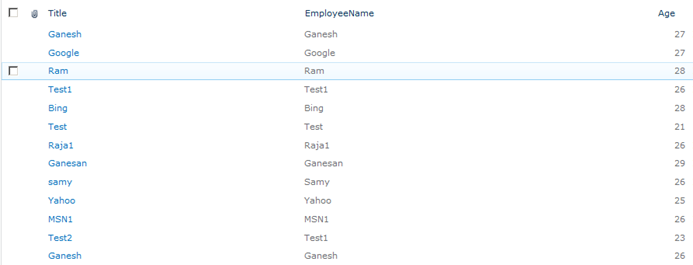
The List looks like below,
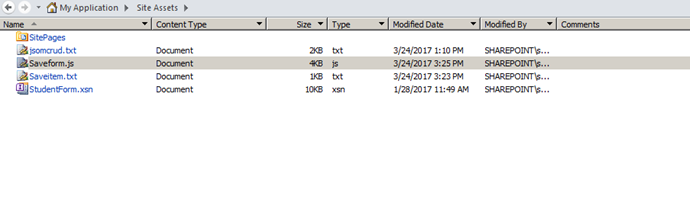
Create a text file “Saveitem.txt” and js file “Saveform.js” in Site Assets as shown below,
Put the below code in Saveitem.txt,
| <script src=”https://ajax.googleapis.com/ajax/libs/jquery/1.12.0/jquery.min.js”></script> <script type=”text/javascript” src=”/SiteAssets/Saveform.js”> </script> <table border=”0″ cellspacing=”2″ cellpadding=”2″> <tr> <td> Employee Name </td> <td> <input type=”text” id=”txtEmpName” /> </td> </tr> <tr> <td> Employee Age </td> <td> <input type=”text” id=”txtEmpAge” /> </td> </tr> <tr> <td> </td> <td> <input type=”hidden” id=”txtId” /> <input type=”Button” value=”Save” id=”btnSave” onclick=”createItem()” /> <input type=”Button” value=”Update” id=”btnUpdate” onclick=”updateItem()” /> </td> </tr> <tr> <td colspan=”2″> <table border=”0″ cellspacing=”2″ cellpadding=”2″ id=”tbldata”> <thead> <tr> <td> Id </td> <td> Employee Name </td> <td> Employee Age </td> </tr> </thead> <tbody> </tbody> </table> </td> </tr> </table> |
Put the below code in “Saveform.js”,
| $(document).ready(function(){ $(‘#btnUpdate’).hide(); SP.SOD.executeFunc(‘sp.js’, ‘sp.runtime’, retrieveListItems); }); function editvalue(element) { var Id=element.parentNode.parentElement.cells[0].outerText; var EmpName=element.parentNode.parentElement.cells[1].outerText; var Age=element.parentNode.parentElement.cells[2].outerText; $(‘#txtId’).val(Id); $(‘#txtEmpName’).val(EmpName); $(‘#txtEmpAge’).val(Age); $(‘#btnUpdate’).show(); $(‘#btnSave’).hide(); } function updateItem() { var context = new SP.ClientContext.get_current(); var web = context.get_web(); var list = web.get_lists().getByTitle(‘EmployeeList’); var listItem = list.getItemById($(‘#txtId’).val()); listItem.set_item(“Title”, $(‘#txtEmpName’).val()); listItem.set_item(“EmployeeName”, $(‘#txtEmpName’).val()); listItem.set_item(“Age”, $(‘#txtEmpAge’).val()); listItem.update(); //Update the List Item context.load(listItem); context.executeQueryAsync(onGetUserNameSuccess, onGetUserNameFail); } function createItem() { var context = new SP.ClientContext.get_current(); var web = context.get_web(); var list = web.get_lists().getByTitle(‘EmployeeList’); var listCreationInformation = new SP.ListItemCreationInformation(); //Object for creating Item in the List var listItem = list.addItem(listCreationInformation); listItem.set_item(“Title”, $(‘#txtEmpName’).val()); listItem.set_item(“EmployeeName”, $(‘#txtEmpName’).val()); listItem.set_item(“Age”, $(‘#txtEmpAge’).val()); listItem.update(); //Update the List Item context.load(listItem); context.executeQueryAsync(onGetUserNameSuccess, onGetUserNameFail); } function onGetUserNameSuccess() { $(‘#txtEmpName’).val(”); $(‘#txtEmpAge’).val(”); $(‘#btnUpdate’).hide(); $(‘#btnSave’).show(); alert(‘Success’); retrieveListItems(); } // This function is executed if the above call fails function onGetUserNameFail(sender, args) { alert(‘Failed to get user name. Error:’ + args.get_message()); } var siteUrl = ‘http://htc:7004/‘; function retrieveListItems() { var clientContext = new SP.ClientContext.get_current(); var oList = clientContext.get_web().get_lists().getByTitle(‘EmployeeList’); var camlQuery = new SP.CamlQuery(); camlQuery.set_viewXml(‘<View><Query></Query></View>’); this.collListItem = oList.getItems(camlQuery); clientContext.load(collListItem); clientContext.executeQueryAsync(Function.createDelegate(this, this.onQuerySucceeded), Function.createDelegate(this, this.onQueryFailed)); } function onQuerySucceeded(sender, args) { var listItemEnumerator = collListItem.getEnumerator(); $(‘#tbldata tbody’).empty(); while (listItemEnumerator.moveNext()) { var oListItem = listItemEnumerator.get_current(); $(‘#tbldata tbody’).append(‘<tr class=”child”><td>’+oListItem.get_item(‘ID’) +'</td><td>’+oListItem.get_item(‘Title’) +'</td><td>’+oListItem.get_item(‘Age’) +'</td>’+'<td>’+ ‘<input type=\”Button\” value=\”Edit\” onclick=\”editvalue(this)\” /></td></tr>’); } } function onQueryFailed(sender, args) { alert(‘Request failed. ‘ + args.get_message() + ‘\n’ + args.get_stackTrace()); } |
Create a page in Site pages library and edit the page,
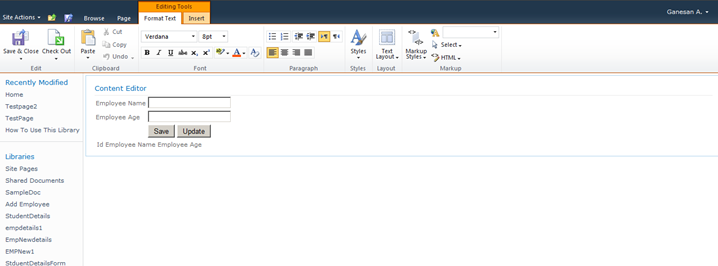
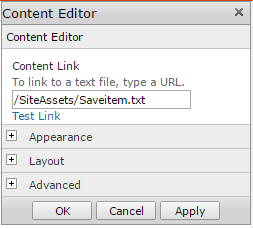
Put “/SiteAssets/Saveitem.txt” in Content Editor web part.
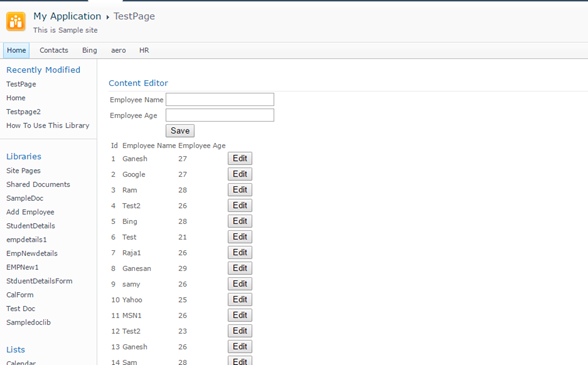
Output as below,
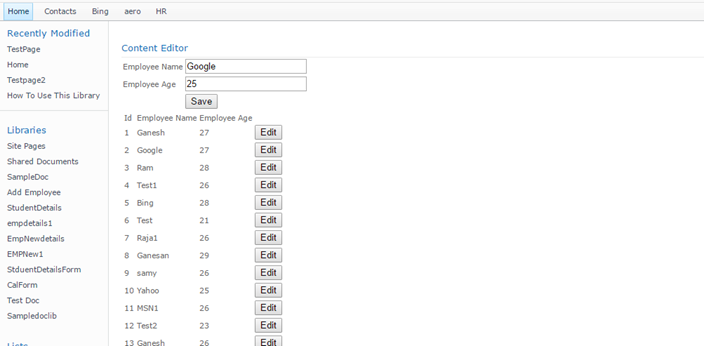
Click on Save.
Click on Edit.
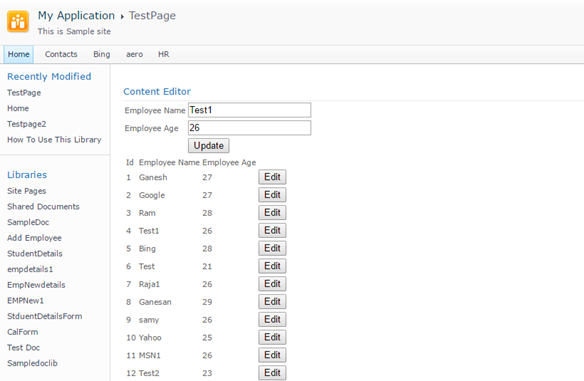
Click Update.
Click here to download the solution,
https://1drv.ms/u/s!ArddhCoxftkQg9VWsy-V87mHMy6C1g
CRUD operation in SharePoint using Power shell commands
Document by Ganesanva@hotmail.com – + 919042710472
Create a List “EmployeeList” with below columns.

The List looks as below,
Create a power shell script CRUD.ps1 with below code,
| Add-PSSnapin Microsoft.SharePoint.PowerShell -ErrorAction SilentlyContinue $web = Get-SPWeb http://htc:7004/ $list = $web.Lists[“EmployeeList”] $option = Read-Host ‘Enter Option 1.Create item 2.Update item 3.Read item’ if($option -eq 1) { #Create a new item $newItem = $list.Items.Add() $Title = Read-Host ‘Enter Title’ $EmployeeName = Read-Host ‘Enter Employee Name’ #Add properties to this list item $newItem[“Title”] = $Title $newItem[“EmployeeName”] = $EmployeeName #Update the object so it gets saved to the list $newItem.Update() echo ‘item updation Done’ } if($option -eq 2) { #Get all items in this list and save them to a variable $items = $list.items $Titlevalue = Read-Host ‘Enter Title value to update’ #Go through all items foreach($item in $items) { #If the “Title” column value equals “My first item!” do something with it if($item[“Title”] -eq $Titlevalue) { $Title = Read-Host ‘Enter Title’ $EmployeeName = Read-Host ‘Enter Employee Name’ #Change the value of the “Title” column $item[“Title”] = $Title $item[“EmployeeName”] = $EmployeeName #Update the item $item.Update() } } echo ‘item updation Done’ } if($option -eq 3) { $items = $list.items #Go through all items foreach($item in $items) { write-host “`n” write-host “Title:”$item[“Title”] write-host “Employee Name:” $item[“EmployeeName”] } } |
Open Windows PowerShell ISE from Start menu.
If windows PowerShell ISE not found in start menu do the below steps.
Simply, go and add this feature:
add PowerShell ise: here is the steps:
Open Server Manager
2. Click the Features node
3. Click the Add Features link
4. Check the box for “Windows PowerShell Integrated Scripting Environment”.
5. Click Next, then Install
6. Wait until installation is complete
7. Open PowerShell ISE from Programs>Accessories>PowerShell folder
Open the CRUD.PS1 from File -> Open in Windows PowerShell ISE.
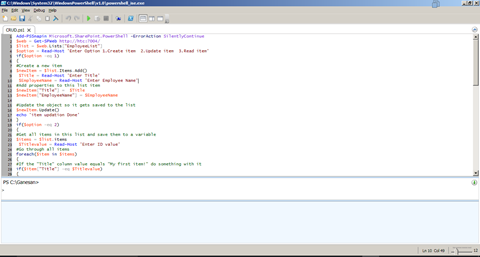
Output as below:
Click on the Play button.

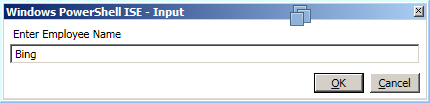
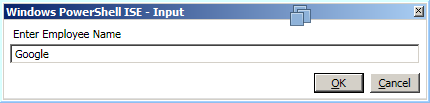
Enter “1”
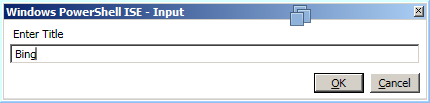
Click OK.
Click Ok.
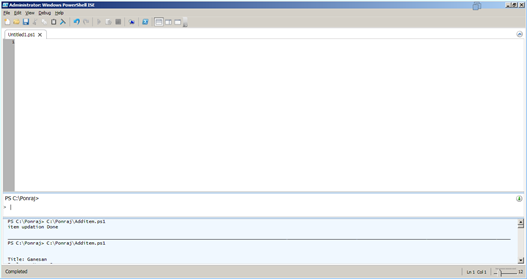
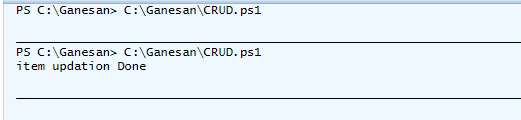
The Output windows shows as below,
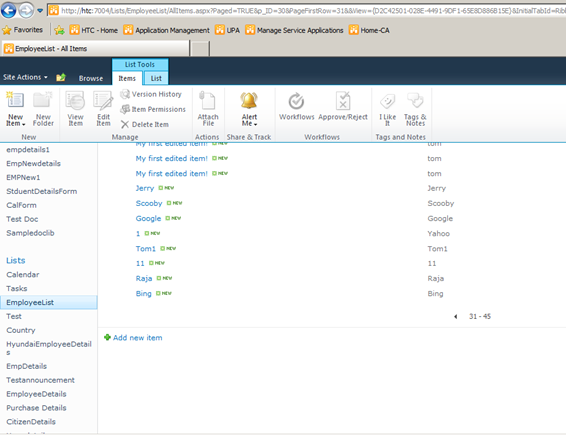
The item gets added in List as below,
Run again and select the Option “2”.

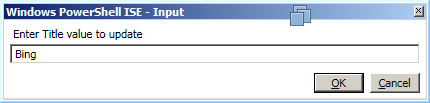
Checks for Title equals “Bing”

Now the item Bing gets updated to Google in the list.
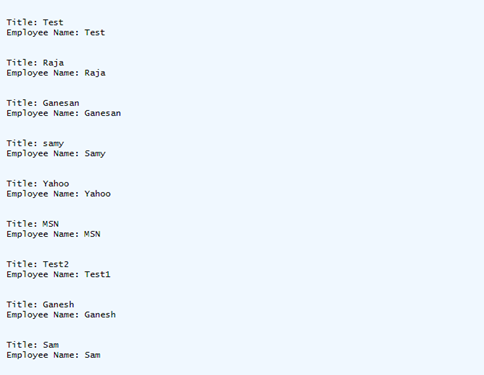
Run the Script again and enter option “3”.
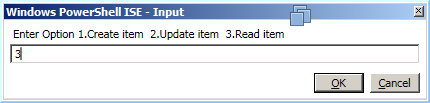
The output will be printed as below,
Click below to download the solution,
https://1drv.ms/u/s!ArddhCoxftkQg9VV49MnJI30l3tRsA
CRUD Operation using Server object model in Console Application
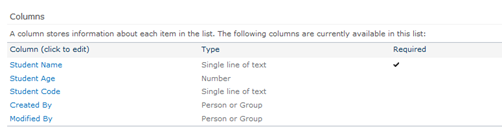
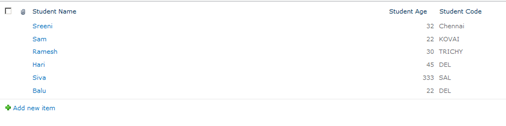
Create a List “Student Details” in Share point as shown below,

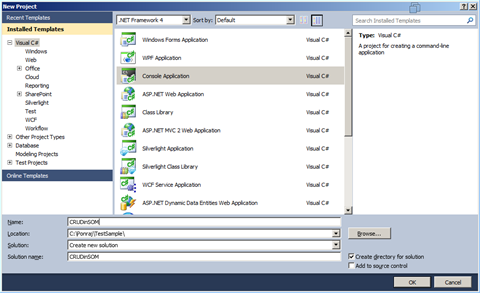
Create a new Console Application as shown below,
Click Ok.
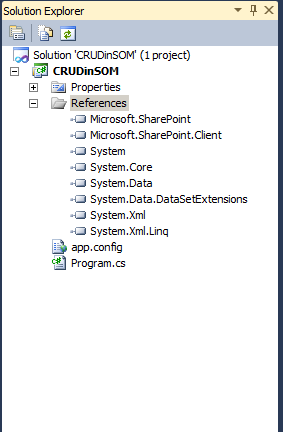
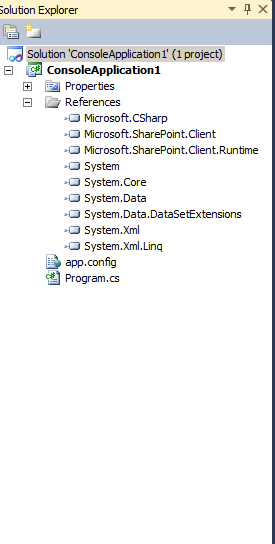
Add References in the Solution as shown in Solution Explorer,
Replace the Class Program with the below code,
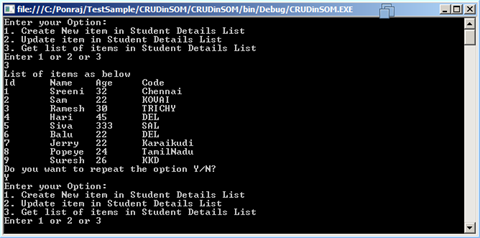
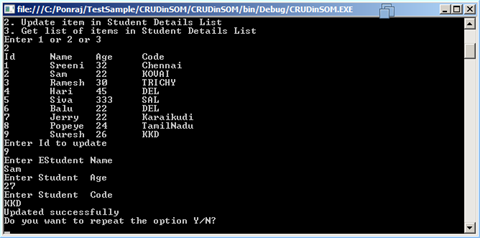
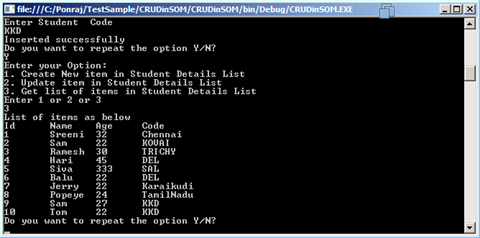
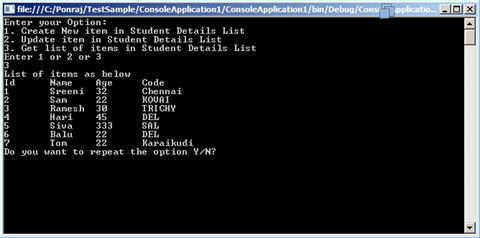
| class Program { static void Main(string[] args) { string siteUrl = “http://htc:7004/“; using (SPSite site = new SPSite(siteUrl)) // Site Collection { using (SPWeb web = site.OpenWeb()) // Site { SPList list = web.Lists[“Student Details”]; // List SPQuery curQry = new SPQuery(); curQry.Query = “”; startconsole: Console.WriteLine(“Enter your Option:”); Console.WriteLine(“1. Create New item in Student Details List”); Console.WriteLine(“2. Update item in Student Details List”); Console.WriteLine(“3. Get list of items in Student Details List”); Console.WriteLine(“Enter 1 or 2 or 3”); int optionvalue = Convert.ToInt32(Console.ReadLine()); if (optionvalue == 1) { Console.WriteLine(“Enter EStudent Name”); string EmpName = Console.ReadLine(); Console.WriteLine(“Enter Student Age”); string Age = Console.ReadLine(); Console.WriteLine(“Enter Student Code”); string Code = Console.ReadLine(); SPListItem oListItem = list.Items.Add(); oListItem[“Title”] = EmpName; oListItem[“Student_x0020_Age”] = Age; oListItem[“Student_x0020_Code”] = Code; oListItem.Update(); Console.WriteLine(“Inserted successfully”); } else if (optionvalue == 2) { //Get the Items using Query SPListItemCollection olistitemcollection = list.GetItems(curQry); Console.WriteLine(“Id” + “\t” + “Name” + “\t” + “Age” + “\t” + “Code”); foreach (SPListItem oitem in olistitemcollection) { Console.WriteLine(Convert.ToString(oitem[“ID”]).Trim() + “\t” + Convert.ToString(oitem[“Title”]).Trim() + “\t” + oitem[“Student_x0020_Age”] + “\t” + oitem[“Student_x0020_Code”]); } Console.WriteLine(“Enter Id to update”); int id = Convert.ToInt32(Console.ReadLine()); Console.WriteLine(“Enter EStudent Name”); string EmpName = Console.ReadLine(); Console.WriteLine(“Enter Student Age”); string Age = Console.ReadLine(); Console.WriteLine(“Enter Student Code”); string Code = Console.ReadLine(); SPListItem oListItem = list.Items.GetItemById(id); oListItem[“Title”] = EmpName; oListItem[“Student_x0020_Age”] = Age; oListItem[“Student_x0020_Code”] = Code; oListItem.Update(); Console.WriteLine(“Updated successfully”); } else if (optionvalue == 3) { Console.WriteLine(“List of items as below”); SPListItemCollection olistitemcollection = list.GetItems(curQry); Console.WriteLine(“Id” + “\t” + “Name” + “\t” + “Age” + “\t” + “Code”); foreach (SPListItem oitem in olistitemcollection) { Console.WriteLine(Convert.ToString(oitem[“ID”]).Trim() + “\t” + Convert.ToString(oitem[“Title”]).Trim() + “\t” + oitem[“Student_x0020_Age”] + “\t” + oitem[“Student_x0020_Code”]); } } Console.WriteLine(“Do you want to repeat the option Y/N?”); string optionresult = Console.ReadLine(); if (optionresult == “Y”) { goto startconsole; } } } } } |
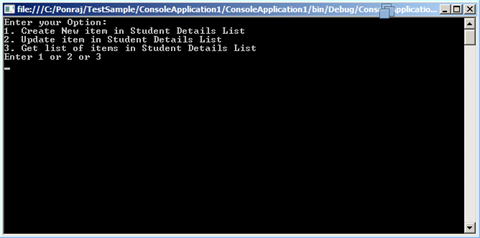
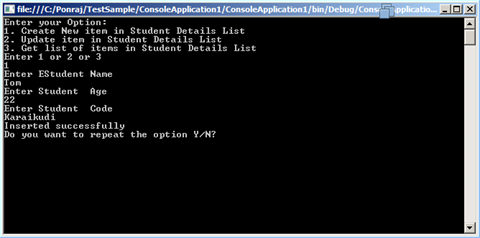
Output as shown below,
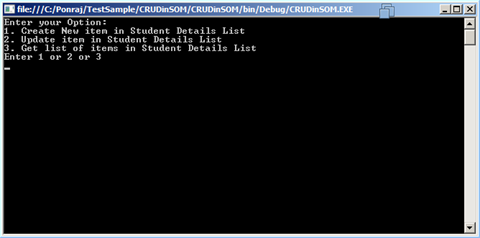
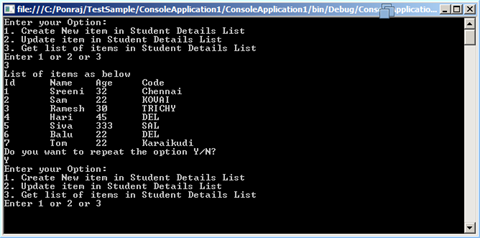
Enter Option 3
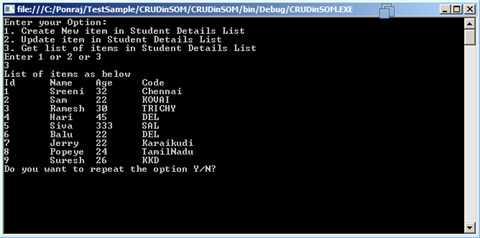
Enter Y
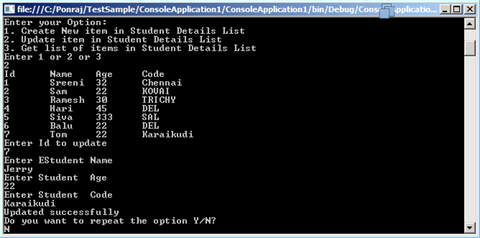
Enter Option 2
Enter Y and enter Option 1

Click below link to download the solution,
https://1drv.ms/u/s!ArddhCoxftkQg9VMr5BmgrwH2-FzMA
CRUD operation in Client side object model C#.net
Document by Ganesanva@hotmail.com – + 919042710472
This Blog helps you to do CSOM Crud operation in SharePoint 2010 using Managed C# code.
Create a List “Student Details” in Share point as shown below,

Create a new Console Application as shown below,
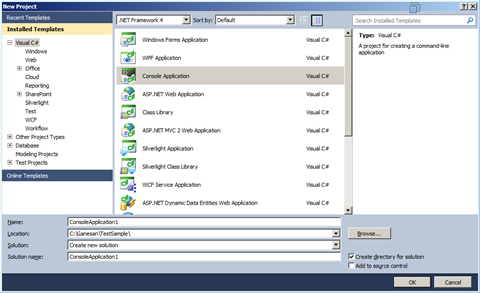
Click Ok.
Add References in the Solution as shown in Solution Explorer,
Replace the Class Program with the below code,
|
class Program { static void Main(string[] args) { string siteUrl = “http://htc:7004/“; ClientContext clientContext = new ClientContext(siteUrl); List oList = clientContext.Web.Lists.GetByTitle(“Student Details”); startconsole: Console.WriteLine(“Enter your Option:”); Console.WriteLine(“1. Create New item in Student Details List”); Console.WriteLine(“2. Update item in Student Details List”); Console.WriteLine(“3. Get list of items in Student Details List”); Console.WriteLine(“Enter 1 or 2 or 3”); int optionvalue = Convert.ToInt32(Console.ReadLine()); if (optionvalue == 1) { Console.WriteLine(“Enter EStudent Name”); string EmpName = Console.ReadLine(); Console.WriteLine(“Enter Student Age”); string Age = Console.ReadLine(); Console.WriteLine(“Enter Student Code”); string Code = Console.ReadLine(); ListItemCreationInformation itemCreateInfo = new ListItemCreationInformation(); ListItem oListItem = oList.AddItem(itemCreateInfo); oListItem[“Title”] = EmpName; oListItem[“Student_x0020_Age”] = Age; oListItem[“Student_x0020_Code”] = Code; oListItem.Update(); clientContext.ExecuteQuery(); Console.WriteLine(“Inserted successfully”); } else if (optionvalue == 2) { CamlQuery oquery = new CamlQuery(); ListItemCollection oListItemCollection = oList.GetItems(oquery); clientContext.Load(oListItemCollection); clientContext.ExecuteQuery(); Console.WriteLine(“Id” + “\t” + “Name” + “\t” + “Age” + “\t” + “Code”); foreach (ListItem oitem in oListItemCollection) { Console.WriteLine(Convert.ToString(oitem[“ID”]).Trim() + “\t” + Convert.ToString(oitem[“Title”]).Trim() + “\t” + oitem[“Student_x0020_Age”] + “\t” + oitem[“Student_x0020_Code”]); } Console.WriteLine(“Enter Id to update”); int id = Convert.ToInt32(Console.ReadLine()); Console.WriteLine(“Enter EStudent Name”); string EmpName = Console.ReadLine(); Console.WriteLine(“Enter Student Age”); string Age = Console.ReadLine(); Console.WriteLine(“Enter Student Code”); string Code = Console.ReadLine(); ListItemCreationInformation itemCreateInfo = new ListItemCreationInformation(); ListItem oListItem = oList.GetItemById(id); oListItem[“Title”] = EmpName; oListItem[“Student_x0020_Age”] = Age; oListItem[“Student_x0020_Code”] = Code; oListItem.Update(); clientContext.ExecuteQuery(); Console.WriteLine(“Updated successfully”); } else if (optionvalue == 3) { CamlQuery oquery = new CamlQuery(); ListItemCollection oListItemCollection = oList.GetItems(oquery); clientContext.Load(oListItemCollection); clientContext.ExecuteQuery(); Console.WriteLine(“List of items as below”); Console.WriteLine(“Id” + “\t” + “Name” + “\t” + “Age” + “\t” + “Code”); foreach (ListItem oitem in oListItemCollection) { Console.WriteLine(Convert.ToString(oitem[“ID”]).Trim() + “\t” + Convert.ToString(oitem[“Title”]).Trim() + “\t” + oitem[“Student_x0020_Age”] + “\t” + oitem[“Student_x0020_Code”]); } } Console.WriteLine(“Do you want to repeat the option Y/N?”); string optionresult = Console.ReadLine(); if (optionresult == “Y”) { goto startconsole; } } } |
Output as shown below,
Enter Option 1,
Enter Option 3
Enter Option Y
Enter Option 2

Enter N to exit
Click below to download the solution,
https://1drv.ms/u/s!ArddhCoxftkQg9VJ4aFU07BD91QxkA
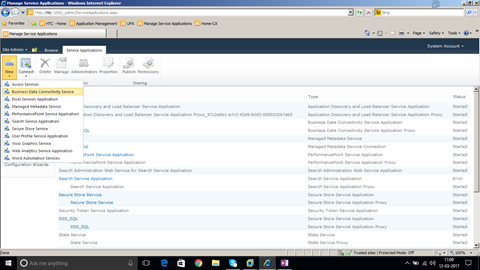
Create External List using BCS in share point 2010
Go to Application Management -> Manage Service Applications as shown below.
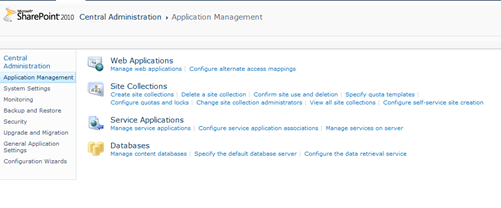
Click on New ->Business Data Connectivity Service
Enter Service Application Name and Click OK.
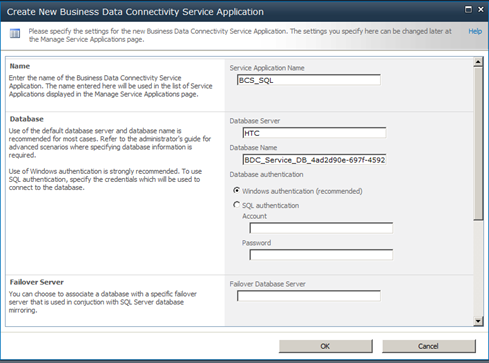
Business Data Connectivity Service application is created as shown below,
Create New -> Secure Store Service application as shown below,
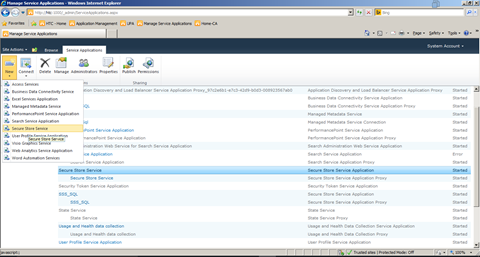
Enter the name “Secure Store Service” and Click Ok.
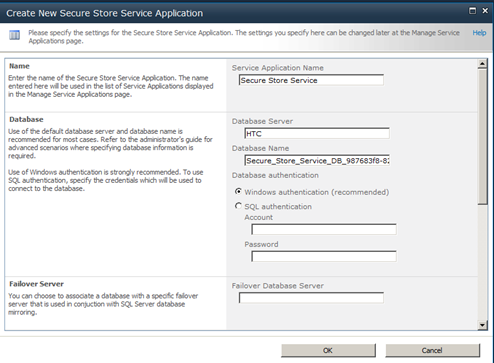
Secure Store service is created as shown below.
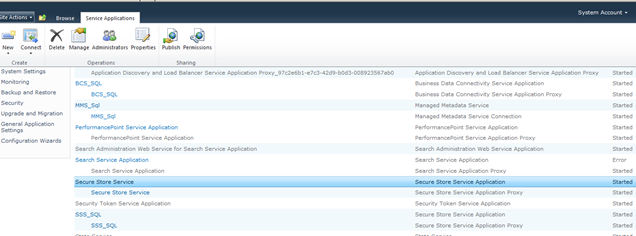
Business Connectivity service and Secure store service are the prerequisites for Creating BCS in SharePoint.
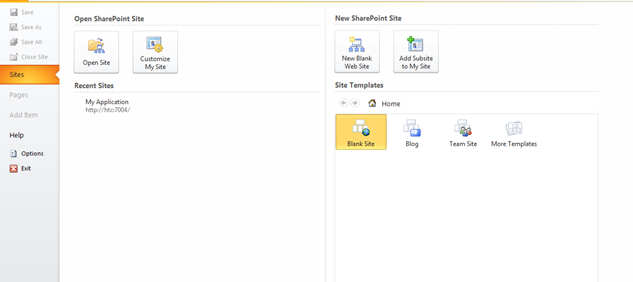
Open site in SharePoint Designer as shown below.
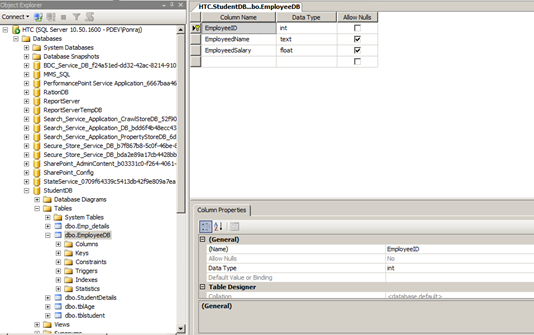
Open Sql Server and Create a Database StudentDB.
Create a Table EmployeeDB with below Script,
| CREATE TABLE [dbo].[EmployeeDB]( [EmployeeID] [int] IDENTITY(1,1) NOT NULL, [EmployeedName] [text] NULL, [EmployeedSalary] [float] NULL, CONSTRAINT [PK_EmployeeDB] PRIMARY KEY CLUSTERED ( [EmployeeID] ASC )WITH (PAD_INDEX = OFF, STATISTICS_NORECOMPUTE = OFF, IGNORE_DUP_KEY = OFF, ALLOW_ROW_LOCKS = ON, ALLOW_PAGE_LOCKS = ON) ON [PRIMARY] ) ON [PRIMARY] TEXTIMAGE_ON [PRIMARY] |
Table Design looks as below,
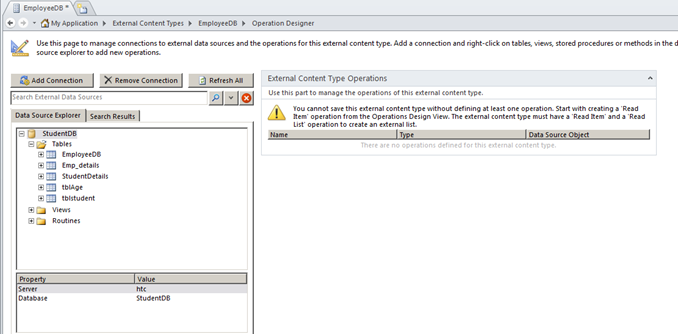
Go to External Content types option in SPD as shown below,
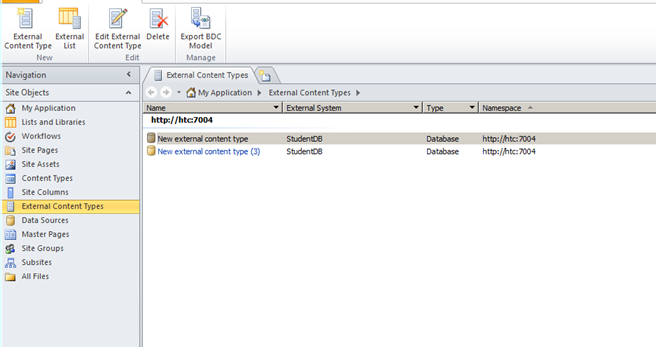
Click on External Content Type button in Top menu. The designer looks as below,
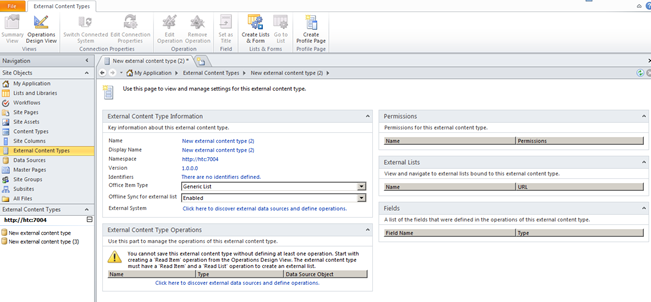
Click on the option “Click here to discover external data sources and define operations” under External Content Type Operations.
The designer looks as below,
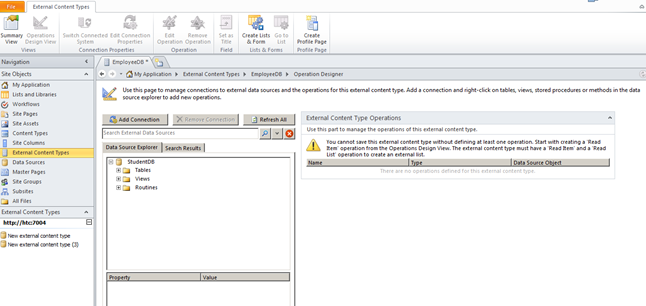
Click on Add Connection.
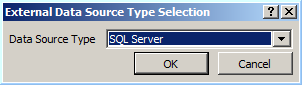
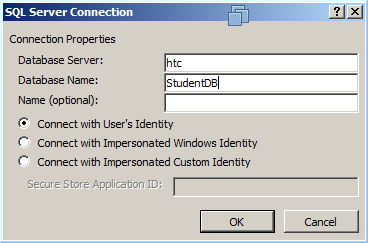
Click OK.
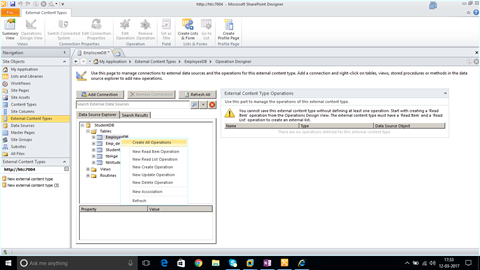
Right Click on the Table and Select Create all operations as shown below.
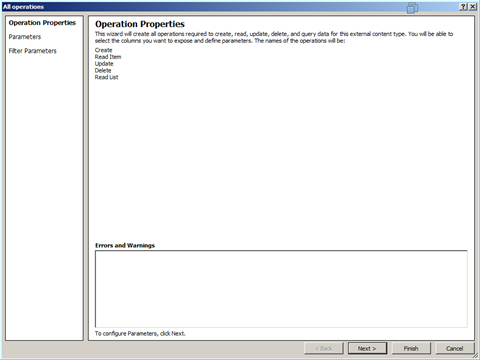
Click on Next.
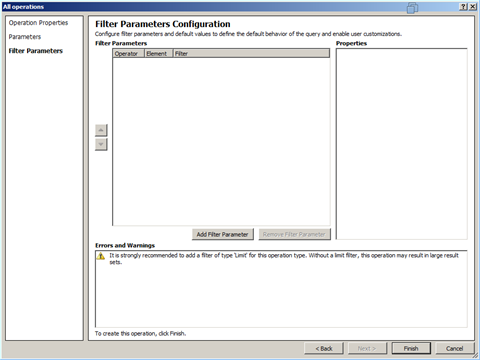
Click on Finish.
Save the Content Type in the Name EmployeeDB as shown below.
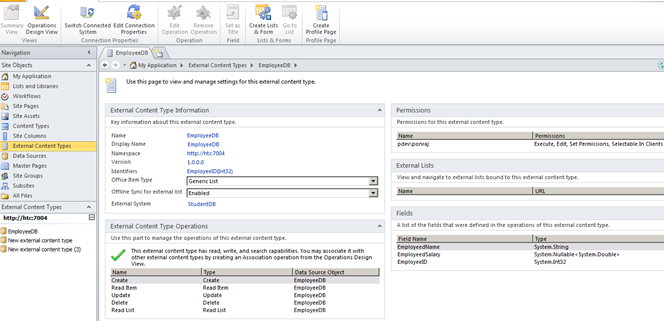
Open the SharePoint Site http://htc:7004/ in Browser.
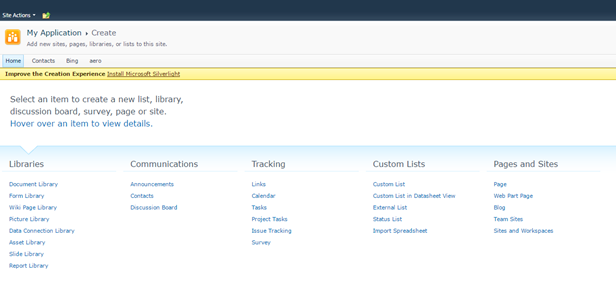
Click on Site Action -> Site Content.
Click on Create.

Click on External List.
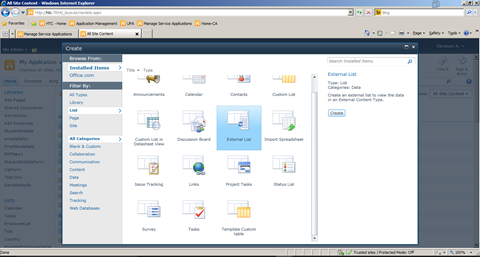
Click Create.
Select the Content type from the list.
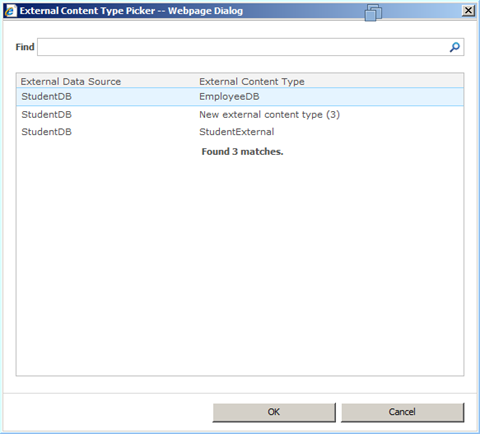
Click Ok.
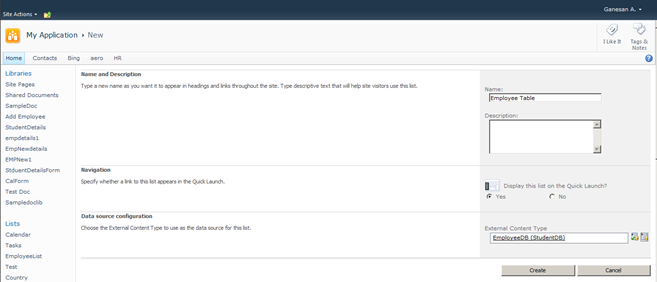
Give name as Employee Table and Click on Create.
The Output as below,
External List is created as shown below.
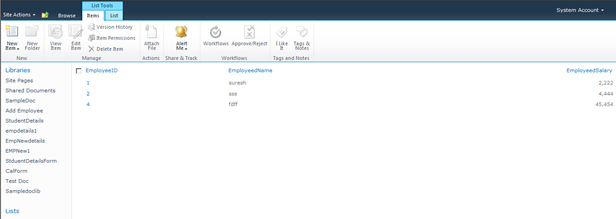
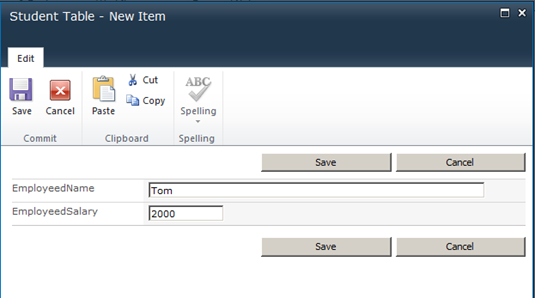
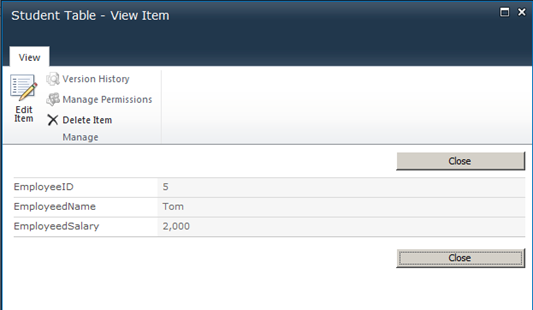
Now the External List allow CRUD Operation.
Create Site Columns, Content Types, Bind content type to list in share point
Document by Vairavan – enquiry@softwaretraininginchennai.com – + 919042710472
Navigate to the Site URL http://htc:7004/
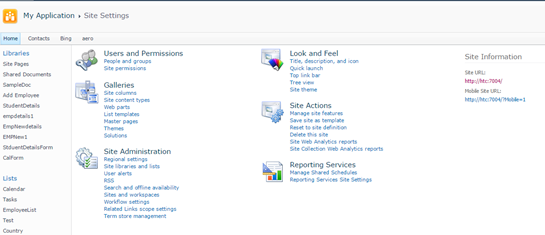
Click on Site Action -> Site Settings
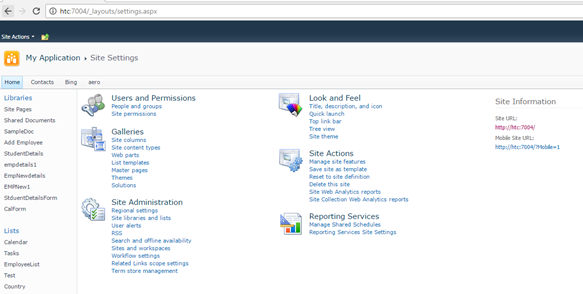
Click on Site Columns in Gallery.
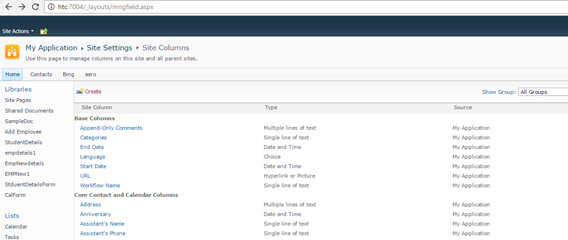
http://htc:7004/_layouts/mngfield.aspx
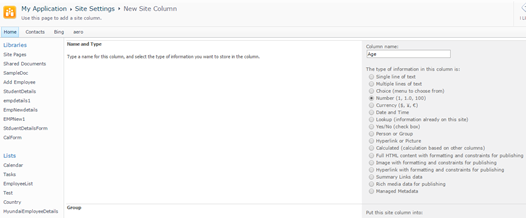
Click on Create.
Create a Site column with column name StudentName and type as Single Line of Text. Click Ok.
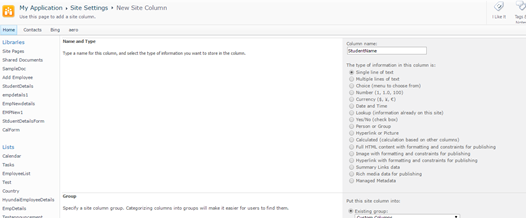
Create Site column Age with Number as DataType.
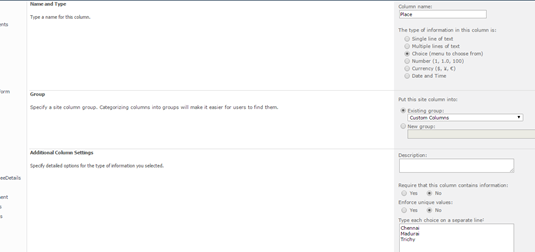
Create a site column Place with Choice
Chennai
Madurai
Trichy.
Navigate to Site Action –>Site Settings
Click on Site Content Types in Gallery.
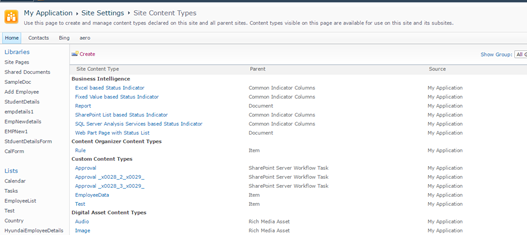
Click on Create.Create a site content type with name as StudentDetails and Parent Content Type from as
List Content Type and Parent Content Type as Item.
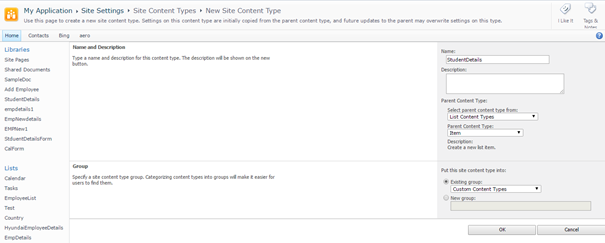
Click Ok.
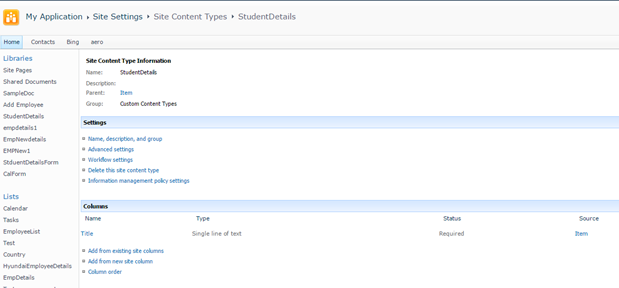
Click on Add from Existing Site column.
Select Custom Columns in the dropdown.
Add StudentName,Age,Place to Columns to add.Click on Add.
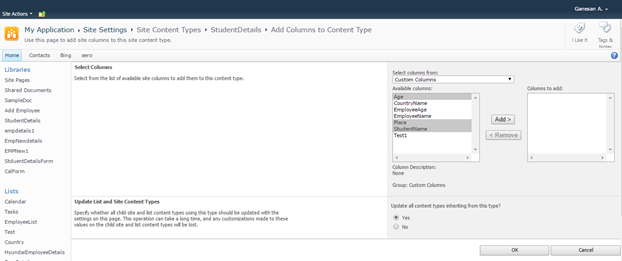
Click Ok.
Create a Custom List as shown below.
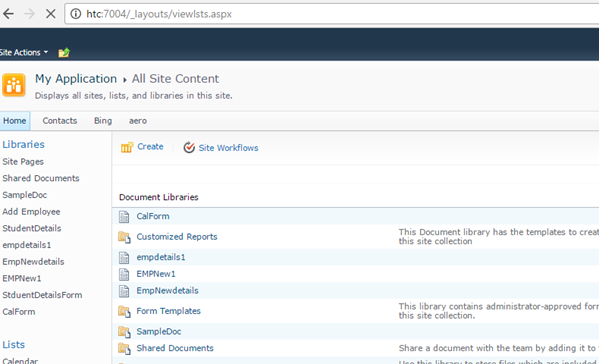
Click on Site Action –> View All site content
Click on Create.
Select Custom List as shown.
Create a List StudentDB.
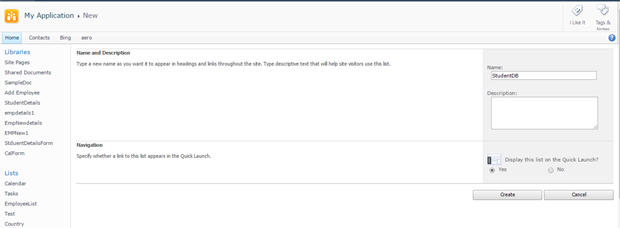
Click on Create.
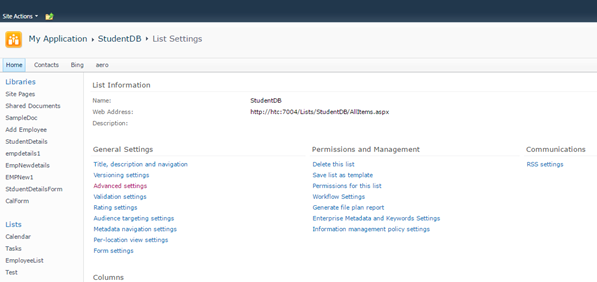
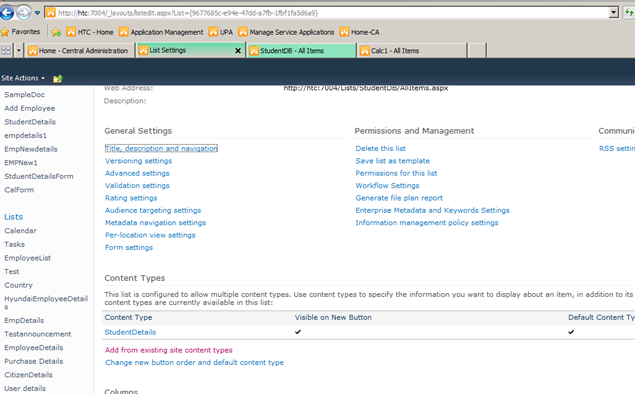
Click on List settings. Click on Advanced Settings.
Change Allow Management of Content Types to Yes.
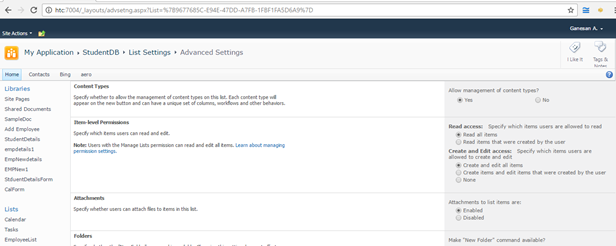
Click Ok.
Click on Add from Existing Site content Types from Content Types Tab.
Select Custom Content Types from Dropdown as shown below.
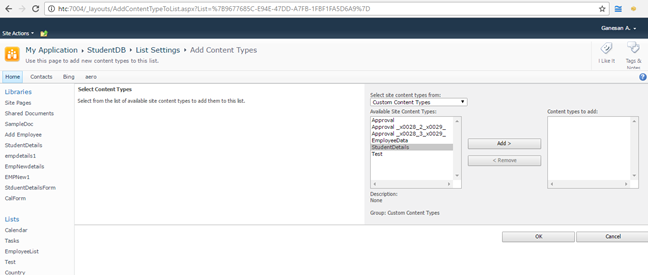
Select Student Details and Click on Add.
Click on Ok .Now the content Type will be added to List.
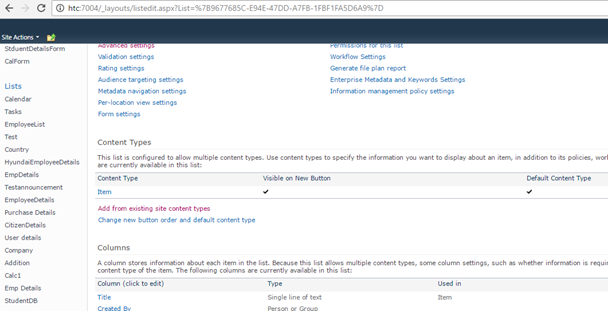
Now you can see both content types.

Click on Item Content Type.
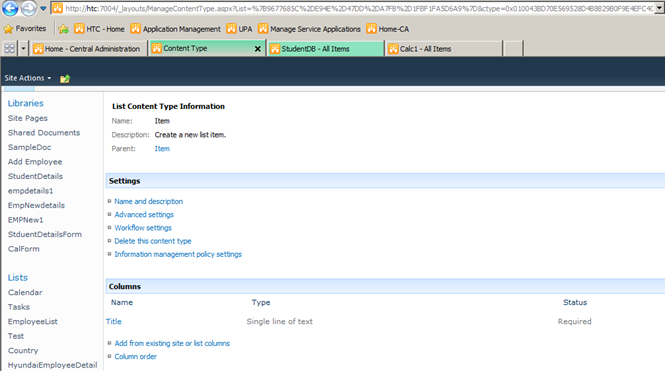
Click on Delete this Content Type.
Now you can see only one Content Type associated with the List ie. StudentDetails .
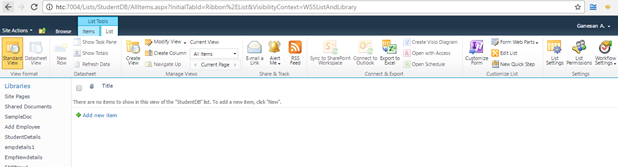
Click on New item in StudentDb List.It shows StudentDetails ContentType.
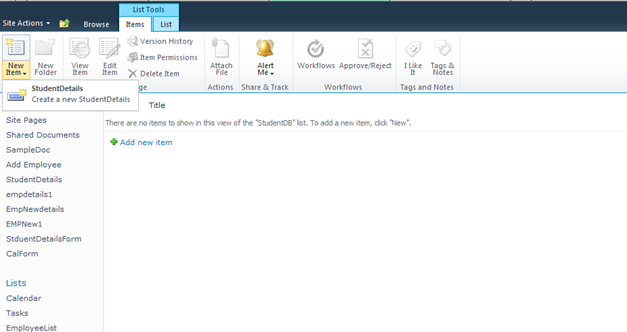
http://htc:7004/Lists/StudentDB/AllItems.aspx
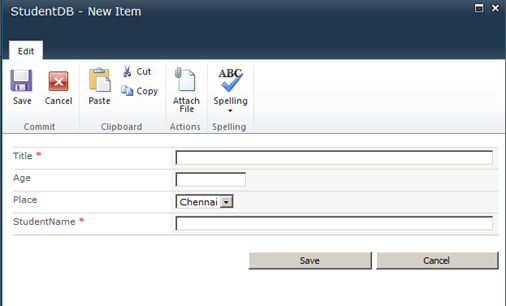
Click on New Student Details link. The New form appears as below.
Click on Modify View and Add the columns to View.
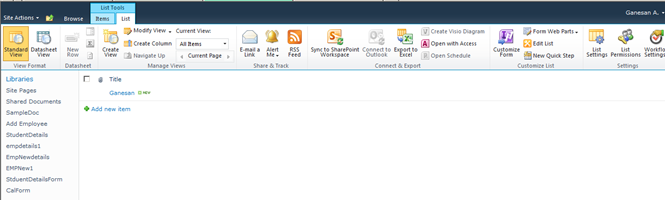
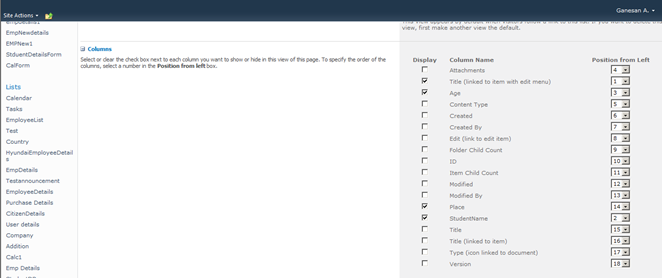
Click on Ok .Now the view looks as below.

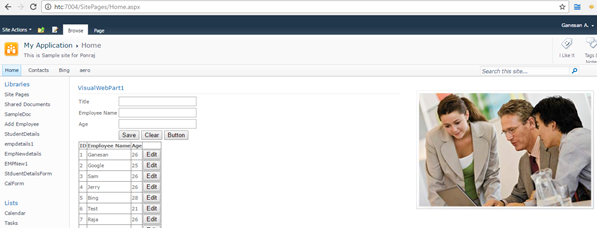
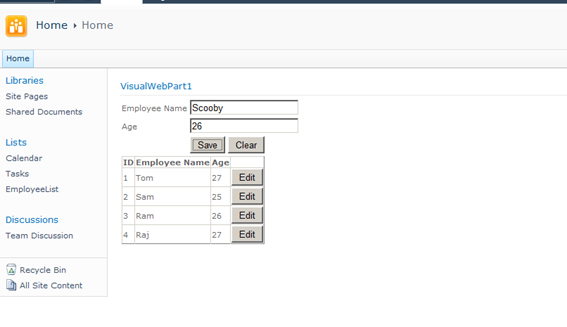
CRUD operation with SharePoint List in Visual web part
Document by Ganesan – Ganesanva@hotmail.com – + 919600370429
-
Create EmployeeList in Sharepoint 2010 site with the below Columns.
EmployeeName, Age
- Create a new Visual Web part Project using File –>New Project
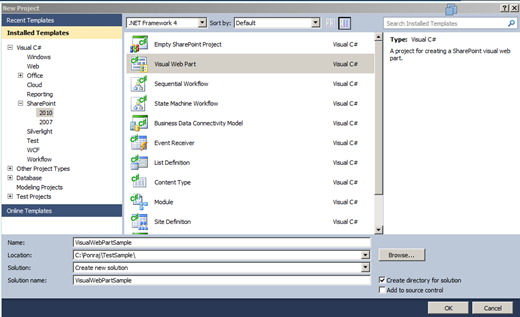
Click Ok.
The Solution Explorer will looks as below,
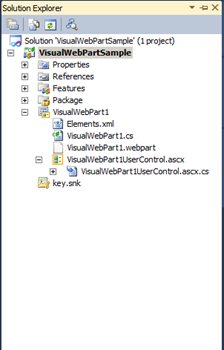
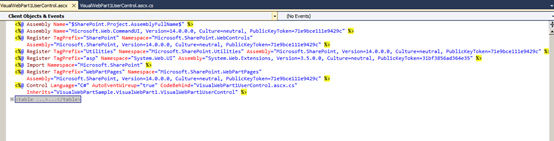
In VisualWebPart1UserControl.ascx Put the below code snippet,
| <table border=”0″ cellpadding=”2″ cellspacing=”2″> <tr> <td colspan=”2″ style=”color:Green”> <asp:Label ID=”lblresults” runat=”server”></asp:Label> </td> </tr> <tr> <td> Employee Name </td> <td> <asp:TextBox ID=”txtEmployeeName” runat=”server”></asp:TextBox> </td> </tr> <tr> <td> Age </td> <td> <asp:TextBox ID=”txtAge” runat=”server”></asp:TextBox> </td> </tr> <tr> <td> </td> <td> <asp:Button ID=”btnSave” runat=”server” Text=”Save” OnClick=”btnSave_Click” /> <asp:Button ID=”btnUpdate” runat=”server” Text=”Update” onclick=”btnUpdate_Click” /> <asp:HiddenField ID=”hfId” runat=”server” /> <asp:Button ID=”btnClear” runat=”server” Text=”Clear” onclick=”btnClear_Click” /> </td> </tr> <tr> <td colspan=”2″> <asp:GridView ID=”grvEmployeeDetails” runat=”server” AutoGenerateColumns=”false”> <Columns> <asp:BoundField DataField=”ID” HeaderText=”ID” /> <asp:BoundField DataField=”EmployeeName” HeaderText=”Employee Name” /> <asp:BoundField DataField=”Age” HeaderText=”Age” /> <asp:TemplateField> <ItemTemplate> <asp:Button ID=”btnEdit” runat=”server” Text=”Edit” onclick=”btnEdit_Click” /> </ItemTemplate> </asp:TemplateField> </Columns> </asp:GridView> </td> </tr> </table> |
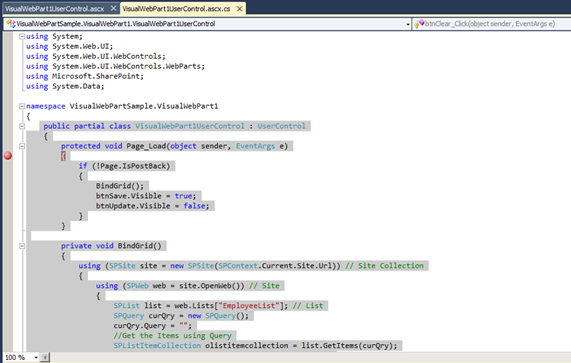
In VisualWebPart1UserControl.ascx.cs put/Replace the below code snippet,
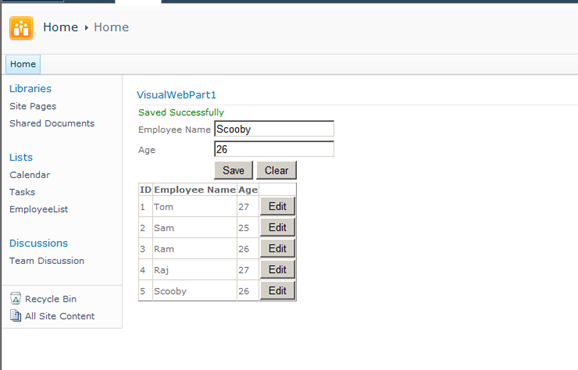
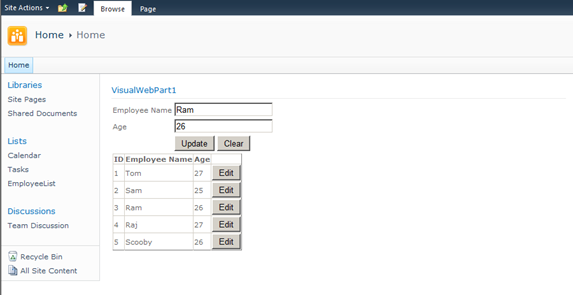
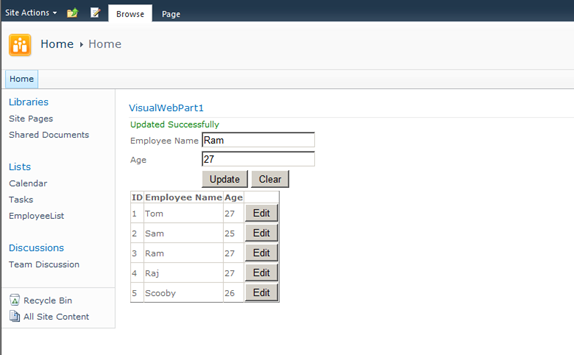
| public partial class VisualWebPart1UserControl : UserControl { protected void Page_Load(object sender, EventArgs e) { if (!Page.IsPostBack) { BindGrid(); btnSave.Visible = true; btnUpdate.Visible = false; } } private void BindGrid() { using (SPSite site = new SPSite(SPContext.Current.Site.Url)) // Site Collection { using (SPWeb web = site.OpenWeb()) // Site { SPList list = web.Lists[“EmployeeList”]; // List SPQuery curQry = new SPQuery(); curQry.Query = “”; //Get the Items using Query SPListItemCollection olistitemcollection = list.GetItems(curQry); DataTable dt = olistitemcollection.GetDataTable(); grvEmployeeDetails.DataSource = dt; grvEmployeeDetails.DataBind(); } } } protected void btnSave_Click(object sender, EventArgs e) { using (SPSite site = new SPSite(SPContext.Current.Site.Url)) // Site Collection { using (SPWeb web = site.OpenWeb()) // Site { SPList list = web.Lists[“EmployeeList”]; // List SPListItem oListItem = list.Items.Add(); oListItem[“Title”] = txtEmployeeName.Text; oListItem[“EmployeeName”] = txtEmployeeName.Text; oListItem[“Age”] = txtAge.Text; oListItem.Update(); BindGrid(); lblresults.Text = “Saved Successfully”; } } } protected void btnEdit_Click(object sender, EventArgs e) { Button btn = (Button)sender; //Get the row that contains this button GridViewRow gvr = (GridViewRow)btn.NamingContainer; hfId.Value = gvr.Cells[0].Text; txtEmployeeName.Text = gvr.Cells[1].Text; txtAge.Text = gvr.Cells[2].Text; btnSave.Visible = false; btnUpdate.Visible = true; } protected void btnUpdate_Click(object sender, EventArgs e) { using (SPSite site = new SPSite(SPContext.Current.Site.Url)) // Site Collection { using (SPWeb web = site.OpenWeb()) // Site { SPList list = web.Lists[“EmployeeList”]; // List SPListItem oListItem = list.Items.GetItemById(Convert.ToInt32(hfId.Value)); oListItem[“Title”] = txtEmployeeName.Text; oListItem[“EmployeeName”] = txtEmployeeName.Text; oListItem[“Age”] = txtAge.Text; oListItem.Update(); BindGrid(); lblresults.Text = “Updated Successfully”; } } } protected void btnClear_Click(object sender, EventArgs e) { txtEmployeeName.Text = string.Empty; txtAge.Text = string.Empty; hfId.Value = string.Empty; lblresults.Text = string.Empty; btnSave.Visible = true; btnUpdate.Visible = false; } } |
Right click on the Project and Click Deploy.
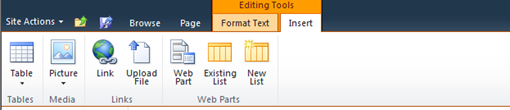
Go to Home Page and Click on Site Actions –>Edit Page
Insert –>Web part in Ribbon.
Select the Web part and click Add.
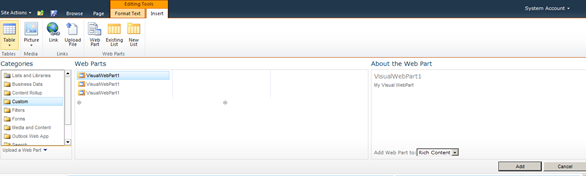
The Output as below,
Click below to download the solution,
https://1drv.ms/u/s!ArddhCoxftkQg6l3ED81o25f4nzffg
Dot net / SharePoint freelance Consultants in Chennai
Document by Ganesan – Ganesanva@hotmail.com – +919042710472
Given the huge demand for dot net and SharePoint applications today and the growing importance of freelancers across the city, .net and SharePoint freelancers in Chennai have engaged in providing the best available professional coaching in the software applications. The job opportunities for dot net with certification have significantly increased the number of .net freelancers in Chennai. Whether it is for professional or educational purposes, it is advisable to take a Dot net Freelance trainer in Chennai to meet the ever-changing demands of corporates and educational systems.
Hiring a Microsoft certified trainer in Chennai helps with professional coaching on Microsoft technologies such Asp.Net, C#.Net, SQL server etc. And in today’s digitalized world, the virtual presence of the trainers in substantial enough for an expert coaching on the applications. An online Dot net trainer uses the best practices of the industry to ensure dot net and SharePoint solutions meet business and educational needs of contemporary period.
A certified Dot net corporate trainer in Chennai combines the passion for technological innovation and deep platform expertise to ensure that proper training is delivered. The key focus of an online Dot net trainer in Chennai is to equip individuals leverage dot net and SharePoint technologies effectively to meet the professional and educational requirements. Young and dynamic professional and aspiring students can utilize the services of many Dot net part time consultants in Chennai to handle challenging and innovative projects. Further, given the array of opportunities in SharePoint and dot net, career as a Freelance SharePoint developer in Chennai or as an asp.net MVC consultant in Chennai holds a lot of promise for the future.
Today’s competitive market has brought dot net and SharePoint professionals to the forefront. A few years ago, a dot net or a SharePoint consultant in Chennai would have been just another consultant but today dot net and SharePoint developers have defined the career path of many individuals and professional services. Being ahead of the industry and constantly upgrading in the latest versions, dot net and SharePoint developers have been and are the preferred vendors for many corporates and students for their training and educational needs.
Along with a good demonstration of how projects are developed in real-time environment, a Microsoft certified trainer in Chennai imparts confidence and knowledge of technical skills for both freshers and working professionals and also ensures that the sessions are well structured and interactive.
With the shifting expectations of the IT industry and education, the ecosystems of dot net and SharePoint and the range of professionalism exhibited by dot net and SharePoint trainers have become more radical and created excitement and interest in learning more about the applications.
Recent Posts
Categories
- All
- Angularjs training in Chennai
- ASP.NET Core
- dot net training
- dot net training in chennai
- dotnet full stack developer
- Free dotnet training
- information on dotnet
- Learn Java in chennai
- Learn Python at Karaikudi
- learn python online
- learn python online from chennai
- Linq Queries in .net
- mutual funds
- MVC Training Tutorials
- PHP Training in Chennai
- pmp training online
- power apps online training
- Python Training Online
- share market
- Sharepoint framework online training
- SharePoint Freelancers in Chennai
- software testing
- spfx online training
- Stock market
- Uncategorized