How to Host DOTNET site in IIS
what is IIS?
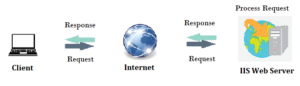
IIS, or Internet Information Services, is a web server software developed by Microsoft for hosting and serving web applications and websites. It is an integral part of the Windows Server operating system and is widely used for deploying and managing web-based applications on the Microsoft platform.
Key features of IIS include:
Web Server Functionality: IIS serves as a powerful web server, handling HTTP and HTTPS requests. It supports various web technologies, including HTML, CSS, JavaScript, and different server-side scripting languages like ASP.NET.
Application Hosting: IIS is designed to host and manage web applications and services built on the Microsoft technology stack, such as ASP.NET, .NET Core, and PHP. It also supports classic ASP (Active Server Pages).
Security: IIS provides robust security features, including authentication, authorization, and SSL/TLS support for encrypting data in transit. It allows administrators to control access to websites and applications based on user roles and permissions.
Scalability: IIS is scalable and can handle a large number of concurrent connections. It supports load balancing and can be configured to distribute incoming requests across multiple servers for improved performance and reliability.
Management Tools: IIS comes with a user-friendly management interface, known as IIS Manager, which allows administrators to configure and manage web server settings, applications, and security features. It also supports remote administration.
Logging and Monitoring: IIS generates logs that provide detailed information about web server activity, helping administrators troubleshoot issues and analyze performance. Additionally, administrators can use performance monitoring tools to track server metrics.
Extensibility: IIS is extensible and supports the integration of various modules and extensions. This allows developers and administrators to add custom functionality, such as URL rewriting, compression, and caching.
FTP Server: In addition to its web server capabilities, IIS includes a built-in FTP (File Transfer Protocol) server, allowing users to transfer files to and from the server.
IIS is a versatile and widely used web server that caters to a broad range of web hosting needs, from simple static websites to complex dynamic web applications. It is a crucial component for organizations leveraging Microsoft technologies in their web development and hosting environments.
Hosting a .NET site in Internet Information Services (IIS) – Introduction:
Hosting a .NET site in Internet Information Services (IIS) is a crucial step in deploying web applications built on the .NET framework. IIS provides a robust and scalable platform for hosting, managing, and securing web applications. This step-by-step guide will walk you through the process of hosting a .NET site in IIS.
Step-by-Step Guide on How to Host a .NET Site in IIS:
Step 1: Install IIS on the Server:
Before hosting a .NET site in IIS, ensure that IIS is installed on the server. You can install IIS through the Windows Features menu. Go to Control Panel -> Programs -> Turn Windows features on or off, and then select Internet Information Services.
Step 2: Install the Appropriate .NET Runtime:
Ensure that the server has the correct version of the .NET runtime installed to support your .NET application. You can download and install the necessary runtime from the official Microsoft website.
Step 3: Publish the .NET Application:
Publish your .NET application using Visual Studio or the command line. This process generates the necessary files for deployment. Choose the appropriate publish settings, including the target framework and deployment configuration.
Step 4: Create a New IIS Site:
Open the IIS Manager and create a new site for your .NET application. Right-click on “Sites” and choose “Add Website.” Enter a unique site name, set the physical path to the location where you published your .NET application, and assign a port number and host name if necessary.
Step 5: Configure Application Pool:
Create a new application pool or use an existing one for your .NET site. Ensure that the application pool is configured to use the correct version of the .NET runtime and is set up with the necessary permissions.
Step 6: Adjust Security Settings:
Review and adjust the security settings for your site. Configure authentication, authorization, and SSL settings based on your application’s requirements. Ensure that the necessary permissions are granted to the application pool identity.
Step 7: Test Your Site:
After configuring IIS, test your .NET site by navigating to the specified URL in a web browser. Ensure that all pages and functionalities work as expected. Monitor the IIS logs for any errors or issues.
Step 8: Monitor and Maintain:
Regularly monitor the performance of your .NET site in IIS. Use tools like Performance Monitor to analyze server metrics and address any performance bottlenecks. Keep the server and IIS components up to date with the latest security patches and updates.
Conclusion:
Hosting a .NET site in IIS involves several essential steps, from installing IIS and the correct .NET runtime to configuring application pools and security settings. Following this step-by-step guide will help you successfully deploy and manage your .NET web application in a secure and scalable environment.
Social tagging: asp.net framework > asp.net mvc > C# DOTNET > IIS with dotnet > learn dotnetRecent Posts
- Banking Sector: Tackling Security and Data Integrity Challenges with .NET Skills
- How Data Analytics Helps Manufacturers in Bangalore Reduce Production Downtime
- Understanding ASP.NET MVC Architecture with Real Examples
- Common Challenges in Learning Programming and How Python Makes It Easier
- Why Companies Are Hiring More React Developers Than Ever Before
Categories
- All
- Angularjs training in Chennai
- ASP.NET Core
- Data Analytics
- Dot Net Development Course
- dot net training
- dot net training in chennai
- dotnet full stack developer
- Free dotnet training
- information on dotnet
- Learn Java in chennai
- Learn Python at Karaikudi
- learn python online
- learn python online from chennai
- Linq Queries in .net
- mutual funds
- MVC Training Tutorials
- PHP Training in Chennai
- pmp training online
- power apps online training
- Power platofrm
- Python Training Online
- React Full Stack Development
- React training
- ReactJs
- share market
- Sharepoint framework online training
- SharePoint Freelancers in Chennai
- software testing
- spfx online training
- SQL Course Details
- Stock market
- Uncategorized