Understanding Microsoft Azure Fundamentals
Microsoft Azure has become a prominent platform in the cloud computing space, providing a wide range of services to individuals, companies, and organizations globally. It is becoming more and more important for businesses to grasp the foundations of Microsoft Azure as they move their operations to the cloud. The purpose of this article is to give a general overview of Azure, including its essential features, advantages, and the reasons behind its rise to prominence in the cloud computing industry.
What is Microsoft Azure?
Microsoft offers a full-featured cloud computing platform called Microsoft Azure. Computing, storage, networking, databases, machine learning, Internet of Things (IoT), and other services are among the many that it provides. With Azure, users can create, launch, and maintain services and applications via Microsoft’s extensive global data centre network.
Key Components of Microsoft Azure:
- Compute: For high-performance computing (HPC) workloads, Azure offers a variety of computing options, such as virtual machines (VMs), containers, serverless computing with Azure Functions, and Azure Batch.
- Storage: Blob Storage for unstructured data, File Storage for cloud file sharing, Queue Storage for messaging between application components, and Disk Storage for virtual machines (VMs) are just a few of the scalable storage options that Azure provides.
- Networking: Users can establish virtual networks, link load balancers to Azure, connect on-premises data centers to Azure, and guarantee secure communication by utilizing Azure VPN Gateway and Azure ExpressRoute features.
- Databases: Azure offers a range of database services, such as Cosmos DB for globally distributed NoSQL databases, Azure SQL Database for relational databases, Azure Database for MySQL and PostgreSQL, and services like Azure Synapse Analytics and Azure Cache for Redis.
- Identity and Access Management (IAM): Microsoft’s cloud-based identity and access management service, Azure Active Directory (Azure AD), enables users to safely log in and access resources.
- AI and Machine Learning: To create, train, and implement machine learning models, Azure provides AI and Machine Learning services like Azure Machine Learning, Azure Cognitive Services, and Azure Databricks.
- Internet of Things (IoT): Services like Azure IoT Central offer an end-to-end IoT application platform, while Azure IoT Hub facilitates safe and scalable connectivity between IoT devices and the cloud.
- Developer Tools: For continuous integration, delivery, and testing, Azure offers a comprehensive range of developer tools and services, such as Azure DevOps, Visual Studio Team Services, and Azure DevTest Labs.
Benefits of Microsoft Azure:
- Scalability: Azure enables companies to adjust their resource levels in response to demand, guaranteeing peak efficiency and optimum performance.
- Global Reach: Azure allows businesses to deploy applications closer to their users for lower latency and an enhanced user experience. Azure has data centers situated in various regions of the world.
- Security and Compliance: Azure guarantees data protection and regulatory compliance across a range of industries by adhering to industry-standard security practices and compliance certifications.
- Cost-effectiveness: Azure provides pay-as-you-go pricing options that spare companies from up-front capital costs by letting them pay only for the resources they really use.
- Integration: Azure offers a seamless ecosystem for application development and management by integrating with other Microsoft products and services, as well as third-party tools and technologies.
Conclusion:
As a key player in the cloud computing space, Microsoft Azure enables enterprises to grow, innovate, and completely reinvent themselves. For people and companies hoping to take full advantage of cloud computing, knowing the foundations of Azure is crucial. Azure is still the go-to option for cloud computing solutions in a variety of industries thanks to its extensive service portfolio, global presence, and dedication to security and compliance.
If you need any Training / Technical Support in DOTNET & SQL Contact +91 90427 10472
How to Host DOTNET site in IIS
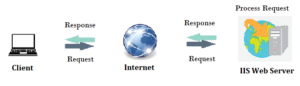
what is IIS?
IIS, or Internet Information Services, is a web server software developed by Microsoft for hosting and serving web applications and websites. It is an integral part of the Windows Server operating system and is widely used for deploying and managing web-based applications on the Microsoft platform.
Key features of IIS include:
Web Server Functionality: IIS serves as a powerful web server, handling HTTP and HTTPS requests. It supports various web technologies, including HTML, CSS, JavaScript, and different server-side scripting languages like ASP.NET.
Application Hosting: IIS is designed to host and manage web applications and services built on the Microsoft technology stack, such as ASP.NET, .NET Core, and PHP. It also supports classic ASP (Active Server Pages).
Security: IIS provides robust security features, including authentication, authorization, and SSL/TLS support for encrypting data in transit. It allows administrators to control access to websites and applications based on user roles and permissions.
Scalability: IIS is scalable and can handle a large number of concurrent connections. It supports load balancing and can be configured to distribute incoming requests across multiple servers for improved performance and reliability.
Management Tools: IIS comes with a user-friendly management interface, known as IIS Manager, which allows administrators to configure and manage web server settings, applications, and security features. It also supports remote administration.
Logging and Monitoring: IIS generates logs that provide detailed information about web server activity, helping administrators troubleshoot issues and analyze performance. Additionally, administrators can use performance monitoring tools to track server metrics.
Extensibility: IIS is extensible and supports the integration of various modules and extensions. This allows developers and administrators to add custom functionality, such as URL rewriting, compression, and caching.
FTP Server: In addition to its web server capabilities, IIS includes a built-in FTP (File Transfer Protocol) server, allowing users to transfer files to and from the server.
IIS is a versatile and widely used web server that caters to a broad range of web hosting needs, from simple static websites to complex dynamic web applications. It is a crucial component for organizations leveraging Microsoft technologies in their web development and hosting environments.
Hosting a .NET site in Internet Information Services (IIS) – Introduction:
Hosting a .NET site in Internet Information Services (IIS) is a crucial step in deploying web applications built on the .NET framework. IIS provides a robust and scalable platform for hosting, managing, and securing web applications. This step-by-step guide will walk you through the process of hosting a .NET site in IIS.
Step-by-Step Guide on How to Host a .NET Site in IIS:
Step 1: Install IIS on the Server:
Before hosting a .NET site in IIS, ensure that IIS is installed on the server. You can install IIS through the Windows Features menu. Go to Control Panel -> Programs -> Turn Windows features on or off, and then select Internet Information Services.
Step 2: Install the Appropriate .NET Runtime:
Ensure that the server has the correct version of the .NET runtime installed to support your .NET application. You can download and install the necessary runtime from the official Microsoft website.
Step 3: Publish the .NET Application:
Publish your .NET application using Visual Studio or the command line. This process generates the necessary files for deployment. Choose the appropriate publish settings, including the target framework and deployment configuration.
Step 4: Create a New IIS Site:
Open the IIS Manager and create a new site for your .NET application. Right-click on “Sites” and choose “Add Website.” Enter a unique site name, set the physical path to the location where you published your .NET application, and assign a port number and host name if necessary.
Step 5: Configure Application Pool:
Create a new application pool or use an existing one for your .NET site. Ensure that the application pool is configured to use the correct version of the .NET runtime and is set up with the necessary permissions.
Step 6: Adjust Security Settings:
Review and adjust the security settings for your site. Configure authentication, authorization, and SSL settings based on your application’s requirements. Ensure that the necessary permissions are granted to the application pool identity.
Step 7: Test Your Site:
After configuring IIS, test your .NET site by navigating to the specified URL in a web browser. Ensure that all pages and functionalities work as expected. Monitor the IIS logs for any errors or issues.
Step 8: Monitor and Maintain:
Regularly monitor the performance of your .NET site in IIS. Use tools like Performance Monitor to analyze server metrics and address any performance bottlenecks. Keep the server and IIS components up to date with the latest security patches and updates.
Conclusion:
Hosting a .NET site in IIS involves several essential steps, from installing IIS and the correct .NET runtime to configuring application pools and security settings. Following this step-by-step guide will help you successfully deploy and manage your .NET web application in a secure and scalable environment.
Developing ASP.NET Core MVC Web Applications:
Introduction:
Creating dynamic and interactive web pages using the ASP.NET Core framework is required when developing ASP.NET Core MVC (Model-View-Controller) web applications. Model, View, and Controller (MVC) is a design pattern that divides an application into three main components: Model, View, and Controller. ASP.NET Core MVC is a lightweight, cross-platform, open-source framework for building modern, scalable web applications.
Here is a step-by-step tutorial for creating ASP.NET Core MVC web applications:
1. Install Prerequisites:
As your development environment, install Visual Studio or use Visual Studio Code.
Install the.NET SDK from the Microsoft website:
https://dotnet.microsoft.com/download
2. Create a new ASP.NET Core MVC project as follows:
Open Visual Studio and choose “Create a new project.”
Select “ASP.NET Core Web App” and then “ASP.NET Core with MVC” as the template.
Configure the project parameters and then click “Create.”
3. Understand the Project Structure:
Look into the project structure to learn about the key components:
Controllers: Controllers are responsible for handling user input and orchestrating interactions between the model and the view.
Views: Present information to the user and collect user input.
Models: Represent the application’s data and business logic.
4. Define Models:
Model classes should be created to represent the data entities in your application.
Data annotations can be used to validate data and define metadata.
public class Product
{
public int Id { get; set; }
[Required]
public string Name { get; set; }
public decimal Price { get; set; }
}
5. Create Controllers:
To handle user requests and interact with models, create controllers.
Define controller actions to respond to specific HTTP requests.
public class ProductController : Controller
{
public IActionResult Index()
{
// Retrieve and return a list of products
return View(products);
}
public IActionResult Details(int id)
{
// Retrieve a specific product by id and return it
return View(product);
}
}
6. Develop Views:
To define the presentation layer, create view files (.cshtml).
To display dynamic content, use Razor syntax to embed C# code within HTML.
@model List<Product>
<h2>Product List</h2>
<ul>
@foreach (var product in Model)
{
<li>@product.Name - $@product.Price</li>
}
</ul>
7. Configure Routing:
Define routes in the Startup.cs file to map URLs to controller actions.
app.UseEndpoints(endpoints =>
{
endpoints.MapControllerRoute(
name: "default",
pattern: "{controller=Home}/{action=Index}/{id?}");
});
8. Handle Form Submissions:
In controllers, use the HttpPost attribute to handle form submissions.
[HttpPost]
public IActionResult Create(Product product)
{
// Validate and save the new product
return RedirectToAction("Index");
}
9. Implement Data Access:
To interact with databases, use Entity Framework Core or other data access technologies.
10. If desired, include authorization and authentication:
Authenticate and authorize users in accordance with the specifications of your application.
11. Test Your Application:
Run your application locally and verify various scenarios to test it.
12. Publish Your Application:
Publish your ASP.NET Core MVC application to a cloud platform or hosting environment.
Note: Always refer to the official ASP.NET Core documentation for more information on each stage of development: https://docs.microsoft.com/en-us/aspnet/core/
DOTNET Online Training in Chennai
Unleashing Your DOTNET Software Development Potential
Do you want to learn about versatile and powerful software development – DOTNET & SQL? There is no need to look any further! Our Maria Academy is intended to provide you with the skills and knowledge required to thrive in the fast-paced field of application development.
About DOTNET (.NET)
Microsoft’s .NET framework is a robust and widely used framework for developing a wide range of applications, from desktop and web applications to mobile and cloud solutions. The demand for skilled .NET developers is increasing as the technology industry evolves.
About SQL
SQL, or Structured Query Language, is a programming language that is standardized for managing and manipulating relational databases. It includes commands for querying data, inserting records, updating information, and creating database structures. SQL is required for interacting with databases in a variety of applications, allowing for the structured and organized storage, retrieval, and manipulation of data. Its syntax is consistent across various database management systems, making it a universal database communication language. A solid understanding of SQL is essential in the world of data management and application development, whether you’re a developer, data analyst, or database administrator.
Why Should You Take .NET Online Training?
Versatility: Because .NET supports the development of a wide range of applications, it is a popular framework for a wide range of projects.
Industry Importance: Many large enterprises and organizations rely on .NET to build scalable and secure applications, resulting in many job opportunities.
Cross-Platform Development: .NET Core allows developers to create applications that run on Windows, Linux, and macOS.
Excellence in Web Development: ASP.NET, a component of the .NET framework, is a leading technology for developing powerful and dynamic web applications.
What Our Training Provides:
Comprehensive Curriculum: Our training covers the entire scope of .NET, from fundamental concepts to advanced topics, ensuring you’re ready for real-world projects.
Hands-on Projects: Gain practical experience by working on real-world projects and applying what you’ve learned throughout the course.
Flexibility: Our online format allows you to learn at your own pace, working around your hectic schedule.
Interactive Learning: To improve your comprehension and get answers to any questions, participate in interactive sessions, debates, and Q&A sessions.
Professional Teachers: Learn from professionals in the field who have a great deal of .NET development experience and gain insightful advice.
Who Needs to take:
IT Specialists Seeking Professional Development
Aspiring Programmers
Web Designers
Software Developers
Join Us to Advance Your Career!
Begin your journey to becoming a skilled .NET developer. Our .NET Online Training in Chennai is your ticket to mastering the skills that industry leaders are looking for. Are you prepared to shape your future in software development? Enroll right away!
for Training / Technical Support in .NET, Contact +91 90427 10472
Data Access in ASP.NET MVC
Data access in ASP.NET MVC refers to the process of retrieving, updating, and modifying data from a database or other data sources for use in a web application. There are various ways to accomplish data access in ASP.NET MVC, and the technology you choose generally relies on the requirements and design of your application. Here are some popular data access methods in ASP.NET MVC:
1. Entity Framework (EF): Microsoft’s Entity Framework is a prominent Object-Relational Mapping (ORM) framework. It enables you to work with your data by abstracting the underlying database using highly typed.NET objects. Entity Framework requires you to define your data model as C# classes, and Entity Framework will construct the SQL queries needed to interface with the database.
Follow these steps to get started with Entity Framework in ASP.NET MVC:
a. Use NuGet to install Entity Framework.
b. Create a DbContext-derived data context class.
Create entity classes to represent database tables.
Interact with your data using LINQ queries.
2. ADO.NET: ADO.NET is a lower-level data access technology that allows you to work directly with databases using data providers. ADO.NET can be used to make database connections, run SQL queries, and retrieve data. While it gives you greater power, it often requires you to write more code than Entity Framework.
You can utilize ADO.NET in ASP.NET MVC by following these general steps:
a. Use SqlConnection to create a database connection.
b. Using SqlCommand, create and run SQL queries or stored procedures.
c. To get data, use SqlDataReader or any data reader.
3. Dapper: Dapper is an ADO.NET-based lightweight Object-Relational Mapping (ORM) library. By offering a quick and simple method to map database records to C# objects without the complexities of Entity Framework, it streamlines data access.
You may use Dapper in ASP.NET MVC by following these steps:
a. Use NuGet to install Dapper.
b. Create SQL queries, then execute them using Dapper’s extension methods and map the results to objects.
4. Web API and HTTP Services: In some cases, you might be able to receive data from remote servers using web APIs or HTTP services rather than directly accessing a database. To send HTTP queries to external APIs and use the results in your MVC application, you can use libraries like as HttpClient.
You can use HTTP services and web APIs in the following ways:
a. Create controller actions that send HTTP queries.
b. Create C# objects by deserializing the XML or JSON answers.
Selecting the best approach for data access security, error management, and performance optimization is crucial, regardless of the data access method you use. A clean and maintainable architecture should also be achieved by keeping your data access code distinct from your controllers and views. For example, you can encapsulate data access functionality in repositories or services.
Model in ASP.NET MVC
Introduction to Model in MVC:
In the Model-View-Controller (MVC) architectural pattern, the “Model” is the core component responsible for representing the application’s data and implementing the business logic required for managing and processing that data. The Model plays a crucial role in separating concerns and organizing the structure of an application. It encapsulates the data and provides methods and operations to manipulate and interact with it. By doing so, the Model ensures that the data remains independent of the user interface and the user actions. This separation allows for easier maintenance, scalability, and reusability of the application. Additionally, the Model is responsible for enforcing data integrity and implementing validation rules to ensure the consistency and correctness of the data. It acts as the central hub for data-related operations, such as retrieving, updating, and deleting data, as well as performing complex calculations and transformations. Overall, the Model in MVC serves as the backbone of the application, providing a reliable and efficient way to manage and process data while promoting a clean and organized architecture.
Here is a detailed explanation of the Model in MVC in several areas:
Business Logic: The business logic of the application is contained in the Model. It includes all of the procedures, algorithms, and rules that control the handling and modification of data. It carries out any necessary computations or data transformations, enforces validation, and guarantees data integrity.
Data Management: The data in the application is managed by the Model. Numerous sources, including databases, web services, external APIs, and in-memory data structures, may provide this data. The logic for retrieving, storing, and manipulating data from many sources is encapsulated in the Model.
Data Representation: You specify the data structure that the application uses in the Model. Creating classes or objects to represent entities in the domain of your application is usually required for this. Database tables, data transfer objects (DTOs), and domain entities are frequently mapped to these types.
Data Access: Working with databases and other data storage systems is part of the data access that the Model manages. To carry out tasks like inserting, updating, deleting, and querying data, it interfaces with the database. Object-Relational Mapping (ORM) frameworks like Entity Framework or libraries like Hibernate are utilized in many contemporary MVC applications to make data access easier.
Data Validation: The Model is in charge of verifying that the data complies with certain limitations and guidelines. To guarantee data quality and integrity, data validation techniques can include custom validation algorithms, data type validation, and mandatory field checks.
Separation of Concerns: The separation of concerns is a fundamental principle of MVC. Both the View and the Controller are separated from the Model. This separation enables each component to be developed, tested, and maintained independently, making the program more modular and maintainable.
Event Handling: The Model can incorporate event handling in particular instances. When data changes, it can alert other portions of the program (Views and Controllers). This approach is also known as the “observable” or “publish-subscribe” pattern.
Testing: Since models include the essential data operations and business logic, they are very testable. Independent of the user interface, you can create unit tests to verify that your business logic and data manipulation are sound. An important benefit in software development is this.
UI-Agnostic: Models are UI-agnostic, which means they don’t care how the user interacts with the data or how it is presented to them. Because of this separation, you may modify the user interface without changing the business logic or underlying data.
In summary, the Model in the Model-View-Controller (MVC) architectural pattern is the crucial component responsible for representing and managing the data and business logic of an application. It plays a pivotal role in the development of robust, maintainable, and organized software by effectively separating concerns and fostering a modular architecture. By encapsulating the data and implementing the necessary business rules, the Model ensures the integrity and consistency of the application’s data. It acts as the central hub for data manipulation, validation, and storage, providing a reliable foundation for the overall functionality of the software. Additionally, the Model facilitates the decoupling of the user interface (View) and the application logic (Controller), enabling independent development and testing of these components. Through its role in the MVC pattern, the Model promotes code reusability, scalability, and maintainability, ultimately contributing to the overall success of the software development process.
Setting up a Basic MVC Project in ASP.NET
There are various phases involved in creating a simple ASP.NET MVC (Model-View-Controller) project. Model-View-Controller (MVC) is a design pattern that divides an application into three interrelated components: Models, Views, and Controllers. This split aids in code organisation and maintainability. Here’s a step-by-step tutorial for creating a simple ASP.NET MVC project:
step 1 – Install Visual Studio:
Install Visual Studio, a popular programming environment for ASP.NET apps, if you haven’t already. The free Community edition can be downloaded from the Microsoft website.
step 2 – Create a New Project:
Make a new ASP.NET project first:
Launch Microsoft Visual Studio.
Click on “File” > “New” > “Project…”
Choose “ASP.NET Web Application” from the “Create a new project” window, then click “Next.”
step 3 – Choose Project Template:
Choose the “ASP.NET Core Web Application” template from the “New Project” dialog box. You have the option to select the target framework, name your project, and designate a location. Press “Create.”
step 4 – Configure Your Project:
Click “Create a new ASP.NET framework web application” in the dialog box.
Choose the project template “Web Application (Model-View-Controller)”.
Select “Create” from the menu.
step 5 – Understanding the Framework:
Controllers: Your controller classes are stored in this folder.
Models: This is the location for your model classes.
Views: The views (HTML templates) for your application are stored in this folder.
wwwroot: This is the location for static files such as CSS, JavaScript, and pictures.
step 6 – Create a New Model Class:
Create a new class in your MVC project for your model. You may do this by right-clicking on the “Models” folder in Visual Studio (or your preferred IDE) and selecting “Add” > “Class.” or “using ado.net data entity model method”.
step 7 – Create a Controller:
You may add a new controller to your MVC project by right-clicking the Controllers folder, selecting “Add” > “Controller,” and then following the wizard to construct a basic controller with actions.
step 8 – Create Views:
Create subfolders for your controller actions in your MVC project’s Views folder (e.g., “Home” for the HomeController). Create Razor views (.cshtml files) for your activities within these subfolders.
step 9 – Configure Routing:
The Startup.cs file configures the default routing for ASP.NET MVC. In the Configure function, you can map URLs to controller actions by configuring routes.
step 10 – Run the Program:
Use the Debug menu or press F5 to launch your application. This will start a web server and show your application on a web browser.
step 11 – Test Your MVC Application:
By visiting the relevant URLs, you can access the actions that you created. As an illustration, if your HomeController has an action called “Index,” you can get it at http://localhost:port/Home/Index.
A simple ASP.NET MVC application setup is shown here. Models, controllers, views, and more intricate routing can all be added to this base as your project requires it. To get additional functionality, you can combine different libraries and frameworks with Entity Framework and utilize it to work with databases.
Recent Posts
- Banking Sector: Tackling Security and Data Integrity Challenges with .NET Skills
- How Data Analytics Helps Manufacturers in Bangalore Reduce Production Downtime
- Understanding ASP.NET MVC Architecture with Real Examples
- Common Challenges in Learning Programming and How Python Makes It Easier
- Why Companies Are Hiring More React Developers Than Ever Before
Categories
- All
- Angularjs training in Chennai
- ASP.NET Core
- Data Analytics
- Dot Net Development Course
- dot net training
- dot net training in chennai
- dotnet full stack developer
- Free dotnet training
- information on dotnet
- Learn Java in chennai
- Learn Python at Karaikudi
- learn python online
- learn python online from chennai
- Linq Queries in .net
- mutual funds
- MVC Training Tutorials
- PHP Training in Chennai
- pmp training online
- power apps online training
- Power platofrm
- Python Training Online
- React Full Stack Development
- React training
- ReactJs
- share market
- Sharepoint framework online training
- SharePoint Freelancers in Chennai
- software testing
- spfx online training
- SQL Course Details
- Stock market
- Uncategorized