ASP.NET Core course in Chennai
Introduction to ASP.NET Core course in Chennai:
There are various respected colleges in Chennai that offer comprehensive ASP.NET Core training courses.
The course provides hands-on experience through real-world projects, preparing you to tackle web development issues confidently.
An ASP.NET course equips you with the tools and knowledge to become proficient in building web applications using Microsoft’s robust ASP.NET framework.
The course covers ASP.NET basics and architecture, gradually progressing to advanced topics like data management, security, and performance optimization.
Special features of the ASP.NET Core course in Chennai:
ASP.NET is a constantly growing technology, and this course will keep you up to date on the latest breakthroughs and industry trends, increasing your value in the job market.
Whether you’re a beginner or an experienced developer, the Basics of ASP.NET course caters to a wide range of skill levels and provides a thorough learning experience.
What type of hands-on experience does the ASP.NET Core course provide in Chennai?
- Web application development with ASP.NET
- Create interactive online forms.
- Integration and modification of databases
- Authentication and authorization of users
- Implementation of MVC (Model-View-Controller) architecture
Key Benefits of the ASP.NET Core course in Chennai:
Prepare to enter into the exciting world of ASP.NET!
Microsoft’s web development framework is a powerful tool for building strong and dynamic websites and apps.
Offering an array of tools and features, ASP.NET caters to beginners and seasoned developers. At its core, ASP.NET Overview is a server-side framework ideal for crafting dynamic websites, apps, and services.
Its seamless integration with Microsoft technologies like SQL Server and Azure empowers the creation of scalable, high-performance applications.
ASP.NET stands out for its user-friendly nature. Building interactive web pages, from forms to data-driven apps, becomes a breeze with a range of controls and libraries.
Its drag-and-drop functionality expedites UI development, reducing both effort and errors. Performance is a highlight of ASP.NET.
Scope of ASP.NET Core course in Chennai:
The scope of an ASP.NET Core course in Chennai is highly promising, with several options in web development and beyond. Here’s a look at the size of an ASP.NET course:
Web Development Careers: Completing an ASP.NET course prepares you to create dynamic and interactive web apps. This opens the door to a variety of positions, including web developer, full-stack developer, front-end developer, and back-end developer.
Diverse areas: ASP.NET is used in e-commerce, banking, healthcare, entertainment, and other areas. This diversity broadens your opportunities to work in fields that correspond with your interests.
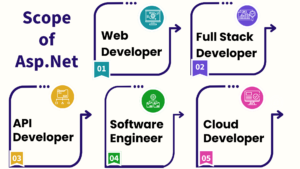
Many software organizations demand ASP.NET Core in Chennai to create web-based solutions for their clients, making you an important member of software development teams.
Corporate Intranets: Large firms frequently use ASP.NET to create internal applications and corporate intranets, providing chances for enterprise-level software development.
Freelancing: If you know ASP.NET and MVC, you can work as a freelance web developer, taking on projects from clients all over the world and enjoying the flexibility that comes with it.
Career Possibilities of Learning the ASP.NET Core course in Chennai:
Maria Academy in Chennai offers placement opportunities as an add-on to every student/professional who has completed our classroom or online training.
With experience, ASP.NET developers take on more complex projects, fostering a sense of professional growth and accomplishment.
ASP.NET developers experience the satisfaction of creating impactful and user-friendly web applications, seeing their work in action, and receiving positive user feedback.
ASP.NET is used by both large and small organizations, offering the chance to work with renowned companies that provide competitive salaries and significant growth prospects.
ASP.NET certification is your ticket to advancing your web development career.
Microsoft’s certification verifies your knowledge of how to use the ASP.NET framework for web applications.
Adding it to your resume enhances your marketability, showcasing your readiness to excel in the field.
Moreover, it unlocks diverse career paths, from web developer to technical lead, due to the high demand for ASP.NET skills.
Frequently asked questions:
1. Does Maria Academy provide placement?
We have excellent relationships with over 700+ top MNCs, including SAP, Oracle, Amazon, HCL, Wipro, Dell, Accenture, Google, CTS, TCS, and IBM.
More than 3500 students were placed last year in India and globally.
Maria Academy conducts development sessions including mock interviews, presentation skills to prepare students to face a challenging interview situation with ease.
2. Is Maria Academy certification good?
Certification is accredited by every major global company.
Maria Academy is a unique Authorized Oracle Partner, Authorized Microsoft Partner, Authorized Pearson Vue Exam Center, Authorized PSI Exam Center, and Authorized Partner Of AWS
3. Work On Live Projects?
The entire ASP.NET training has been built around real-time implementation. You get hands-on experience with industry projects, hackathons & lab sessions, which will help you to build your project portfolio
GitHub repository and showcase to recruiters in interviews, and get placed.
4. Who are the Trainers?
All Maria Academy’s trainers are industry practitioners with at least 9-12 years of relevant IT experience. They are subject matter experts and have been trained by Maria Academy to provide an excellent learning experience.
5. What is a web application?
A normal website is not the same as a web application. Websites are static. The website returns an HTML page when you visit it, without performing any processing to create the HTML page’s contents. Reloading the browser will display the same page. A web application, on the other hand, may give you a different answer each time you visit.
6. What is the NuGet package manager?
Not all code is created from scratch by software developers. They depend on code libraries created by other programmers.
A way for developers to download and utilize pre-existing libraries, sometimes known as packages, must be included in any contemporary development environment.
For instance, the NPM (Node Package Manager) in the JavaScript ecosystem allows developers to locate and utilize libraries created by other JavaScript developers.
If you are seeking for advanced course in .net web application, contact us at Asp.net core training
Dot net full stack developer online course
A Dot NET Full Stack Developer Online Course is designed to teach you both frontend and backend development using Microsoft technologies.
Full-stack developers work on both the client-side (frontend) and server-side (backend) of applications, making them versatile and highly valuable in the job market.
Course Overview
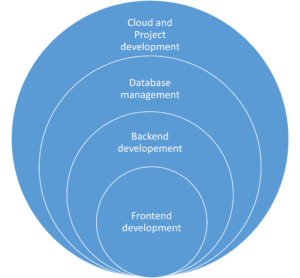
This course typically covers:
Frontend Development
- HTML, CSS, and JavaScript – Basics of web design and interactivity.
- TypeScript – A superset of JavaScript for scalable applications.
- Angular / React – Popular frontend frameworks for building dynamic UI.
- Bootstrap / Tailwind CSS – Styling frameworks to create responsive designs.
Backend Development
- C# Programming – The primary language for .NET development.
- ASP.NET Core / MVC – Framework for building robust web applications.
- RESTful API Development – Creating APIs using .NET Core Web API.
- Entity Framework Core – ORM for database interactions.
Database Management
- SQL Server – Managing and querying databases.
- Stored Procedures & LINQ – Efficient database operations.
Cloud & DevOps (Optional, but beneficial)
- Docker & Kubernetes – Containerization and orchestration.
- CI/CD Pipelines – Automated testing and deployment.
Project Development
- Building a Full-Stack Project – Integrating frontend, backend, and database.
- Version Control with Git & GitHub – Collaboration and code management.
Who Should Take This Dot net developer online Course?
- Beginners with basic programming knowledge.
- Developers looking to specialize in .NET full-stack development.
- IT professionals switching to web development.
Career Opportunities
After completing the course, you can apply for roles such as:
- .NET Full Stack Developer
- Web Developer (C#/.NET)
- Software Engineer
- Backend Developer
Advantages of Dot Net full stack developer online course:
Comprehensive Skill Set
- Gain expertise in both frontend and backend development, making you a versatile developer.
- Learn C#, ASP.NET Core, SQL Server, Angular/React, and cloud technologies in one program.
High Demand & Job Opportunities
- .NET Full Stack Developers are highly sought after in industries like finance, healthcare, and e-commerce.
- Opens doors for roles like .NET Developer, Software Engineer, and Full Stack Developer.
Flexibility & Convenience
- Learn at your own pace with self-paced videos or live instructor-led sessions.
- Access course materials anytime, anywhere.
Hands-on Experience with Real-World Projects
- Work on practical projects, helping you build a strong portfolio.
- Gain experience with GitHub, CI/CD, Docker, and cloud deployment.
Microsoft Ecosystem Integration
- Learn how to integrate .NET with Azure, Microsoft SQL Server, and other Microsoft tools.
- Become proficient in modern enterprise-level application development.
Strong Community & Support
- Join a vast community of .NET developers for networking and learning.
- Get career guidance, resume building tips, and interview preparation.
Scalability & Performance Knowledge
- Learn how to develop scalable and high-performance applications.
- Understand microservices, API development, and enterprise software architecture.
Cost-Effective Learning
- Online courses are affordable compared to traditional degrees.
- Many platforms offer certifications that enhance your resume.
Applications of a Dot NET Full Stack Developer Online Course
A .NET Full Stack Developer Online Course prepares you to build scalable, secure, and high-performance applications.
The skills learned can be applied to various domains, including:
Web Application Development
- Build interactive web applications using ASP.NET Core MVC/Web API with Angular or React.
- Develop e-commerce platforms, blogging websites, and content management systems (CMS).
Enterprise Software Solutions
- Design and develop large-scale enterprise applications for businesses.
- Work on CRM (Customer Relationship Management), ERP (Enterprise Resource Planning), and HRMS (Human Resource Management Systems).
Cloud-Based Applications
- Deploy applications on Microsoft Azure or AWS for global accessibility.
- Implement serverless computing, microservices architecture, and cloud storage solutions.
API Development & Integration
- Develop RESTful APIs using ASP.NET Core Web API.
- Integrate third-party APIs for payment gateways, social media, and authentication.
Database-Driven Applications
- Work with SQL Server, Entity Framework Core, and LINQ for data-driven solutions.
- Build applications requiring real-time data processing, analytics, and reporting.
Fintech & Banking Applications
- Create secure financial applications with role-based authentication.
- Implement payment processing, transaction management, and fraud detection.
Healthcare & E-Governance Solutions
- Develop electronic health records (EHR) systems and hospital management software.
- Work on government portals and citizen services using Dot NET full stack developer online
Mobile App Development (Xamarin/.NET MAUI)
- Build cross-platform mobile applications using .NET MAUI (formerly Xamarin).
- Develop apps for iOS & Android with native-like performance.
High Demand & Job Opportunities
- Dot NET full stack developer online course is widely used in enterprise software, web development, cloud computing, and mobile apps.
- Companies like Microsoft, Accenture, Infosys, TCS, and Deloitte actively hire .NET developers.
- Stable career path with opportunities in various industries (finance, healthcare, e-commerce, gaming, etc.).
Frequently Asked Question:
1. What is the Web?
The Web, also known as the World Wide Web (WWW), is a collection of web pages, images, videos, and other resources connected through link.
2. What is Web Development?
Web development is the process of building websites and web applications. The goal is to create websites that are easy to use and work properly on different devices.
3.What is a website?
A website is a collection of web pages that are connected under a common domain name and can be accessed through the internet.
4. What is the Internet?
The Internet is a vast global network that connects millions of computers, servers, and devices worldwide.
5. What is DOCTYPE?
A doctype or document-type declaration is an instruction that tells the web browser about the markup language in which the current page is written.
6. What are the various heading tags and their importance?
There are 6 levels of headings defined by HTML. These six heading elements are H1, H2, H3, H4, H5, and H6; with H1 being at the highest level and H6 at the least.
Importance of Heading
- Search Engines use headings for indexing the structure and content of the webpage.
- Headings are used for highlighting important topics.
7. What are attributes?
An attribute is used to provide extra or additional information about an element.
- All HTML elements can have attributes. Attributes provide additional information about an element.
- It takes 2 parameters i.e.., name and value. These define the properties of the element and are placed inside the opening tag of the element.
- The name parameter takes the name of the property we would like to assign to the element and the value takes the property value or extent of the property names that can be aligned over the element.
If you are seeking for advanced course in .NET web application, contact us at Asp.net core training
Dotnet Course in Chennai with Placement
Unlocking Your DOTNET Software Development Potential:
Do you want to learn about versatile and powerful software development with DOTNET and SQL? There’s no need to look any further! Our Maria Academy is designed to equip you with the skills and knowledge needed to succeed in the fast-paced world of application development.
About DOTNET (.NET):
Microsoft’s.NET framework is a powerful and widely used framework for creating a wide range of applications, including desktop, web, mobile, and cloud solutions. The demand for skilled.NET developers is growing as the technology industry evolves.
About SQL:
SQL, or Structured Query Language, is a programming language designed specifically for managing and manipulating relational databases. It contains commands for querying data, inserting records, updating information, and building database structures. SQL is required for interacting with databases in a variety of applications, as it allows for structured and organized data storage, retrieval, and manipulation. Its syntax is the same across all database management systems, making it a universal database communication language. Whether you’re a developer, data analyst, or database administrator, you’ll need a solid understanding of SQL.
Are you curious about the continued demand for.NET?
You don’t need to search any farther! One of the most widely used web application development frameworks for building dynamic websites is.NET, an open-source web framework. It should come as no surprise that experts with past experience in this field are in high demand today given the industry’s bright future growth prospects. Maintain your.NET proficiency to stay on top of developments!
The.NET framework offers programming guidelines for developing a variety of applications, including web and mobile ones. Numerous programming languages are supported, such as C#, VB.NET, C++, F#, and others. So, code is crucial when working with.NET. Keep trying new things and learning to become a proficient.NET developer!
The main framework for creating Windows-based applications is called.NET. This is because Windows comes with a local framework called.NET that makes it simpler for programmers to create applications. In addition, a lot of programmers find that building web applications in.NET is simpler than in Java.
It is commonly known that the.NET Framework can establish an extremely secure environment for applications. To provide the highest level of protection, it has a range of security features. The integrated Windows authentication system is one of these mechanisms, which makes it simple for developers to create safe and secure applications. The application’s overall security is increased by this authentication system, which guarantees that only authorized users can access it.
Additionally, a collection of cryptography classes that are necessary for safeguarding sensitive data are included in the.NET Framework. Data security is increased by these classes, which make encryption and decryption possible. These cryptography courses can be used by developers to create robust encryption algorithms that efficiently safeguard data both in transit and in storage. This guarantees that private information stays that way and is not accessible to unauthorized parties.
Therefore, the.NET Framework’s many security features allow developers to prioritize data protection and reduce potential security risks when creating applications.
Why Should You Take .NET Online Training?
Cross-Platform Development: .NET Core enables developers to create applications for Windows, Linux, and macOS.
Excellence in Web Development: ASP.NET, a component of the.NET framework, is a leading technology for creating robust and dynamic web applications.
Versatility: Because.NET allows for the creation of a wide range of applications, it is a popular framework for a variety of projects.
Industry Importance: Many large enterprises and organizations rely on.NET to develop scalable and secure applications, creating numerous job opportunities.
What Our Training Provides:
Comprehensive Curriculum: Our training covers all aspects of.NET, from fundamental concepts to advanced topics, preparing you for real-world projects.
Hands-on Projects: Gain practical experience by completing real-world projects and applying what you’ve learned throughout the course.
Flexibility: Our online format allows you to learn at your own pace, accommodating your hectic schedule.
Interactive Learning: To improve your comprehension and get answers to any questions, participate in interactive sessions, debates, and Q&A sessions.
Professional Teachers: Learn from industry experts with extensive.NET development experience and gain valuable insights.
Who should take:
IT specialists seeking professional development.
Aspiring programmers
Web Designers
Software Developers
Come Grow Your Career with Us!
Start the process of developing into a proficient.NET developer. Your key to developing the abilities that employers are seeking is our.NET Online Training in Chennai. Are you ready to take charge of your software development career? Enroll immediately!
For.NET training and technical assistance, call +91 90427 10472.
How to Get Ready for a Dotnet Interview
Microsoft’s Dotnet framework is widely used for developing robust and scalable applications. Preparing for a Dotnet interview, whether you’re a seasoned developer or a recent graduate, necessitates a thorough understanding of the framework, its components, and best practices. In this article, we’ll go over key areas to concentrate on and offer practical advice to help you succeed in your Dotnet interview.
Understand the Fundamentals:
Before moving on to more advanced topics, make sure you understand fundamental concepts like Common Language Runtime (CLR), Common Type System (CTS), and Common Intermediate Language (CIL). Examine object-oriented programming principles, which are essential for Dotnet development.
Master Core Technologies:
C# Language Proficiency:
C# is the primary language used in Dotnet development, so brush up on it. Prepare to show your understanding of language features, inheritance, polymorphism, and exception handling.
ASP Dotnet and ASP Dotnet Core:
Learn the distinctions between ASP Dotnet and ASP Dotnet Core. Understand the MVC (Model-View-Controller) architecture, as well as routing and middleware.
ADO Dotnet and Entity Framework:
It is critical to have a solid understanding of ADO Dotnet for data access and Entity Framework for object-relational mapping. Prepare to talk about database connectivity, LINQ, and data modelling.
Explore Web Technologies:
Web API and RESTful Services:
Learn how to create and use Web APIs. Learn RESTful principles as well as how to design and implement scalable services.
Front-End Development:
Learn about front-end technologies such as HTML, CSS, and JavaScript. Knowledge of JavaScript frameworks such as Angular or React can be advantageous.
Look into Testing and Debugging in Depth:
Unit Testing:
Understand the significance of unit testing and be acquainted with testing frameworks such as NUnit or xUnit. Understand how to write efficient unit tests for your code.
Debugging Skills:
Demonstrate your ability to efficiently troubleshoot and debug code. Understand how to use Visual Studio’s debugging tools.
Explore Cloud Services:
Azure Services:
Many businesses use Microsoft Azure to host and manage applications. Understand Azure services such as Azure App Service, Azure Functions, and Azure SQL Database.
Security Best Practices:
Authentication and Authorization:
Learn about various authentication mechanisms such as OAuth and OpenID Connect. Understand how to use role-based access control (RBAC) to secure applications.
Secure Coding Practices:
Understand common security flaws and best practices for writing secure code. Learn how to defend against common threats such as SQL injection and cross-site scripting (XSS).
Keep Up with the Latest Trends:
Latest versions updates:
Keep yourself updated on the latest versions of Dotnet, including Dotnet Core and be aware of new features and improvements.
Containerization and Microservices:
Learn about Docker containerization and the concept of microservices. Learn how these architectural patterns can benefit Dotnet applications.
Behavioral and Problem-Solving Questions:
Soft Skills:
Be prepared to answer behavioral questions about your communication, teamwork, and problem-solving abilities.
Coding Challenges:
Exercise your coding skills by solving algorithmic and real-world problems. LeetCode and HackerRank, for example, provide a variety of Dotnet-related challenges.
Conclusion:
Getting ready for a Dotnet interview necessitates a mix of technical knowledge, practical skills, and problem-solving abilities. You’ll be well-equipped to impress your interviewers and land that Dotnet development role if you focus on the key areas mentioned above and stay up to date on the latest trends. Best wishes!
Begin your Journey Today,
for Training, Contact via Call/WhatsApp :+91 90427 10472
Web API with ASP.NET Core using MVC
Creating a web API with ASP.NET Core using the MVC (Model-View-Controller) pattern entails creating controllers to handle HTTP requests, models to represent data, and routes for the API. A step-by-step guide to creating an MVC web API with ASP.NET Core is provided below.
Step 1 Install the Necessary Software
Check that your machine has the.NET SDK installed.
Step 2 Create a New ASP.NET Core MVC Web API Project
Run the following commands in a terminal or command prompt
dotnet new mvc -n MyMvcWebApi
cd MyMvcWebApi
This will create a new ASP.NET Core MVC project called MyMvcWebApi and navigate to its directory.
Step 3 Explore the Project Structure
Launch your preferred IDE and open the project. Controllers, Models, and Views are among the folders in the project structure.
Controllers In this section, you will define your API controllers.
Models To represent your data, you can create model classes.
Views Although views are not required for an API, this folder is included in the standard MVC structure.
Step 4 Create a Model
To represent your data, create a model class. Create a file called Item.cs in the Models folder, for example
public class Item
{
public int Id { get; set; }
public string Name { get; set; }
}
Step 5 Establish a Controller
Add a new file to the Controllers folder, such as ItemsController.cs, to create a controller
using Microsoft.AspNetCore.Mvc;
using System.Collections.Generic;
namespace MyMvcWebApi.Controllers
{
[Route(api[controller])]
[ApiController]
public class ItemsController ControllerBase
{
private static ListItem _items = new ListItem
{
new Item { Id = 1, Name = Item 1 },
new Item { Id = 2, Name = Item 2 },
new Item { Id = 3, Name = Item 3 }
};
GET apiitems
[HttpGet]
public ActionResultIEnumerableItem Get()
{
return _items;
}
GET apiitems1
[HttpGet({id})]
public ActionResultItem Get(int id)
{
var item = _items.Find(i = i.Id == id);
if (item == null)
return NotFound();
return item;
}
POST apiitems
[HttpPost]
public ActionResultItem Post([FromBody] Item newItem)
{
newItem.Id = _items.Count + 1;
_items.Add(newItem);
return CreatedAtAction(nameof(Get), new { id = newItem.Id }, newItem);
}
PUT apiitems1
[HttpPut({id})]
public IActionResult Put(int id, [FromBody] Item updatedItem)
{
var existingItem = _items.Find(i = i.Id == id);
if (existingItem == null)
return NotFound();
existingItem.Name = updatedItem.Name;
return NoContent();
}
DELETE apiitems1
[HttpDelete({id})]
public IActionResult Delete(int id)
{
var itemToRemove = _items.Find(i = i.Id == id);
if (itemToRemove == null)
return NotFound();
_items.Remove(itemToRemove);
return NoContent();
}
}
}
Step 6 Run the Program
Enter the following command at the command prompt or terminal
dotnet run
The URL for your API will be http://localhost:5000 or https://localhost:5001. Open an API testing tool such as Postman:
GET Request: To retrieve items, open https://localhost:5001/api/items.
POST Request: To add a new item, submit a POST request with a JSON body to https://localhost:5001/api/items.
PUT Request: To update an item, submit a PUT request with a JSON body to https://localhost:5001/api/items/1.
DELETE Request: To delete an item, send a DELETE request to https://localhost:5001/api/items/1.
Step 7 Explore and Extend
To improve your web API, investigate additional ASP.NET Core MVC features like middleware, authentication, dependency injection, and model binding. Depending on the needs of your application, you can handle various HTTP methods, define more models, and add more controllers.
Microservices Architecture with DOTNET Core
Introduction:
The ability of microservices architecture to break down large, monolithic applications into smaller, independent services has led to widespread adoption. This article delves into the design principles and implementation strategies for developing microservices with DOTNET Core, Microsoft’s versatile and powerful framework.
Understanding Microservices Architecture:
Microservices is a design style in which an application is made up of loosely coupled, independently deployable services. Each service is intended to carry out a specific business function and communicates with other services via well-defined APIs.
Design Principles:
1. Single Responsibility Principle (SRP): Each microservice should be responsible for a single business capability. This ensures ease of use and maintainability.
2. Decentralized Data Management: Databases belong to microservices. Because of this decentralization, dependencies are reduced and each service is free to select the database technology that best meets its needs.
3. Inter-Service Communication: APIs are used by services to communicate with one another, and they frequently use lightweight protocols such as HTTP/REST or messaging queues. This allows for independence and flexibility in technology stack selection.
4. Fault Tolerance and Resilience: Create services that are resistant to failure. To handle faults gracefully, use mechanisms such as circuit breakers and retries.
5. Continuous Integration and Deployment (CI/CD): Use CI/CD techniques to automate the processes of building, testing, and deployment. This guarantees the delivery of microservices quickly and consistently.
6. Scalability: Microservices can be scaled independently based on demand. By horizontally scaling instances, you can design services to handle varying levels of load.
Implementation with DOTNET Core:
1. Service Development: For each microservice, create a separate DOTNET Core project. Build web APIs with ASP DOTNET Core and consider high-performance communication technologies like gRPC.
2. API Gateway: Set up an API Gateway to manage and route requests to the proper microservices. In Azure, tools such as Ocelot and API Gateway can be used.
3. Service Discovery: To dynamically locate and call services, use service discovery tools such as Consul or Eureka. This is critical for dealing with the fluid nature of microservices.
4. Containerization: Use Docker to containerize each microservice. This ensures consistency across environments and makes deployment easier.
5. Orchestration with Kubernetes: Use Kubernetes to orchestrate and manage containers. Kubernetes makes it easier to deploy, scale, and manage microservices.
6. Logging and Monitoring: Consolidate logging and monitoring. Tools such as the ELK stack (Elasticsearch, Logstash, Kibana) or Application Insights can provide insights into the behavior of microservices.
7. Security: Implement an all-encompassing security strategy. Utilize OAuth for authentication, JWT for token-based authorization, and HTTPS for secure communication.
8. Testing: For each microservice, perform unit testing, integration testing, and end-to-end testing. In this context, tools like xUnit, NUnit, and Postman can be useful.
9. Database Management: Select databases based on the needs of the microservices. Accept polyglot persistence and think about SQL and NoSQL databases.
10. Event-Driven Architecture: Think about using event-driven patterns with message brokers such as RabbitMQ or Apache Kafka. Asynchronous communication between microservices is enabled by events.
Conclusion:
Using DOTNET Core to build microservices necessitates adhering to architectural principles that prioritize independence, scalability, and maintainability. Developers can create a robust microservices ecosystem that meets the demands of modern, scalable applications by using a containerized and orchestrated approach. The combination of DOTNET Core and microservices unleashes the power of agile development, rapid deployment, and efficient scaling, enabling organizations to deliver resilient and scalable applications in today’s dynamic computing landscape.
Begin your journey today, for Training / Technical Support,
Contact via Call/WhatsApp :+91 90427 10472
Learn DOTNET Core Online
Overview of DOTNET Core: A Contemporary Framework for Cross-Platform Development
Microsoft created the free, open-source, cross-platform DOTNET Core framework to help developers create contemporary, scalable applications. With its modular design and lightweight architecture, it offers a substantial departure from the conventional DOTNET Framework and supports a broad variety of application kinds. We’ll go over the main benefits and features that make DOTNET Core a desirable option for developers in this introduction.
Principal attributes:
1. Cross-Platform Interoperability: With the help of DOTNET Core, programmers can create and execute apps for Windows, Linux, and macOS. For contemporary development scenarios, where applications must be deployed on various environments, cross-platform support is essential.
2. High-performance and modular: Because DOTNET Core is modular by design, developers can include only the parts that are required for their application. Its modularity makes it perfect for microservices and cloud-native apps because it reduces footprint and speeds up startup times.
3. Community-driven and Open Source: The framework is being developed as an open-source project to encourage community contributions and collaboration. This openness encourages transparency and creativity while guaranteeing that developers can take an active role in the framework’s evolution.
4. Combined Platform for Various Tasks: Cloud-native microservices, cross-platform desktop apps with Xamarin, and web development with ASP DOTNET Core are just a few of the workloads that can be combined into one cohesive platform with DOTNET Core. Because of its adaptability, developers can use the same set of tools and libraries for various kinds of applications.
5. Modern Development Practices Support: DOTNET Core supports contemporary development practices such as Docker containerization, continuous integration and deployment (CI/CD), and microservices architecture. These characteristics make it ideal for developing and deploying scalable, cloud-ready applications.
6. Comparative Versioning: In contrast to the conventional DOTNET Framework, side-by-side versioning is supported by DOTNET Core. This enables applications to use the version of the runtime and libraries that they were built with by allowing multiple versions to coexist on the same machine.
DOTNET Core components include:
1. DOTNET Core Runtime: The Common Language Runtime (CLR) and Just-In-Time (JIT) compilation are two of the runtime’s key components that are required to run DOTNET Core applications.
2. Core Libraries for.NET: These libraries offer common functionality for applications built with DOTNET Core. They consist of networking, file I/O, data structures, and algorithms, among other things.
3. ASP DOTNET Core: A cross-platform, high-performance framework for creating contemporary, cloud-based, and internet-connected apps is called ASP DOTNET Core. It’s frequently utilized for creating microservices, APIs, and web apps.
4. Entity Framework Core: An open-source, lightweight, and extensible object-relational mapping (ORM) framework is called Entity Framework Core. It makes working with databases using C# objects easier for developers by streamlining persistence and data access.
Getting Started:
Setting up your development environment, starting a new project, and learning the core principles of ASP DOTNET Core are the first steps in getting started with the framework. Here is a step-by-step tutorial to get you started with ASP DOTNET Core web application development.
Step 1: Install Prerequisites
Make sure the following is installed on your computer before you begin:
a.) DOTNET SDK: The DOTNET SDK can be downloaded and installed from the official DOTNET website: Get the DOTNET SDK here.
b.) Code Editor: Select a code editor for your project. Although Visual Studio Code is a well-liked option, you are free to use any other code editor of your choosing.
Step 2: Create a New Project for ASP DOTNET Core
To start a new ASP DOTNET Core project, launch a terminal or command prompt and type the following commands:
# Create a new folder for your project
mkdir MyFirstAspNetCoreApp
cd MyFirstAspNetCoreApp
# Create a new ASP DOTNET Core web application
dotnet new web -n MyFirstAspNetCoreApp
Step 3: Explore the Project Structure
Go to the project folder and examine the project hierarchy. Important documents and directories consist of:
Program.cs: Program.cs is the application’s entry point.
Startup.cs: Startup.cs is responsible for configuring the application’s services and middleware.
wwwroot: Static files (CSS, JavaScript, images) are stored in the wwwroot directory.
Controllers: The controllers that handle requests are listed here.
Views: This collection contains the views that define the user interface.
Models: Contains the data models that the application employs.
Step 4: Run the Program
To build and run the application, use the following command:
dotnet run
Navigate to https://localhost:1001 (or http://localhost:1002) in a web browser. The default ASP DOTNET Core welcome page should appear.
Step 5: Make a Simple Modification
In your code editor, open the project. There is an action method called Index in the Controllers/HomeController.cs file. Modify the ViewBag’s content.Message to another entity. As an example:
public IActionResult Index()
{
ViewBag.Message = “Hello, ASPDOTNETCore!”;
return View();
}
When you save the file, the web application will reload with your changes.
Step 6: Also, Understand the Fundamentals
Explore the following fundamental concepts:
Routing: Learn about URL routing in ASP DOTNET Core. Route configurations can be found in the Startup.cs file.
Views and Razor Pages: Discover how to make views with Razor syntax. Static files can be found in the Views and wwwroot folders.
Dependency Injection: Learn how to configure dependency injection in ASP DOTNET Core. For service registration, look in the Startup.cs file.
Middleware: Discover the elements of middleware and how the Startup.cs file configures them.
As you gain more familiarity with the fundamentals of ASP DOTNET Core development, you should also think about exploring more complex subjects like database access, authentication, and deployment.
Begin your journey today, for Training / Technical Support, Contact +91 90427 10472
Recent Posts
- Banking Sector: Tackling Security and Data Integrity Challenges with .NET Skills
- How Data Analytics Helps Manufacturers in Bangalore Reduce Production Downtime
- Understanding ASP.NET MVC Architecture with Real Examples
- Common Challenges in Learning Programming and How Python Makes It Easier
- Why Companies Are Hiring More React Developers Than Ever Before
Categories
- All
- Angularjs training in Chennai
- ASP.NET Core
- Data Analytics
- Dot Net Development Course
- dot net training
- dot net training in chennai
- dotnet full stack developer
- Free dotnet training
- information on dotnet
- Learn Java in chennai
- Learn Python at Karaikudi
- learn python online
- learn python online from chennai
- Linq Queries in .net
- mutual funds
- MVC Training Tutorials
- PHP Training in Chennai
- pmp training online
- power apps online training
- Power platofrm
- Python Training Online
- React Full Stack Development
- React training
- ReactJs
- share market
- Sharepoint framework online training
- SharePoint Freelancers in Chennai
- software testing
- spfx online training
- SQL Course Details
- Stock market
- Uncategorized