Understanding Microsoft Azure Fundamentals
Microsoft Azure has become a prominent platform in the cloud computing space, providing a wide range of services to individuals, companies, and organizations globally. It is becoming more and more important for businesses to grasp the foundations of Microsoft Azure as they move their operations to the cloud. The purpose of this article is to give a general overview of Azure, including its essential features, advantages, and the reasons behind its rise to prominence in the cloud computing industry.
What is Microsoft Azure?
Microsoft offers a full-featured cloud computing platform called Microsoft Azure. Computing, storage, networking, databases, machine learning, Internet of Things (IoT), and other services are among the many that it provides. With Azure, users can create, launch, and maintain services and applications via Microsoft’s extensive global data centre network.
Key Components of Microsoft Azure:
- Compute: For high-performance computing (HPC) workloads, Azure offers a variety of computing options, such as virtual machines (VMs), containers, serverless computing with Azure Functions, and Azure Batch.
- Storage: Blob Storage for unstructured data, File Storage for cloud file sharing, Queue Storage for messaging between application components, and Disk Storage for virtual machines (VMs) are just a few of the scalable storage options that Azure provides.
- Networking: Users can establish virtual networks, link load balancers to Azure, connect on-premises data centers to Azure, and guarantee secure communication by utilizing Azure VPN Gateway and Azure ExpressRoute features.
- Databases: Azure offers a range of database services, such as Cosmos DB for globally distributed NoSQL databases, Azure SQL Database for relational databases, Azure Database for MySQL and PostgreSQL, and services like Azure Synapse Analytics and Azure Cache for Redis.
- Identity and Access Management (IAM): Microsoft’s cloud-based identity and access management service, Azure Active Directory (Azure AD), enables users to safely log in and access resources.
- AI and Machine Learning: To create, train, and implement machine learning models, Azure provides AI and Machine Learning services like Azure Machine Learning, Azure Cognitive Services, and Azure Databricks.
- Internet of Things (IoT): Services like Azure IoT Central offer an end-to-end IoT application platform, while Azure IoT Hub facilitates safe and scalable connectivity between IoT devices and the cloud.
- Developer Tools: For continuous integration, delivery, and testing, Azure offers a comprehensive range of developer tools and services, such as Azure DevOps, Visual Studio Team Services, and Azure DevTest Labs.
Benefits of Microsoft Azure:
- Scalability: Azure enables companies to adjust their resource levels in response to demand, guaranteeing peak efficiency and optimum performance.
- Global Reach: Azure allows businesses to deploy applications closer to their users for lower latency and an enhanced user experience. Azure has data centers situated in various regions of the world.
- Security and Compliance: Azure guarantees data protection and regulatory compliance across a range of industries by adhering to industry-standard security practices and compliance certifications.
- Cost-effectiveness: Azure provides pay-as-you-go pricing options that spare companies from up-front capital costs by letting them pay only for the resources they really use.
- Integration: Azure offers a seamless ecosystem for application development and management by integrating with other Microsoft products and services, as well as third-party tools and technologies.
Conclusion:
As a key player in the cloud computing space, Microsoft Azure enables enterprises to grow, innovate, and completely reinvent themselves. For people and companies hoping to take full advantage of cloud computing, knowing the foundations of Azure is crucial. Azure is still the go-to option for cloud computing solutions in a variety of industries thanks to its extensive service portfolio, global presence, and dedication to security and compliance.
If you need any Training / Technical Support in DOTNET & SQL Contact +91 90427 10472
Dotnet Course in Chennai with Placement
Unlocking Your DOTNET Software Development Potential:
Do you want to learn about versatile and powerful software development with DOTNET and SQL? There’s no need to look any further! Our Maria Academy is designed to equip you with the skills and knowledge needed to succeed in the fast-paced world of application development.
About DOTNET (.NET):
Microsoft’s.NET framework is a powerful and widely used framework for creating a wide range of applications, including desktop, web, mobile, and cloud solutions. The demand for skilled.NET developers is growing as the technology industry evolves.
About SQL:
SQL, or Structured Query Language, is a programming language designed specifically for managing and manipulating relational databases. It contains commands for querying data, inserting records, updating information, and building database structures. SQL is required for interacting with databases in a variety of applications, as it allows for structured and organized data storage, retrieval, and manipulation. Its syntax is the same across all database management systems, making it a universal database communication language. Whether you’re a developer, data analyst, or database administrator, you’ll need a solid understanding of SQL.
Are you curious about the continued demand for.NET?
You don’t need to search any farther! One of the most widely used web application development frameworks for building dynamic websites is.NET, an open-source web framework. It should come as no surprise that experts with past experience in this field are in high demand today given the industry’s bright future growth prospects. Maintain your.NET proficiency to stay on top of developments!
The.NET framework offers programming guidelines for developing a variety of applications, including web and mobile ones. Numerous programming languages are supported, such as C#, VB.NET, C++, F#, and others. So, code is crucial when working with.NET. Keep trying new things and learning to become a proficient.NET developer!
The main framework for creating Windows-based applications is called.NET. This is because Windows comes with a local framework called.NET that makes it simpler for programmers to create applications. In addition, a lot of programmers find that building web applications in.NET is simpler than in Java.
It is commonly known that the.NET Framework can establish an extremely secure environment for applications. To provide the highest level of protection, it has a range of security features. The integrated Windows authentication system is one of these mechanisms, which makes it simple for developers to create safe and secure applications. The application’s overall security is increased by this authentication system, which guarantees that only authorized users can access it.
Additionally, a collection of cryptography classes that are necessary for safeguarding sensitive data are included in the.NET Framework. Data security is increased by these classes, which make encryption and decryption possible. These cryptography courses can be used by developers to create robust encryption algorithms that efficiently safeguard data both in transit and in storage. This guarantees that private information stays that way and is not accessible to unauthorized parties.
Therefore, the.NET Framework’s many security features allow developers to prioritize data protection and reduce potential security risks when creating applications.
Why Should You Take .NET Online Training?
Cross-Platform Development: .NET Core enables developers to create applications for Windows, Linux, and macOS.
Excellence in Web Development: ASP.NET, a component of the.NET framework, is a leading technology for creating robust and dynamic web applications.
Versatility: Because.NET allows for the creation of a wide range of applications, it is a popular framework for a variety of projects.
Industry Importance: Many large enterprises and organizations rely on.NET to develop scalable and secure applications, creating numerous job opportunities.
What Our Training Provides:
Comprehensive Curriculum: Our training covers all aspects of.NET, from fundamental concepts to advanced topics, preparing you for real-world projects.
Hands-on Projects: Gain practical experience by completing real-world projects and applying what you’ve learned throughout the course.
Flexibility: Our online format allows you to learn at your own pace, accommodating your hectic schedule.
Interactive Learning: To improve your comprehension and get answers to any questions, participate in interactive sessions, debates, and Q&A sessions.
Professional Teachers: Learn from industry experts with extensive.NET development experience and gain valuable insights.
Who should take:
IT specialists seeking professional development.
Aspiring programmers
Web Designers
Software Developers
Come Grow Your Career with Us!
Start the process of developing into a proficient.NET developer. Your key to developing the abilities that employers are seeking is our.NET Online Training in Chennai. Are you ready to take charge of your software development career? Enroll immediately!
For.NET training and technical assistance, call +91 90427 10472.
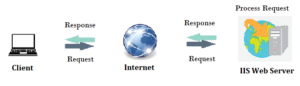
How to Host DOTNET site in IIS
what is IIS?
IIS, or Internet Information Services, is a web server software developed by Microsoft for hosting and serving web applications and websites. It is an integral part of the Windows Server operating system and is widely used for deploying and managing web-based applications on the Microsoft platform.
Key features of IIS include:
Web Server Functionality: IIS serves as a powerful web server, handling HTTP and HTTPS requests. It supports various web technologies, including HTML, CSS, JavaScript, and different server-side scripting languages like ASP.NET.
Application Hosting: IIS is designed to host and manage web applications and services built on the Microsoft technology stack, such as ASP.NET, .NET Core, and PHP. It also supports classic ASP (Active Server Pages).
Security: IIS provides robust security features, including authentication, authorization, and SSL/TLS support for encrypting data in transit. It allows administrators to control access to websites and applications based on user roles and permissions.
Scalability: IIS is scalable and can handle a large number of concurrent connections. It supports load balancing and can be configured to distribute incoming requests across multiple servers for improved performance and reliability.
Management Tools: IIS comes with a user-friendly management interface, known as IIS Manager, which allows administrators to configure and manage web server settings, applications, and security features. It also supports remote administration.
Logging and Monitoring: IIS generates logs that provide detailed information about web server activity, helping administrators troubleshoot issues and analyze performance. Additionally, administrators can use performance monitoring tools to track server metrics.
Extensibility: IIS is extensible and supports the integration of various modules and extensions. This allows developers and administrators to add custom functionality, such as URL rewriting, compression, and caching.
FTP Server: In addition to its web server capabilities, IIS includes a built-in FTP (File Transfer Protocol) server, allowing users to transfer files to and from the server.
IIS is a versatile and widely used web server that caters to a broad range of web hosting needs, from simple static websites to complex dynamic web applications. It is a crucial component for organizations leveraging Microsoft technologies in their web development and hosting environments.
Hosting a .NET site in Internet Information Services (IIS) – Introduction:
Hosting a .NET site in Internet Information Services (IIS) is a crucial step in deploying web applications built on the .NET framework. IIS provides a robust and scalable platform for hosting, managing, and securing web applications. This step-by-step guide will walk you through the process of hosting a .NET site in IIS.
Step-by-Step Guide on How to Host a .NET Site in IIS:
Step 1: Install IIS on the Server:
Before hosting a .NET site in IIS, ensure that IIS is installed on the server. You can install IIS through the Windows Features menu. Go to Control Panel -> Programs -> Turn Windows features on or off, and then select Internet Information Services.
Step 2: Install the Appropriate .NET Runtime:
Ensure that the server has the correct version of the .NET runtime installed to support your .NET application. You can download and install the necessary runtime from the official Microsoft website.
Step 3: Publish the .NET Application:
Publish your .NET application using Visual Studio or the command line. This process generates the necessary files for deployment. Choose the appropriate publish settings, including the target framework and deployment configuration.
Step 4: Create a New IIS Site:
Open the IIS Manager and create a new site for your .NET application. Right-click on “Sites” and choose “Add Website.” Enter a unique site name, set the physical path to the location where you published your .NET application, and assign a port number and host name if necessary.
Step 5: Configure Application Pool:
Create a new application pool or use an existing one for your .NET site. Ensure that the application pool is configured to use the correct version of the .NET runtime and is set up with the necessary permissions.
Step 6: Adjust Security Settings:
Review and adjust the security settings for your site. Configure authentication, authorization, and SSL settings based on your application’s requirements. Ensure that the necessary permissions are granted to the application pool identity.
Step 7: Test Your Site:
After configuring IIS, test your .NET site by navigating to the specified URL in a web browser. Ensure that all pages and functionalities work as expected. Monitor the IIS logs for any errors or issues.
Step 8: Monitor and Maintain:
Regularly monitor the performance of your .NET site in IIS. Use tools like Performance Monitor to analyze server metrics and address any performance bottlenecks. Keep the server and IIS components up to date with the latest security patches and updates.
Conclusion:
Hosting a .NET site in IIS involves several essential steps, from installing IIS and the correct .NET runtime to configuring application pools and security settings. Following this step-by-step guide will help you successfully deploy and manage your .NET web application in a secure and scalable environment.
Full Stack Dot NET Developer Course Online
Introduction
Full Stack.NET Developers play an important role in creating end-to-end solutions by seamlessly integrating front-end and back-end technologies using the Microsoft.NET framework. With the convenience of online courses, aspiring developers can begin their journey to master the complexities of Full Stack.NET development. This article serves as a guide, delving into the key components and benefits of online courses designed to develop skilled Full Stack.NET developers.
A Comprehensive Approach to Understanding Full Stack.NET Development
Using Microsoft’s.NET technologies, full stack.NET development includes both front-end and back-end development. For server-side development, it requires knowledge of languages like C# and ASP.NET, and for client-side development, frameworks like Angular or React. A wide range of topics are covered in online courses designed specifically for Full Stack.NET Developers, guaranteeing a well-rounded skill set.
Key Features of Online Full Stack.NET Courses:
Full Stack.NET Developers must have a strong understanding of C#. Online courses frequently begin with in-depth C# programming modules that cover topics such as object-oriented programming, data types, and control structures.
Courses cover ASP.NET MVC (Model-View-Controller), a framework for developing scalable and maintainable web applications. Students learn about routing, controllers, views, and data models while gaining practical experience in developing robust server-side applications.
Full Stack.NET Front-end developers must be knowledgeable about these technologies. HTML, CSS, and JavaScript are frequently used in online courses, as are popular front-end frameworks such as Angular and React. This allows developers to create interactive and user-friendly interfaces.
Database integration is a critical component of full stack development. The courses cover SQL for database management as well as ORM (Object-Relational Mapping) tools such as Entity Framework, which allow developers to interact with databases seamlessly.
Full Stack.NET Developers frequently create and consume APIs (Application Programming Interfaces). Online courses teach students how to create RESTful APIs, which allow different web application components to communicate with one another.
Source Control and Deployment:
Version control systems (such as Git) and deployment strategies are critical for application collaboration and release. Courses provide insights into Git workflows and deployment techniques, allowing developers to manage projects more efficiently.
Benefits of Online Full Stack .NET Development Courses:
Flexibility:
Online courses allow students to balance their studies with other commitments. Asynchronous learning materials, like video lectures and interactive assignments, cater to a variety of learning styles.
Hands-On Projects:
Practical application is critical to skill development. Many online courses include hands-on projects and real-world scenarios, allowing students to put theoretical knowledge into practice.
Community Support:
Forums and discussion boards are common features of online platforms that foster a sense of community. Learners can connect with their peers, share their experiences, and ask for help from instructors and other students.
Industry-Relevant Content:
Reputable online courses are created with input from industry experts. They keep up with the latest trends and technologies, ensuring that students learn skills that are relevant to today’s job market needs.
Conclusion: Shaping Future Full Stack .NET Developers
Starting the journey to become a Full Stack.NET Developer with online courses provides a flexible and comprehensive learning experience. Aspiring developers can expect to learn how to design, implement, and maintain fully functional web applications, making them valuable assets in the ever-changing web development landscape. Individuals who are dedicated and take the right online course can turn their coding passion into a rewarding career as a Full Stack.NET Developer.
If you need any Training / Technical Support in DOTNET & SQL Contact +91 90427 10472
How to Get Ready for a Dotnet Interview
Microsoft’s Dotnet framework is widely used for developing robust and scalable applications. Preparing for a Dotnet interview, whether you’re a seasoned developer or a recent graduate, necessitates a thorough understanding of the framework, its components, and best practices. In this article, we’ll go over key areas to concentrate on and offer practical advice to help you succeed in your Dotnet interview.
Understand the Fundamentals:
Before moving on to more advanced topics, make sure you understand fundamental concepts like Common Language Runtime (CLR), Common Type System (CTS), and Common Intermediate Language (CIL). Examine object-oriented programming principles, which are essential for Dotnet development.
Master Core Technologies:
C# Language Proficiency:
C# is the primary language used in Dotnet development, so brush up on it. Prepare to show your understanding of language features, inheritance, polymorphism, and exception handling.
ASP Dotnet and ASP Dotnet Core:
Learn the distinctions between ASP Dotnet and ASP Dotnet Core. Understand the MVC (Model-View-Controller) architecture, as well as routing and middleware.
ADO Dotnet and Entity Framework:
It is critical to have a solid understanding of ADO Dotnet for data access and Entity Framework for object-relational mapping. Prepare to talk about database connectivity, LINQ, and data modelling.
Explore Web Technologies:
Web API and RESTful Services:
Learn how to create and use Web APIs. Learn RESTful principles as well as how to design and implement scalable services.
Front-End Development:
Learn about front-end technologies such as HTML, CSS, and JavaScript. Knowledge of JavaScript frameworks such as Angular or React can be advantageous.
Look into Testing and Debugging in Depth:
Unit Testing:
Understand the significance of unit testing and be acquainted with testing frameworks such as NUnit or xUnit. Understand how to write efficient unit tests for your code.
Debugging Skills:
Demonstrate your ability to efficiently troubleshoot and debug code. Understand how to use Visual Studio’s debugging tools.
Explore Cloud Services:
Azure Services:
Many businesses use Microsoft Azure to host and manage applications. Understand Azure services such as Azure App Service, Azure Functions, and Azure SQL Database.
Security Best Practices:
Authentication and Authorization:
Learn about various authentication mechanisms such as OAuth and OpenID Connect. Understand how to use role-based access control (RBAC) to secure applications.
Secure Coding Practices:
Understand common security flaws and best practices for writing secure code. Learn how to defend against common threats such as SQL injection and cross-site scripting (XSS).
Keep Up with the Latest Trends:
Latest versions updates:
Keep yourself updated on the latest versions of Dotnet, including Dotnet Core and be aware of new features and improvements.
Containerization and Microservices:
Learn about Docker containerization and the concept of microservices. Learn how these architectural patterns can benefit Dotnet applications.
Behavioral and Problem-Solving Questions:
Soft Skills:
Be prepared to answer behavioral questions about your communication, teamwork, and problem-solving abilities.
Coding Challenges:
Exercise your coding skills by solving algorithmic and real-world problems. LeetCode and HackerRank, for example, provide a variety of Dotnet-related challenges.
Conclusion:
Getting ready for a Dotnet interview necessitates a mix of technical knowledge, practical skills, and problem-solving abilities. You’ll be well-equipped to impress your interviewers and land that Dotnet development role if you focus on the key areas mentioned above and stay up to date on the latest trends. Best wishes!
Begin your Journey Today,
for Training, Contact via Call/WhatsApp :+91 90427 10472
Overview of C# and DotNet
Introduction:
The synergy between C# and the DotNet framework has become a cornerstone for building a wide range of applications, from desktop software to web services and cloud-based solutions, in the realm of software development. In this article, we’ll look at the capabilities, features, and versatility that C# and DotNet bring to the table, making them a dynamic programming duo.
C#: A Versatile and Modern Language:
A Quick Overview of C#:
Microsoft C# (pronounced “C sharp”) is a modern, object-oriented programming language. It combines the best features of C and C++ with the simplicity of Java, making it an excellent choice for developers looking for a powerful and expressive programming language.
Object-Oriented Paradigm:
C# adheres to the principles of object-oriented programming (OOP), emphasizing encapsulation, inheritance, and polymorphism. This enables developers to write modular, maintainable code, resulting in more efficient software design.
Type Safety and Memory Management:
C# is a statically-typed language, which means that variable types are known at compile time, reducing the likelihood of runtime errors. Automatic memory management via the garbage collector improves the language’s robustness.
Asynchronous Programming:
C# simplifies asynchronous programming with the introduction of the async and await keywords. This is especially important when developing responsive applications that can handle concurrent tasks without blocking.
DotNet: A Unified Development Platform
Introduction to the DotNet Framework:
Microsoft’s DotNet framework is a comprehensive platform for developing, deploying, and running applications. It provides a consistent development environment for a wide range of applications, including web, mobile, desktop, cloud, and gaming.
Common Language Runtime (CLR):
The Common Language Runtime (CLR), which manages the execution of DotNet programs, is at the heart of the DotNet framework. It has functions like automatic memory management, exception handling, and security.
Unified Type System:
The DotNet framework has a unified type of system in which all types, whether built-in or user-defined, derive from a single root (System.Object). This unity promotes interoperability and code reuse across the DotNet ecosystem’s various languages.
Extensive Class Library:
DotNet includes a large class library with pre-written code for common programming tasks. The Base Class Library (BCL) is a library that simplifies development by providing a wide range of functionalities without the need to reinvent the wheel.
Building Applications with C# and DotNet:
Desktop Applications with WPF:
C# is frequently used to develop Windows Presentation Foundation (WPF) applications, which allow for the creation of feature-rich and visually appealing desktop software.
Web Development with ASP DotNet:
ASP DotNet, a component of the DotNet framework, allows developers to use C# to create dynamic and scalable web applications. ASP DotNet provides a strong framework for developing APIs and full-stack web applications.
Cross-Platform Development with DotNet Core and DotNet 5/6/7:
Recent DotNet ecosystem advancements, such as DotNet Core and the subsequent DotNet 5, DotNet 6, and DotNet 7, have expanded C#’s capabilities to embrace cross-platform development. Developers can now create applications that run on Windows, macOS, and Linux.
Mobile App Development with Xamarin:
C# is used in mobile app development by Xamarin, a framework that allows developers to create cross-platform mobile apps for iOS, Android, and Windows using a single codebase.
Conclusion:
C# and DotNet are modern software development pillars, providing a versatile and unified platform for developing a wide range of applications. Whether you are an experienced developer or just starting out, exploring the capabilities of C# and DotNet opens up a world of possibilities. The continuous evolution of these technologies ensures that developers have the tools they need to stay ahead of the ever-changing software development landscape. Remember that the journey is just as rewarding as the destination as you delve deeper into the worlds of C# and DotNet.
Have fun coding!
Begin your Journey Today,
for Training, Contact via Call/WhatsApp :+91 90427 10472
Dependency Injection in ASP.NET Core
Building Modular and Testable Applications with Dependency Injection in ASP.NET Core
Introduction:
A key component of developing ASP.NET Core applications that encourages modularity, maintainability, and testability is dependency injection, or DI. In this post, we’ll examine the foundations of dependency injection in ASP.NET Core, as well as its advantages and practical uses for developing organized and expandable applications.
Understanding Dependency Injection:
Dependency injection is a design pattern that assists in the management of dependencies among various components in a software system. It refers to the technique of supplying the objects that a class requires (its dependencies) from outside rather than creating them within the class itself in the context of ASP.NET Core. This method makes classes more modular and testable.
Benefits of Dependency Injection in ASP.NET Core:
1. Modular Code: By injecting dependencies into classes, each class can concentrate on its own functionality without being tethered to the implementation details of its dependencies. As a result, the code becomes more modular and maintainable.
2. Testability: Dependency injection makes unit testing easier by allowing developers to replace real implementations of dependencies with mock or test implementations. This facilitates the isolation and testing of individual components.
3. Extensibility: It is easier to extend an application’s functionality with dependency injection by introducing new components or swapping out existing ones. This is especially useful when evolving and scaling an application.
Implementing Dependency Injection in ASP.NET Core:
1. Service Registration:
Services in ASP.NET Core are registered at application startup in the dependency injection container. Services can be added to the container via the ‘ConfigureServices’ method in the ‘Startup’ class.
public void ConfigureServices(IServiceCollection services)
{
services.AddTransient<IMyService, MyService>();
// Add more services...
}
‘IMyService’ is the interface in this example, and ‘MyService’ is the matching implementation. ‘Transient’ means that each time a request is made, a new instance of ‘MyService’ is created.
2. Constructor Injection:
Use the constructor of a class to inject dependencies into it. The necessary dependencies are automatically provided by the DI container when a class instance is created.
public class MyController : Controller
{
private readonly IMyService _myService;
public MyController(IMyService myService)
{
_myService = myService;
}
// Controller actions...
}
3. Using Dependency Injection in Middleware:
Dependency injection can also help middleware components in the ASP.NET Core request processing pipeline. The ‘Invoke’ method can have services injected into it.
public class MyMiddleware
{
private readonly RequestDelegate _next;
private readonly IMyService _myService;
public MyMiddleware(RequestDelegate next, IMyService myService)
{
_next = next;
_myService = myService;
}
public async Task Invoke(HttpContext context)
{
// Use _myService...
await _next(context);
}
}
Scopes and Lifetimes of Services:
Several service lifetimes, such as ‘Transient’, ‘Scoped’, and ‘Singleton’, are supported by ASP.NET Core. Managing the lifespan of service instances requires an understanding of these lifetimes.
1. Transient: Whenever an instance is requested, a new one is created.
2. Scoped: Each request generates a single instance. Within the parameters of an HTTP request, it is shared.
3. Singleton: For the duration of the application, only one instance is created.
Best Practices for Dependency Injection in ASP.NET Core:
1. Choose Constructor Injection: For improved readability and maintainability, inject dependencies via the constructor.
2. Employ Interfaces: Write code that checks against interfaces as opposed to specific implementations. This encourages testability and flexibility.
3. Avoid the Service Location Anti-Pattern: Avoid the ‘ServiceLocator’ pattern, which involves retrieving services directly from the container within a class.
4. Register Services as Interfaces: When registering services, use interfaces rather than concrete implementations.
services.AddTransient<IMyService, MyService>();
Conclusion:
Dependency injection is a powerful design pattern that improves the design, testability, and maintainability of ASP.NET Core applications significantly. Developers can create modular, extensible, and testable applications by leveraging the built-in dependency injection container. Understanding dependency injection principles is critical for developing robust and scalable ASP.NET Core applications.
Microservices Architecture with DOTNET Core
Introduction:
The ability of microservices architecture to break down large, monolithic applications into smaller, independent services has led to widespread adoption. This article delves into the design principles and implementation strategies for developing microservices with DOTNET Core, Microsoft’s versatile and powerful framework.
Understanding Microservices Architecture:
Microservices is a design style in which an application is made up of loosely coupled, independently deployable services. Each service is intended to carry out a specific business function and communicates with other services via well-defined APIs.
Design Principles:
1. Single Responsibility Principle (SRP): Each microservice should be responsible for a single business capability. This ensures ease of use and maintainability.
2. Decentralized Data Management: Databases belong to microservices. Because of this decentralization, dependencies are reduced and each service is free to select the database technology that best meets its needs.
3. Inter-Service Communication: APIs are used by services to communicate with one another, and they frequently use lightweight protocols such as HTTP/REST or messaging queues. This allows for independence and flexibility in technology stack selection.
4. Fault Tolerance and Resilience: Create services that are resistant to failure. To handle faults gracefully, use mechanisms such as circuit breakers and retries.
5. Continuous Integration and Deployment (CI/CD): Use CI/CD techniques to automate the processes of building, testing, and deployment. This guarantees the delivery of microservices quickly and consistently.
6. Scalability: Microservices can be scaled independently based on demand. By horizontally scaling instances, you can design services to handle varying levels of load.
Implementation with DOTNET Core:
1. Service Development: For each microservice, create a separate DOTNET Core project. Build web APIs with ASP DOTNET Core and consider high-performance communication technologies like gRPC.
2. API Gateway: Set up an API Gateway to manage and route requests to the proper microservices. In Azure, tools such as Ocelot and API Gateway can be used.
3. Service Discovery: To dynamically locate and call services, use service discovery tools such as Consul or Eureka. This is critical for dealing with the fluid nature of microservices.
4. Containerization: Use Docker to containerize each microservice. This ensures consistency across environments and makes deployment easier.
5. Orchestration with Kubernetes: Use Kubernetes to orchestrate and manage containers. Kubernetes makes it easier to deploy, scale, and manage microservices.
6. Logging and Monitoring: Consolidate logging and monitoring. Tools such as the ELK stack (Elasticsearch, Logstash, Kibana) or Application Insights can provide insights into the behavior of microservices.
7. Security: Implement an all-encompassing security strategy. Utilize OAuth for authentication, JWT for token-based authorization, and HTTPS for secure communication.
8. Testing: For each microservice, perform unit testing, integration testing, and end-to-end testing. In this context, tools like xUnit, NUnit, and Postman can be useful.
9. Database Management: Select databases based on the needs of the microservices. Accept polyglot persistence and think about SQL and NoSQL databases.
10. Event-Driven Architecture: Think about using event-driven patterns with message brokers such as RabbitMQ or Apache Kafka. Asynchronous communication between microservices is enabled by events.
Conclusion:
Using DOTNET Core to build microservices necessitates adhering to architectural principles that prioritize independence, scalability, and maintainability. Developers can create a robust microservices ecosystem that meets the demands of modern, scalable applications by using a containerized and orchestrated approach. The combination of DOTNET Core and microservices unleashes the power of agile development, rapid deployment, and efficient scaling, enabling organizations to deliver resilient and scalable applications in today’s dynamic computing landscape.
Begin your journey today, for Training / Technical Support,
Contact via Call/WhatsApp :+91 90427 10472
Learn DOTNET Core Online
Overview of DOTNET Core: A Contemporary Framework for Cross-Platform Development
Microsoft created the free, open-source, cross-platform DOTNET Core framework to help developers create contemporary, scalable applications. With its modular design and lightweight architecture, it offers a substantial departure from the conventional DOTNET Framework and supports a broad variety of application kinds. We’ll go over the main benefits and features that make DOTNET Core a desirable option for developers in this introduction.
Principal attributes:
1. Cross-Platform Interoperability: With the help of DOTNET Core, programmers can create and execute apps for Windows, Linux, and macOS. For contemporary development scenarios, where applications must be deployed on various environments, cross-platform support is essential.
2. High-performance and modular: Because DOTNET Core is modular by design, developers can include only the parts that are required for their application. Its modularity makes it perfect for microservices and cloud-native apps because it reduces footprint and speeds up startup times.
3. Community-driven and Open Source: The framework is being developed as an open-source project to encourage community contributions and collaboration. This openness encourages transparency and creativity while guaranteeing that developers can take an active role in the framework’s evolution.
4. Combined Platform for Various Tasks: Cloud-native microservices, cross-platform desktop apps with Xamarin, and web development with ASP DOTNET Core are just a few of the workloads that can be combined into one cohesive platform with DOTNET Core. Because of its adaptability, developers can use the same set of tools and libraries for various kinds of applications.
5. Modern Development Practices Support: DOTNET Core supports contemporary development practices such as Docker containerization, continuous integration and deployment (CI/CD), and microservices architecture. These characteristics make it ideal for developing and deploying scalable, cloud-ready applications.
6. Comparative Versioning: In contrast to the conventional DOTNET Framework, side-by-side versioning is supported by DOTNET Core. This enables applications to use the version of the runtime and libraries that they were built with by allowing multiple versions to coexist on the same machine.
DOTNET Core components include:
1. DOTNET Core Runtime: The Common Language Runtime (CLR) and Just-In-Time (JIT) compilation are two of the runtime’s key components that are required to run DOTNET Core applications.
2. Core Libraries for.NET: These libraries offer common functionality for applications built with DOTNET Core. They consist of networking, file I/O, data structures, and algorithms, among other things.
3. ASP DOTNET Core: A cross-platform, high-performance framework for creating contemporary, cloud-based, and internet-connected apps is called ASP DOTNET Core. It’s frequently utilized for creating microservices, APIs, and web apps.
4. Entity Framework Core: An open-source, lightweight, and extensible object-relational mapping (ORM) framework is called Entity Framework Core. It makes working with databases using C# objects easier for developers by streamlining persistence and data access.
Getting Started:
Setting up your development environment, starting a new project, and learning the core principles of ASP DOTNET Core are the first steps in getting started with the framework. Here is a step-by-step tutorial to get you started with ASP DOTNET Core web application development.
Step 1: Install Prerequisites
Make sure the following is installed on your computer before you begin:
a.) DOTNET SDK: The DOTNET SDK can be downloaded and installed from the official DOTNET website: Get the DOTNET SDK here.
b.) Code Editor: Select a code editor for your project. Although Visual Studio Code is a well-liked option, you are free to use any other code editor of your choosing.
Step 2: Create a New Project for ASP DOTNET Core
To start a new ASP DOTNET Core project, launch a terminal or command prompt and type the following commands:
# Create a new folder for your project
mkdir MyFirstAspNetCoreApp
cd MyFirstAspNetCoreApp
# Create a new ASP DOTNET Core web application
dotnet new web -n MyFirstAspNetCoreApp
Step 3: Explore the Project Structure
Go to the project folder and examine the project hierarchy. Important documents and directories consist of:
Program.cs: Program.cs is the application’s entry point.
Startup.cs: Startup.cs is responsible for configuring the application’s services and middleware.
wwwroot: Static files (CSS, JavaScript, images) are stored in the wwwroot directory.
Controllers: The controllers that handle requests are listed here.
Views: This collection contains the views that define the user interface.
Models: Contains the data models that the application employs.
Step 4: Run the Program
To build and run the application, use the following command:
dotnet run
Navigate to https://localhost:1001 (or http://localhost:1002) in a web browser. The default ASP DOTNET Core welcome page should appear.
Step 5: Make a Simple Modification
In your code editor, open the project. There is an action method called Index in the Controllers/HomeController.cs file. Modify the ViewBag’s content.Message to another entity. As an example:
public IActionResult Index()
{
ViewBag.Message = “Hello, ASPDOTNETCore!”;
return View();
}
When you save the file, the web application will reload with your changes.
Step 6: Also, Understand the Fundamentals
Explore the following fundamental concepts:
Routing: Learn about URL routing in ASP DOTNET Core. Route configurations can be found in the Startup.cs file.
Views and Razor Pages: Discover how to make views with Razor syntax. Static files can be found in the Views and wwwroot folders.
Dependency Injection: Learn how to configure dependency injection in ASP DOTNET Core. For service registration, look in the Startup.cs file.
Middleware: Discover the elements of middleware and how the Startup.cs file configures them.
As you gain more familiarity with the fundamentals of ASP DOTNET Core development, you should also think about exploring more complex subjects like database access, authentication, and deployment.
Begin your journey today, for Training / Technical Support, Contact +91 90427 10472
View in SQL
View in SQL
A view in SQL is a virtual table created from the results of a SELECT query. Views simplify complex queries, encapsulate logic, and provide an abstraction layer over the underlying tables. They can be used to present data in a more meaningful or secure manner than querying the underlying tables directly. Here’s a quick rundown of how to create and use views in SQL:
Creating a View:
The CREATE VIEW statement is used to create a view. The fundamental syntax is as follows:
| CREATE VIEW view_name AS
SELECT column_name_1, column_name_2, … FROM table_name WHERE condition; |
For example, let us create a new table called studentdata using the syntax shown below.
| create table studentdata(
sno int, sname varchar(100), slocaction varchar(100), smothertongue varchar(100)); |
Insert some records as well using the syntax shown below.
| insert into studentdata values(1, ‘RAM’, ‘CHENNAI’, ‘TAMIL’)
insert into studentdata values(2, ‘RAJ’, ‘CHENNAI’, ‘HINDI’) insert into studentdata values(3, ‘RAVI’, ‘HYDERABAD’, ‘TELUGU’) insert into studentdata values(4, ‘RAJESH’, ‘HYDERABAD’, ‘TAMIL’) insert into studentdata values(5, ‘RAJIV’, ‘CHENNAI’, ‘TELUGU’) |
Select query syntax can be used to display the table records.
| SELECT * FROM studentdata |
Create a view using the syntax shown below.
| CREATE VIEW TN AS
SELECT * FROM studentdata WHERE slocaction = ‘CHENNAI’ |
Using a View:
After you’ve created a view, you can query it like a regular table with the following syntax:
| SELECT * FROM view_name |
With reference to the given example,
| SELECT * FROM TN |
Updating a View:
You can use the ALTER VIEW statement to update views:
| ALTER VIEW view_name AS
SELECT column_name_1, column_name_2, … FROM table_name WHERE condition; |
In Microsoft SQL Server, you can use the CREATE OR ALTER VIEW statement to replace an existing view or create a new one. This is similar to the CREATE OR REPLACE VIEW syntax found in other database systems. Using the preceding example:
| ALTER VIEW TN AS
SELECT * FROM studentdata WHERE smothertongue = ‘TAMIL’ |
Dropping a View:
The DROP VIEW statement is used to remove a view:
| DROP VIEW employee_view; |
Thinking back to the earlier illustration:
| DROP VIEW TN |
Multiple Views:
Views enable you to create a virtual table in a relational database based on the results of a SELECT query. You can use JOIN operations in your SELECT statement to combine data from multiple tables in a view. Here’s a general guide to creating a view with multiple tables:
Consider the following scenario: you have two tables: customers and orders. The customers table contains information about customers, and the orders table contains information about the orders that these customers have placed.
| — Sample customers table
CREATE TABLE customers ( CustomerId INT PRIMARY KEY, CustomerName VARCHAR(50), Email VARCHAR(50) ); — Sample orders table CREATE TABLE orders ( OrderId INT PRIMARY KEY, CustomerId INT, OrderDate DATE, TotalAmount DECIMAL(10, 2), FOREIGN KEY (CustomerId) REFERENCES customers(CustomerId) ); |
Let us also insert some sample records into both tables using the insert query:
| INSERT INTO customers VALUES (1, ‘RAM’, ‘ram@mail.com’)
INSERT INTO customers VALUES (2, ‘RAJ’, ‘raj@mail.com’) INSERT INTO customers VALUES (3, ‘RAVI’, ‘ravi@mail.com’) INSERT INTO orders VALUES (101, 1, ‘2023/11/02’, 10000) INSERT INTO orders VALUES (102, 2, ‘2023/11/03’, 12000) |
Check it out with the following select query:
| SELECT * FROM customers
SELECT * FROM orders |
Let’s now create a view that combines data from both tables:
| CREATE VIEW CustomerOrderView AS
SELECT c.CustomerId, c.CustomerName, c.Email, o.OrderId, o.OrderDate, o.TotalAmount FROM customers c JOIN orders o ON c.CustomerId = o.CustomerId; |
The CustomerOrderView view is created in this example by selecting specific columns from both the customers and orders tables. The JOIN clause is used to join rows from both tables using the CustomerId column in common.
After you’ve created the view, you can query it like any other table:
| SELECT * FROM CustomerOrderView |
Remember that the exact syntax can change based on the database management system (SQL, PostgreSQL, MySQL, etc.) you are using. Depending on the system you are working with, modify the SQL statements as necessary.
DOTNET Online Training in Chennai
Unleashing Your DOTNET Software Development Potential
Do you want to learn about versatile and powerful software development – DOTNET & SQL? There is no need to look any further! Our Maria Academy is intended to provide you with the skills and knowledge required to thrive in the fast-paced field of application development.
About DOTNET (.NET)
Microsoft’s .NET framework is a robust and widely used framework for developing a wide range of applications, from desktop and web applications to mobile and cloud solutions. The demand for skilled .NET developers is increasing as the technology industry evolves.
About SQL
SQL, or Structured Query Language, is a programming language that is standardized for managing and manipulating relational databases. It includes commands for querying data, inserting records, updating information, and creating database structures. SQL is required for interacting with databases in a variety of applications, allowing for the structured and organized storage, retrieval, and manipulation of data. Its syntax is consistent across various database management systems, making it a universal database communication language. A solid understanding of SQL is essential in the world of data management and application development, whether you’re a developer, data analyst, or database administrator.
Why Should You Take .NET Online Training?
Versatility: Because .NET supports the development of a wide range of applications, it is a popular framework for a wide range of projects.
Industry Importance: Many large enterprises and organizations rely on .NET to build scalable and secure applications, resulting in many job opportunities.
Cross-Platform Development: .NET Core allows developers to create applications that run on Windows, Linux, and macOS.
Excellence in Web Development: ASP.NET, a component of the .NET framework, is a leading technology for developing powerful and dynamic web applications.
What Our Training Provides:
Comprehensive Curriculum: Our training covers the entire scope of .NET, from fundamental concepts to advanced topics, ensuring you’re ready for real-world projects.
Hands-on Projects: Gain practical experience by working on real-world projects and applying what you’ve learned throughout the course.
Flexibility: Our online format allows you to learn at your own pace, working around your hectic schedule.
Interactive Learning: To improve your comprehension and get answers to any questions, participate in interactive sessions, debates, and Q&A sessions.
Professional Teachers: Learn from professionals in the field who have a great deal of .NET development experience and gain insightful advice.
Who Needs to take:
IT Specialists Seeking Professional Development
Aspiring Programmers
Web Designers
Software Developers
Join Us to Advance Your Career!
Begin your journey to becoming a skilled .NET developer. Our .NET Online Training in Chennai is your ticket to mastering the skills that industry leaders are looking for. Are you prepared to shape your future in software development? Enroll right away!
for Training / Technical Support in .NET, Contact +91 90427 10472
MVC framework in ASP.NET
Introduction to MVC (Model-View-Controller) in ASP.NET:
MVC (Model-View-Controller) is a common architectural paradigm for constructing online applications in ASP.NET. It provides a structured and organized approach to web application development by dividing the application into three interconnected components: the Model, the View, and the Controller. This separation of concerns makes the codebase easier to manage and maintain, promotes code reusability, and improves overall application adaptability.
Let’s take a closer look at each component:
Model: The Model represents the data and business logic of the application. It contains the data on which your application runs as well as the rules that govern that data. It is in charge of retrieving and storing data from a database or other data sources, as well as carrying out data-related tasks.
View: The View is in charge of rendering the user interface and displaying data to the user. Views in an ASP.NET MVC application are normally built in HTML, but they can also contain embedded code (Razor syntax) to show dynamic content. Views are retained as independent files, making the display layer easier to handle.
Controller: The Controller functions as a go-between for the Model and the View. It processes user requests, interacts with the Model to retrieve or change data, and then selects the appropriate View to show the response to the user. It contains the application’s logic for handling HTTP requests and is the starting point for the majority of user interactions.
Main advantages and characteristics of ASP.NET MVC use:
Separation of Concerns: MVC requires a distinct division of responsibilities, which facilitates application understanding, maintenance, and expansion. Developers are able to work independently on various components because to this separation.
Reusability: MVC improves code reusability and reduces redundancy by allowing models, views, and controllers to be often reused in other application components.
Testability: MVC allows for independent unit testing of each component, which improves code quality and facilitates more effective debugging.
Flexibility: MVC enables developers to add to and modify some areas of the program without compromising the functionality of the other sections. It is now simpler to adjust to evolving needs as a result.
Support for Multiple View Engines: ASP.NET MVC offers flexibility in how you render your views by supporting a number of view engines, such as Razor and Web Forms.
Usually, you use one of the MVC project templates to create a project in Visual Studio to begin working with MVC in ASP.NET. Models, views, and controllers are all built up in the fundamental framework of your application by using these templates. After that, you may construct on top of this base by defining your views for data display, writing controller actions for user requests, and defining your data models.
In conclusion, MVC is an effective architectural pattern that encourages the creation of web applications in ASP.NET using an organized methodology. Because of its many benefits for code organization, maintainability, and testability, it is a well-liked option among developers creating ASP.NET web applications.
.NET One Day Workshop at Karaikudi
A Deep Dive into the World of .NET: Unveiling the Karaikudi Workshop
In the heart of Tamil Nadu, amidst the rich cultural heritage and vibrant traditions, the town of Karaikudi stood witness to a technological marvel that unfolded on a day of immense learning and networking. The “.NET One Day Workshop” was an event that not only brought together enthusiasts and professionals from the realm of software development but also paved the way for knowledge exchange and skill enhancement. This blog takes you on a journey through the intricacies of the workshop while delving into the significance of data backup in the realm of .NET.
Unveiling the Workshop
The “.NET One Day Workshop” held in Karaikudi was a convergence of minds eager to grasp the nuances of the .NET framework, a versatile and powerful platform for building applications. Organized by a collaborative effort of local tech communities, the workshop was geared towards catering to a diverse audience – from students aspiring to enter the software industry to seasoned developers keen on expanding their skill set.
The day commenced with an inaugural address that highlighted the importance of continuous learning in the rapidly evolving world of technology. Distinguished speakers from various domains shared their insights, setting the tone for the knowledge-packed day ahead. The agenda covered a range of topics:
Introduction to .NET:
A comprehensive overview of the .NET framework, its components, and its relevance in contemporary software development.
Building Applications with C#:
A deep dive into C#, one of the primary programming languages for developing .NET applications. Attendees were exposed to its syntax, data structures, and object-oriented principles.
Web Development with ASP.NET:
A session focusing on ASP.NET, which enables the creation of dynamic web applications. Participants learned about web forms, MVC architecture, and the role of server-side scripting.
Data Persistence and Backup:
A crucial segment that emphasized the significance of data backup in software applications, ensuring data integrity, security, and disaster recovery.
The Significance of Data Backup
In the era of information, data stands as the backbone of virtually every software application. Whether it’s a user’s preferences in a mobile app or financial records in an enterprise system, data forms the core of functionalities. However, with great power comes the responsibility of safeguarding this data against various threats such as hardware failures, cyberattacks, and human errors. This is where data backup steps in as a savior.
- Data Integrity and Recovery
Data loss can be catastrophic, potentially resulting in financial losses, legal ramifications, and loss of trust among users. Backup solutions ensure data integrity by creating copies of essential information at regular intervals. In case of data corruption or loss, these backups act as recovery points, enabling developers to restore the application to a previous state.
- Disaster Recovery
Natural disasters, hardware failures, or even simple human errors can disrupt the availability of applications. Data backup plays a pivotal role in disaster recovery, allowing organizations to rebuild their applications and services with minimal downtime.
- Security Measures
In the digital age, cybersecurity is of extreme importance. Regular backups can mitigate the damage caused by ransomware attacks or other malicious activities. If a system is compromised, having a backup ensures that attackers can’t hold the data hostage.
- Testing and Development
Backed-up data can be a valuable resource for testing and development purposes. Developers can use copies of real data to create realistic testing scenarios or build new features without risking the integrity of the production environment.
- Compliance and Regulations
Many industries are bound by regulations that mandate data retention and security. Backup strategies that align with these regulations help organizations avoid penalties and legal complications.
Workshop Insights: Data Backup in .NET
As the “.NET One Day Workshop” progressed, the segment on data persistence and backup resonated deeply with the participants. The workshop shed light on how the .NET framework offers several mechanisms to implement effective data backup strategies:
- Database Backups
Databases are at the heart of most applications, housing critical data. .NET supports various database systems like SQL Server, MySQL, and PostgreSQL. These databases often provide built-in mechanisms for automated backups and recovery.
- Version Control
While version control systems like Git are primarily associated with source code management, they indirectly contribute to data backup. By maintaining a history of code changes, version control systems provide a level of data recovery in case of accidental code loss or errors.
- Cloud Solutions
Cloud platforms offer scalable and reliable options for data backup. Azure Backup, for instance, provides services for backing up data, applications, and virtual machines directly from the Azure portal.
- Application State Management
In web applications, maintaining the application’s state is crucial for user experience. .NET offers techniques to persist user sessions and application states, ensuring a seamless experience even after server restarts.
Beyond the Workshop: Empowered Developers
The “.NET One Day Workshop” not only imparted technical knowledge but also fostered a sense of community and collaboration among attendees. The insights gained from the workshop extended beyond the event itself, as participants returned to their workplaces and projects armed with newfound skills and perspectives.
As technology continues to advance, data will remain the cornerstone of innovation. Understanding the significance of data backup and integrating it into the software development lifecycle is an imperative for developers in the .NET ecosystem. The workshop in Karaikudi served as a stepping stone towards this awareness, inspiring participants to embrace robust backup strategies and elevate the quality and resilience of their applications.
In conclusion, the “.NET One Day Workshop” held in Karaikudi was a testament to the thirst for knowledge and growth within the developer community. As the participants left the event with a wealth of insights, they carried with them not only the technical know-how but also a deeper appreciation for the importance of data backup in the realm of .NET. This workshop was not just a one-day affair; it ignited a continuous journey of learning, exploration, and innovation.
Three Tier Architecture in MVC
Three Tier (Three Layer) Architecture
With a three-layer design, the project is divided into three layers: the user interface layer, the business layer, and the data layer (database), where we divide the UI, logic, and data into three groups. If a user wants to switch the user interface from a Windows computer to a smartphone, he or she simply needs to alter the UI layer; all other layers are unaffected. Like this, if a user wishes to change a database, he simply needs to update the data layer; everything else stays the same.
The widely used three-tier (or three-layer) architecture is a way to organise the codebase. This architecture divides the codebase into three distinct levels, each with a unique set of duties:

Presentation layer: This is the application’s user interface, which shows the user the features and data of the programme.
Business logic (or Application) layer: The business logic that powers the application’s essential features is contained in this layer. as processing the data moving between the other two layers and making judgements, calculations, and evaluations.
Data access layer (or Data) layer: To save and recover application data, this layer communicates with databases.
Advantages of using three-tier architecture are:
Accelerated development: Reducing product time to market and enabling developers to use the most current tools and layer appropriate languages.
Improved scalability: By deploying apps on many levels, each tier may always be scaled separately.
Improved Reliability: By using several tiers, you may execute additional components of your application on other servers and employ results that have been cached to improve reliability and availability.
Enhance security: By using a well-designed application layer as a private firewall to help avoid receptive weaknesses like SQL injection.
The package of different layers is as follows.
- Presentation Layer – controller package
- Business Logic Layer – service package
- Data Access Layer – repository package
Three Layer Architecture using MVC Sample:
Create an empty MVC web application project with Project name “WebApp” and solution name “TLA”. This WebApp project is the presentation layer.
In Solution TLA, add a new project to create business logic à Class library (.net framewok) à name the project as BusinessLayer.
Again, in Solution TLA, add a new project to create data access à Class library (.net framewok) à name the project as DataBaseLayer.
Add BusinessLayer & DataBaseLayer as reference in “WebApp”.
Add BusinessLayer as reference in “DataBaseLayer”.
In sql server explorer, add a new database with name “MYDB” and create a table with name “Registration”.
| CREATE TABLE [dbo].[Registration]( [RegId] [int] IDENTITY(1,1) NOT NULL, [FullName] varchar NULL, [Address] varchar NULL, [Gender] varchar NULL, [City] varchar NULL, [DoB] [date] NULL, [Cno] varchar NULL, PRIMARY KEY CLUSTERED ([RegId] ASC) |
In “DataBaseLayer”, add the model file using “ado.net entity data model”.
Once model is created, copy the connection string from app.config of “DataBaseLayer” and paste it in web.config of “WebApp”.
In “BusinessLayer”, create a class file with name “RegistrationModel” and replace with below snippet.
| public class RegistrationModel { public int RegId { get; set; } public string FullName { get; set; } public string Address { get; set; } public string Gender { get; set; } public string City { get; set; } public Nullable DoB { get; set; } public string Cno { get; set; } } |
In “DataBaseLayer”, add a new folder with name “DBOperation”, in it, add a class file with name “ManageRegistration” and replace with below snippet.
| public class ManageRegistration { public void AddReg(RegistrationModel regModel) { using (var DB = new MYDBEntities()) { Registration Reg = new Registration() { FullName = regModel.FullName, Address = regModel.Address, Gender = regModel.Gender, City = regModel.City, DoB = regModel.DoB, Cno = regModel.Cno }; DB.Registrations.Add(Reg); DB.SaveChanges(); } } } |
Then add EntityFramework.dll and EntityFramework.SqlServer.dll references in “WebApp”.
So now the business layer and data layer has been completely created.
Now, in WebApp (i. e. in presentation layer), add a new controller with name “Home controller” and replace with below snippet.
| public class HomeController : Controller { // GET: Home public ActionResult Index() { return View(); } ManageRegistration ManageReg = new ManageRegistration(); [HttpPost] public void AddReg(FormCollection Form) { RegistrationModel registrationModel = new RegistrationModel() { FullName = Form["txtName"], Address = Form["txtAddress"], Gender = Form["rdbGender"], City = Form["txtCity"], DoB = Convert.ToDateTime(Form["txtDoB"]), Cno = Form["txtCno"] }; ManageReg.AddReg(registrationModel); Response.Write("Saved"); } } |
Add index view with empty without model and put the below html and ajax snippet in it
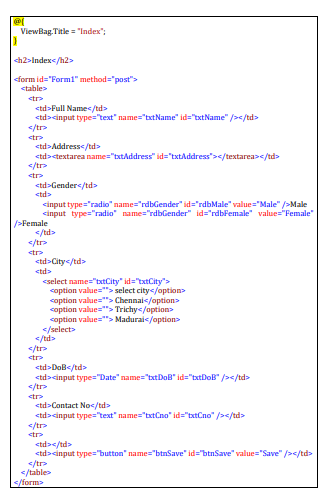
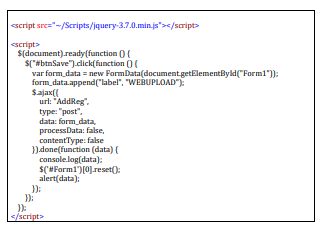
Run the program
Solid Principles in C#.net
In C#, the SOLID principles are a set of guidelines that help developers design software that is modular, maintainable, and extensible. SOLID is an acronym that stands for:
S – Single Responsibility Principle (SRP)
O – Open-Closed Principle (OCP)
L – Liskov Substitution Principle (LSP)
I – Interface Segregation Principle (ISP)
D – Dependency Inversion Principle (DIP)
Single Responsibility Principle (SRP):
A class should have only one reason to change. It states that a class should have only one responsibility or job. This principle helps to keep classes focused, maintainable, and easier to understand.
| public interface INotificationService { void SendNotification(string message); } public class EmailNotificationService : INotificationService { public void SendNotification(string message) { // Code to send an email notification } } public class SMSNotificationService : INotificationService { public void SendNotification(string message) { // Code to send an SMS notification } } public class NotificationSender { private readonly INotificationService _notificationService; public NotificationSender(INotificationService notificationService) { _notificationService = notificationService; } public void SendNotification(string message) { _notificationService.SendNotification(message); }} |
In this example, the FileManager class has the responsibility of reading and saving files, while the FileParser class is responsible for parsing files. Each class has a single responsibility, making it easier to understand and maintain.
Open-Closed Principle (OCP):
Software entities (classes, modules, functions, etc.) should be open for extension but closed for modification. This principle encourages designing modules that can be extended without modifying their existing code, reducing the risk of introducing bugs and making it easier to add new features.
| public abstract class Shape { public abstract double CalculateArea(); } public class Rectangle : Shape { public double Width { get; set; } public double Height { get; set; } public override double CalculateArea() { return Width * Height; }} public class Circle : Shape { public double Radius { get; set; } public override double CalculateArea() { return Math.PI * Radius * Radius; }} |
In this example, the Shape class is open for extension, as new shapes can be added by creating new subclasses of Shape. The existing code is closed for modification, as the Shape class and its existing subclasses do not need to be changed when adding new shapes.
Liskov Substitution Principle (LSP):
Objects of a superclass should be able to be replaced with objects of their subclass without breaking the behavior of the system. In other words, derived classes should be substitutable for their base classes, and they should honor the contracts defined by the base class.
| public class Vehicle { public virtual void Start() { Console.WriteLine(“Starting the vehicle”); } } public class Car : Vehicle { public override void Start() { Console.WriteLine(“Starting the car”); } } public class Motorcycle : Vehicle { public override void Start() { Console.WriteLine(“Starting the motorcycle”); } } |
In this example, the Car and Motorcycle classes are subclasses of Vehicle, and they can be substituted for Vehicle without breaking the behavior of the system. The Start method is overridden in each subclass, providing specific implementations for starting a car and starting a motorcycle.
Interface Segregation Principle (ISP):
Clients should not be forced to depend on interfaces they do not use. This principle encourages the creation of small, specific interfaces instead of large general-purpose interfaces. It helps to avoid forcing clients to implement methods they don’t need and promotes decoupling and flexibility.
| public interface IOrder { void ProcessOrder(); } public interface IShipping { void ShipOrder(); } public class OnlineOrder : IOrder, IShipping { public void ProcessOrder() { Console.WriteLine(“Processing online order”); } public void ShipOrder() { Console.WriteLine("Shipping online order"); }} public class OfflineOrder : IOrder { public void ProcessOrder() { Console.WriteLine(“Processing offline order”); } } |
In this example, we have two interfaces: IOrder and IShipping. The OnlineOrder class implements both interfaces, as it can process an order and ship it. The OfflineOrder class only implements the IOrder interface because it doesn’t involve shipping. This segregation of interfaces ensures that classes only depend on the methods they actually need.
Dependency Inversion Principle (DIP):
High-level modules should not depend on low-level modules; both should depend on abstractions. Abstractions should not depend on details; details should depend on abstractions. This principle promotes loose coupling between modules, promotes modular design, and enables easier testing and maintainability.
| public interface INotificationService { void SendNotification(string message); } public class EmailNotificationService : INotificationService { public void SendNotification(string message) { // Code to send an email notification } } public class SMSNotificationService : INotificationService { public void SendNotification(string message) { // Code to send an SMS notification } } public class NotificationSender { private readonly INotificationService _notificationService; public NotificationSender(INotificationService notificationService) { _notificationService = notificationService; } public void SendNotification(string message) { _notificationService.SendNotification(message); }} |
In this example, the NotificationSender class depends on the INotificationService interface rather than concrete implementations. This allows different notification services to be injected at runtime, promoting loose coupling. The high-level module (NotificationSender) depends on the abstraction (INotificationService) rather than the low-level modules (EmailNotificationService, SMSNotificationService).
By adhering to these principles, developers can create code that is easier to understand, maintain, and modify, leading to more robust and scalable software systems.
Differences between ASP.NET Core and ASP.NET Framework
ASP.NET Core and ASP.NET Framework are both web application frameworks developed by Microsoft, but there are some significant differences between the two. Here are some of the key differences between ASP.NET Core and ASP.NET Framework:
- Open-source and community-driven: ASP.NET Core is open-source and community-driven, with contributions from developers around the world. ASP.NET Framework is also open-source, but Microsoft is the primary contributor.
- Cross-platform support: ASP.NET Core is designed to be cross-platform and can run on Windows, macOS, and Linux. ASP.NET Framework, on the other hand, is designed to run only on Windows.
- Modular design: ASP.NET Core has a modular design, with a lightweight and customizable architecture that allows developers to choose only the components they need. ASP.NET Framework has a monolithic design and includes a large set of pre-built components, which can result in larger and slower applications.
- Performance: ASP.NET Core is optimized for performance and can handle a larger number of requests per second than ASP.NET Framework. This is due to its lightweight design, which reduces overhead and allows it to run more efficiently.
- Dependency Injection: ASP.NET Core includes built-in support for Dependency Injection, which makes it easier to manage dependencies and improve code maintainability. ASP.NET Framework does not include built-in support for Dependency Injection, although it is possible to implement it using third-party libraries.
- Target platforms: ASP.NET Core is designed to target multiple platforms, including cloud, mobile, and desktop, while ASP.NET Framework is primarily targeted at web applications.
In summary, ASP.NET Core and ASP.NET Framework are both powerful web application frameworks, but they have some significant differences in terms of cross-platform support, open-source and community-driven development, modular design, performance, and target platforms. The choice between the two depends on the requirements of the project and the preferences of the developer.
Differences between ASP.NET Web Forms and ASP.NET MVC
ASP.NET Web Forms and ASP.NET MVC are two popular frameworks for building web applications in ASP.NET. Although both are built on the same platform and provide similar functionality, they have some key differences that set them apart. Here are some of the main differences between ASP.NET Web Forms and ASP.NET MVC:
- Separation of Concerns: ASP.NET Web Forms allows mixing of markup (HTML) and code (C# or VB.NET) in the same file, which can make it difficult to maintain the code. ASP.NET MVC separates the markup and code into different files, which makes it easier to maintain the code.
- Architecture: ASP.NET Web Forms uses a Page Controller architecture, where a single page contains all the code to handle the request and response. ASP.NET MVC, on the other hand, uses a Front Controller architecture, where a controller handles all the requests and responses for a group of pages.
- Testability: ASP.NET MVC is more testable than ASP.NET Web Forms, as it separates the code and markup, making it easier to write automated tests.
- URL Routing: ASP.NET Web Forms does not have built-in URL routing support, which can make it difficult to create search engine friendly URLs. ASP.NET MVC has built-in support for URL routing, which makes it easier to create clean and search engine friendly URLs.
- View State: ASP.NET Web Forms uses View State to maintain the state of controls on the page. This can result in large amounts of data being sent back and forth between the server and client, which can impact the performance of the application. ASP.NET MVC does not use View State, which can improve the performance of the application.
In summary, both ASP.NET Web Forms and ASP.NET MVC are powerful frameworks for building web applications in ASP.NET. The choice between them depends on the requirements of the project and the preferences of the developer. If you need more control over the markup and want to create search engine friendly URLs, ASP.NET MVC may be the better choice. If you need a rapid application development tool and are comfortable with the Page Controller architecture, then ASP.NET Web Forms may be the better choice.
C#.NET – MVC Training in Chennai – Maria Academy
C#.NET :
Maria Academy will teach you C# with enthusiasm. Trainers will be more interactive, addressing real-world issues and solutions. Hands-on programming will be provided to help students improve their programming skills. Trainers will have at least six years of experience. The syllabus has been designed to cover the entire C# learning process. To improve programming skills, a practical test and periodic exercises will be provided. With your programming skills, you should be able to provide a solution for a real-world scenario by the end of the training.
We are the best C#.NET Training Providers in Chennai, in terms of placement, course, syllabus, and practical. The evolution of “c” leads to “c++.” The evolution of c++ continues. C# is a modern, robust, and dependable programming language. C#.net is compatible with the Microsoft.NET framework. Cool features like Delegates, Interface, and Abstraction have propelled C#.net to the top of the world. C# has adopted the best features of its forefathers, such as C, C++, and Java. C# remains the solution provider to various hypothetical problems due to their own best features. C#.net was derived from various extracts of object-oriented programming.
C# has the object-oriented programming fundamentals of encapsulation, inheritance, polymorphism, and abstraction. Divide and conquer applies not only to King Makers but also to C# programmers. By learning C# with us, you will have a clear understanding of where the IT industry is using C#.NET. C#.net will provide a plenty of features for breaking down complex and enterprise problems into logical small units. These logical small units have then been reused in various scenarios to deal with the problem. Classes and objects have played an important role in c# and are important fundamentals of OOP. These will be defined in detail, as will the correlation of the objects. Generics, Delegates, and other important features will be covered, as well as hands-on programming. The main habits that lead to competitiveness with other programming languages are garbage collection, versioning support, and improved security. Every real-world object is capable of answering a large number of questions. Every real-world object will be solved by our C#.
MVC:
We are also the Chennai’s best MVC Training Institute. We specialize in C#, ASP.NET, SQL Server, MVVM, WCF, WPF & Silverlight, LINQ & Entity Framework, DOT NET Live Projects, ASP.NET MVC, and Design Pattern training. Learn about ASP.NET Model View Controller (MVC4) App Development to get started developing enterprise web applications, discover new MVC features, and prepare for Exam 70-486 Certification. MVC training course content is exclusively designed with Fundamentals to Advanced Concepts in mind. This MVC course is specifically designed to provide complete practical MVC training in accordance with the Microsoft Official Curriculum (MOC).
We also handle Training Sessions at Karaikudi & Pudukottai
Windows Application CRUD Operation with ADO.net
Document by Ganesan – Ganesanva@hotmail.com – +919600370429
Create TestDB Database in Server Explorer
Create table UserDetails in TestDB with the below code snippet,
| CREATE TABLE [dbo].[UserDetails] ( [UserId] INT IDENTITY (1, 1) NOT NULL, [UserName] VARCHAR (100) NULL, [Password] VARCHAR (100) NULL, [City] VARCHAR (100) NULL, PRIMARY KEY CLUSTERED ([UserId] ASC) ); |
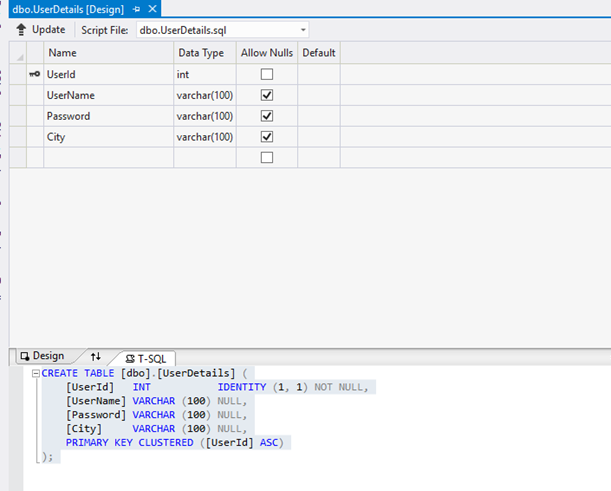
Add the below Connection string in app.config,
| <connectionStrings> <add name=”TestConnection” connectionString=”Data Source=(LocalDb)\v11.0;Initial Catalog=TestDB;Integrated Security=True;Pooling=False” providerName=”System.Data.SqlClient” /> </connectionStrings> |
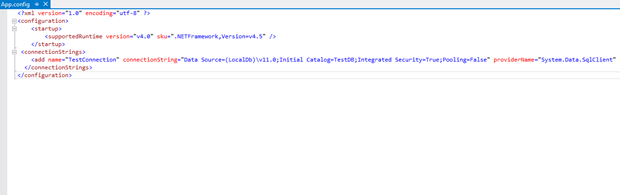
Design Form1 as below,
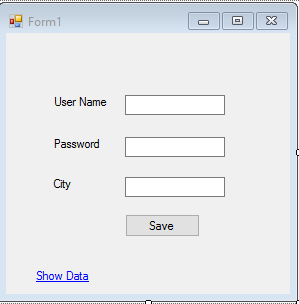
Textbox Properties
UserName Name – txtUserName
Password Name – txtPassword
City Name – txtCity
Save -btnSave
Show Data Link Name -linkLabel1
Events
btnSave OnClick =btnSave_Click
Show Data Link onClick= linkLabel1_LinkClicked
Add below Namespace in Form1.cs.
| Using System.Data.SqlClient; Using System.Configuration; |
Add Reference System.Configuration.DLL in the Project.
In Form1.cs (Replace) put the below Snippet,
| public partial class Form1 : Form { SqlConnection con = new SqlConnection(ConfigurationManager.ConnectionStrings[“TestConnection”].ConnectionString); public Form1() { InitializeComponent(); } private void btnSave_Click(object sender, EventArgs e) { con.Open(); SqlCommand cmd = new SqlCommand(“insert into UserDetails values(‘”+txtUserName.Text+”‘”+”,'”+txtPassword.Text +”‘,'”+txtCity.Text+”‘)”,con); int results=cmd.ExecuteNonQuery(); con.Close(); if (results > 0) { MessageBox.Show(“Inserted Successfully”); } } private void Clear() { txtUserName.Text = string.Empty; txtPassword.Text = string.Empty; txtCity.Text = string.Empty; } private void linkLabel1_LinkClicked(object sender, LinkLabelLinkClickedEventArgs e) { ShowData objShowData = new ShowData(); objShowData.Show(); this.Hide(); } } |
Add ShowData.cs form as below design,
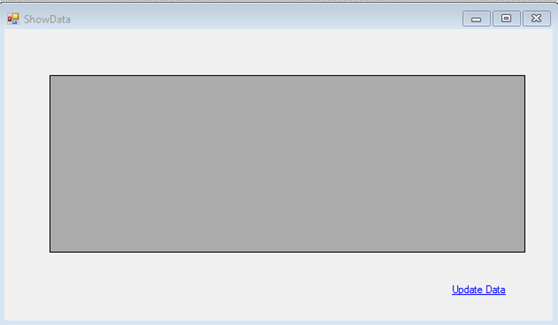
Properties
DataGrid Name – dgvGridData
Update Data Name – lnkUpdate
Events
lnkUpdate Link onClick Event – lnkUpdate_LinkClicked
ShowData Form OnLoad Event – ShowData_Load
Add below Namespace in ShowData .cs.
| Using System.Data.SqlClient; Using System.Configuration; |
In ShowData.cs (Replace) put the below Snippet,
| public partial class ShowData : Form { SqlConnection con = new SqlConnection(ConfigurationManager.ConnectionStrings[“TestConnection”].ConnectionString); public ShowData() { InitializeComponent(); } private void ShowData_Load(object sender, EventArgs e) { SqlCommand cmd = new SqlCommand(“select * from UserDetails”, con); SqlDataAdapter ada = new SqlDataAdapter(cmd); DataSet ds = new DataSet(); ada.Fill(ds); dgvGridData.DataSource = ds.Tables[0]; } private void lnkUpdate_LinkClicked(object sender, LinkLabelLinkClickedEventArgs e) { UpdateUserData objUpdateUserData = new UpdateUserData(); objUpdateUserData.Show(); this.Hide(); } } |
Add UpdateUserData.cs Form as below Design,
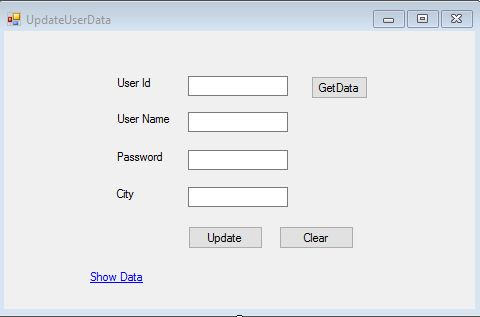
Properties
UserId textbox Name – txtUserId
UserName Textbox -txtUserName
Password Textbox – txtPassword
City Textbox – txtCity
Update button name -btnUpdate
Get Data button Name – btnGet
Clear button Name – btnClear
Show Data Link Name -linkLabel1
Event :
btnUpdate onClick =btnUpdate_Click
btnGet onClick= btnGet_Click
btnClear onClick =btnClear_Click
linkLabel1 onClick – linkLabel1_LinkClicked
Add below Namespace in UpdateUserData .cs.
| Using System.Data.SqlClient; Using System.Configuration; |
Put (Replace) the below snippet in UpdateUserData.cs ,
| public partial class UpdateUserData : Form { SqlConnection con = new SqlConnection(ConfigurationManager.ConnectionStrings[“TestConnection”].ConnectionString); public UpdateUserData() { InitializeComponent(); } private void btnUpdate_Click(object sender, EventArgs e) { con.Open(); SqlCommand cmd = new SqlCommand(“Update UserDetails Set UserName='” + txtUserName.Text + “‘,Password='” + txtPassword.Text + “‘,City='” + txtCity.Text + “‘ where UserId=” + txtUserId.Text, con); int results = cmd.ExecuteNonQuery(); con.Close(); if (results > 0) { MessageBox.Show(“Updated Successfully”); } Clear(); } private void Clear() { txtUserId.Text = string.Empty; txtUserName.Text = string.Empty; txtPassword.Text = string.Empty; txtCity.Text = string.Empty; btnGet.Enabled = true; } private void btnGet_Click(object sender, EventArgs e) { con.Open(); SqlCommand cmd = new SqlCommand(“select * from UserDetails where UserId=”+txtUserId.Text, con); SqlDataReader dr = cmd.ExecuteReader(); while (dr.Read()) { txtUserName.Text = dr[“UserName”].ToString(); txtPassword.Text = dr[“Password”].ToString(); txtCity.Text = dr[“City”].ToString(); } con.Close(); btnGet.Enabled = false; } private void linkLabel1_LinkClicked(object sender, LinkLabelLinkClickedEventArgs e) { ShowData objShowData = new ShowData(); objShowData.Show(); this.Hide(); } private void btnClear_Click(object sender, EventArgs e) { Clear(); } } |
The Output as below,
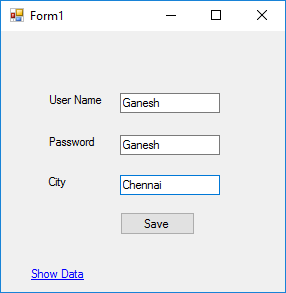
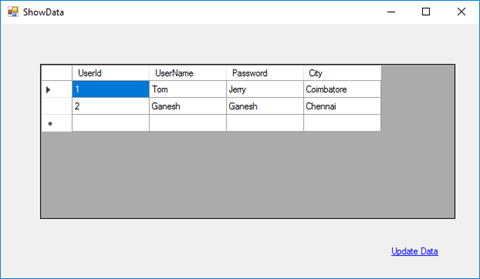

Table Data as below,
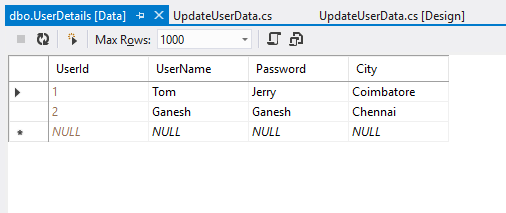
Click below to download the solution,
https://1drv.ms/u/s!ArddhCoxftkQg6khuXmrBnLklntXTA
Consume WCF application in MVC
Document by Ganesan – Ganesanva@hotmail.com – + 919600370429
Create a new MVC application.
Create Connection string in Web.config as below.
| <connectionStrings> <add name=”TestConnection” connectionString=”Data Source=(LocalDb)\v11.0;Initial Catalog=TestDB;Integrated Security=True;Pooling=False” providerName=”System.Data.SqlClient” /> </connectionStrings> |
Create StudentDetails.cs Class file as below.
| [DataContract] public class StudentDetails { [DataMember] public int Id { get; set; } [DataMember] public string StudentName { get; set; } [DataMember] public int? Age { get; set; } } |
Create DBContext.Cs file as below
| public class UsersContext : DbContext { public UsersContext() : base(“TestConnection”) { } public DbSet<StudentDetails> studentDbset { get; set; } } |
Create ScafFolding and autogenerate Views and controllers.
Make sure the Code now works in DB first approach. After this we are going to change the
data source to consume From WCF.
Create Service Reference as below,
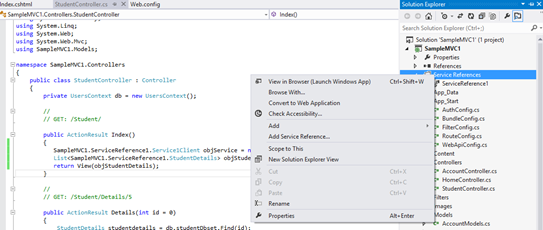
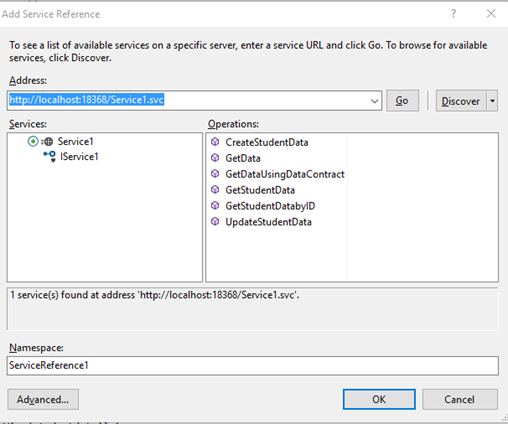
Click OK. Now the service reference will be added as below,
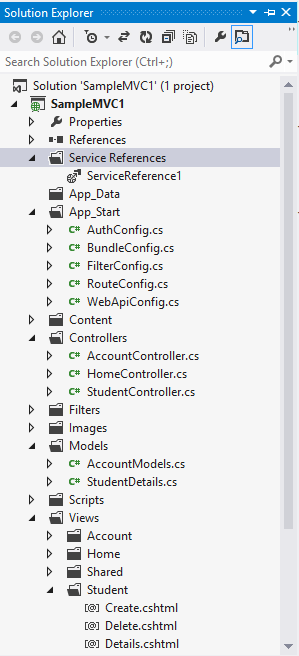
Replace the Controller methods for CRUD as below,
| public ActionResult Index() { SampleMVC1.ServiceReference1.Service1Client objService = new ServiceReference1.Service1Client(); List<SampleMVC1.ServiceReference1.StudentDetails> objStudentDetails= objService.GetStudentData(); return View(objStudentDetails); } [HttpPost] public ActionResult Create(SampleMVC1.ServiceReference1.StudentDetails studentdetails) { if (ModelState.IsValid) { SampleMVC1.ServiceReference1.Service1Client objService = new ServiceReference1.Service1Client(); string result= objService.CreateStudentData(studentdetails); return RedirectToAction(“Index”); } return View(studentdetails); } // // GET: /Student/Edit/5 public ActionResult Edit(int id = 0) { SampleMVC1.ServiceReference1.Service1Client objService = new ServiceReference1.Service1Client(); SampleMVC1.ServiceReference1.StudentDetails studentdetails = objService.GetStudentDatabyID(id); if (studentdetails == null) { return HttpNotFound(); } return View(studentdetails); } // // POST: /Student/Edit/5 [HttpPost] public ActionResult Edit(SampleMVC1.ServiceReference1.StudentDetails studentdetails) { if (ModelState.IsValid) { SampleMVC1.ServiceReference1.Service1Client objService = new ServiceReference1.Service1Client(); string result = objService.UpdateStudentData(studentdetails); return RedirectToAction(“Index”); } return View(studentdetails); } |
Replace the view First line I.E model reference to point to Service model

Similar for other pages too.
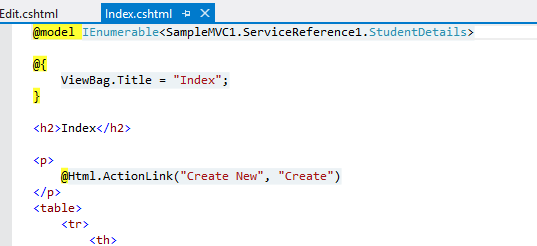
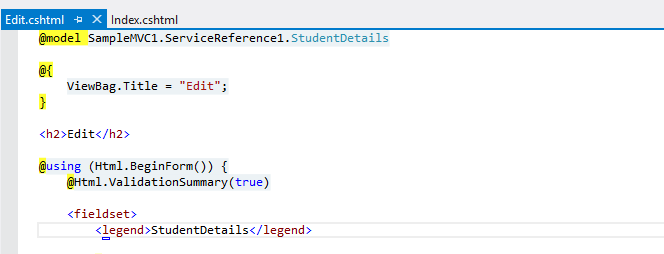
Now the pages will be like below
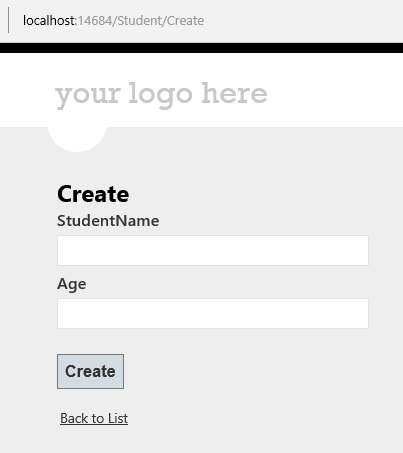

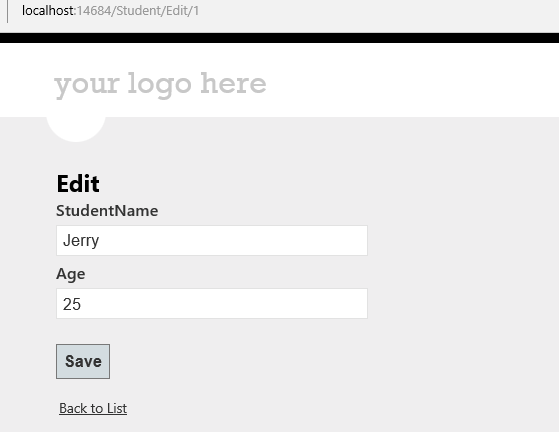
Click on the Link below to get the sample solution
https://1drv.ms/u/s!ArddhCoxftkQg6gdCJeDrlqBAJE0vg
Create wcf Application for CRUD operation
Document by Ganesan – Ganesanva@hotmail.com – + 919600370429
-Create StudentDetails Table in Local DB
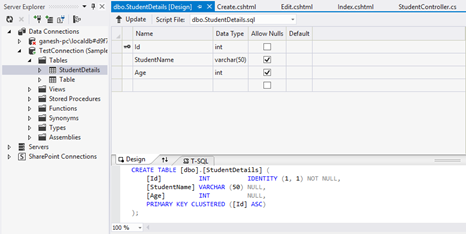
Right Click on the DB and Click Properties.
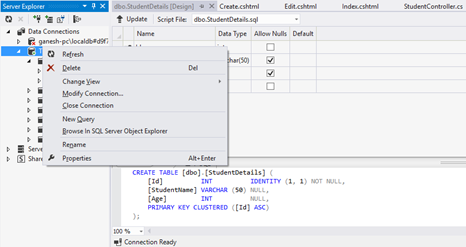
Connection String can be seen in Property window.
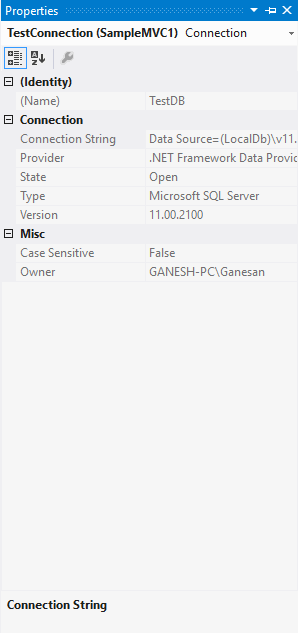
– Create a new WCF Service Application.
Put the connection string above in Web.config as in Snippet.
| <connectionStrings> <add name=”TestConnection” connectionString=”Data Source=(LocalDb)\v11.0;Initial Catalog=TestDB;Integrated Security=True;Pooling=False” providerName=”System.Data.SqlClient” /> </connectionStrings> |
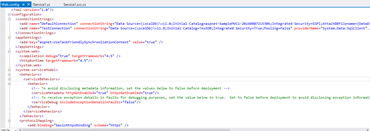
Create StudentDetails.cs Class file as below.
| [DataContract] public class StudentDetails { [DataMember] public int Id { get; set; } [DataMember] public string StudentName { get; set; } [DataMember] public int? Age { get; set; } } |
Create DBContext.Cs file as below
| public class UsersContext : DbContext { public UsersContext() : base(“TestConnection”) { } public DbSet<StudentDetails> studentDbset { get; set; } } |
Open the default interface file IService1.cs
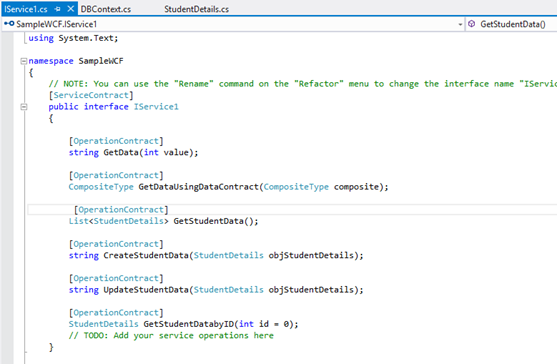
Insert the Snippet as below
| [OperationContract] List<StudentDetails> GetStudentData(); [OperationContract] string CreateStudentData(StudentDetails objStudentDetails); [OperationContract] string UpdateStudentData(StudentDetails objStudentDetails); [OperationContract] StudentDetails GetStudentDatabyID(int id = 0); |
Implement the below code in Service1.Svc.cs
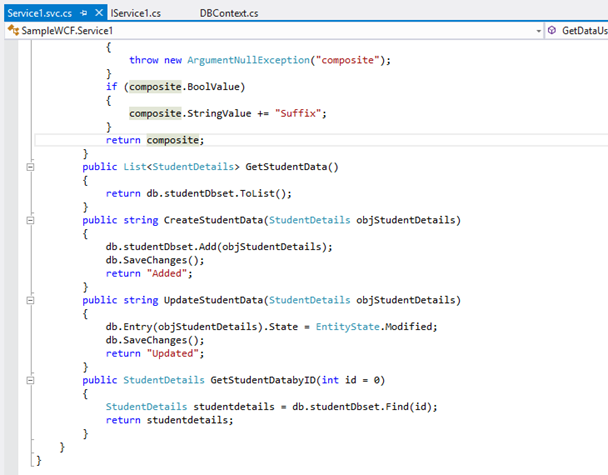
Code Snippet
| public List<StudentDetails> GetStudentData() { return db.studentDbset.ToList(); } public string CreateStudentData(StudentDetails objStudentDetails) { db.studentDbset.Add(objStudentDetails); db.SaveChanges(); return “Added”; } public string UpdateStudentData(StudentDetails objStudentDetails) { db.Entry(objStudentDetails).State = EntityState.Modified; db.SaveChanges(); return “Updated”; } public StudentDetails GetStudentDatabyID(int id = 0) { StudentDetails studentdetails = db.studentDbset.Find(id); return studentdetails; } |
Run the Service application as below

Click on the Link below to get the sample solution
https://1drv.ms/u/s!ArddhCoxftkQg6gdCJeDrlqBAJE0vg
Asp.net Validation Controls
Document by Ganesan -ganesanva@hotmail.com – + 919600370429
List of Asp.net Validation available are as follows,
1.Required Field validator
2.Regular Expression validator
3.Range Validator
4.Custom Validator
5.Compare Validator
Create a new Asp.net Web application
File -> New Project
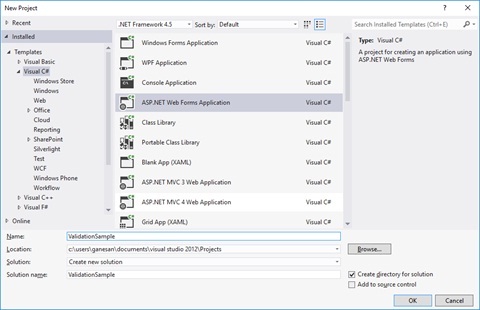
Right click on the solution and Add New web form page AddStudentDetails.aspx as below,

Replace the HTML Tag in AddStudentDetails.aspx with below snippet,
| <html xmlns=”http://www.w3.org/1999/xhtml”> <head runat=”server”> <title></title> </head> <body> <form id=”form1″ runat=”server”> <div> <table border=”0″ cellspacing=”2″ cellpadding=”2″> <tr> <td>Student Name </td> <td> <asp:TextBox ID=”txtStudentName” runat=”server”></asp:TextBox> <asp:RequiredFieldValidator ID=”RQStudentName” runat=”server” ControlToValidate=”txtStudentName” ErrorMessage=”Please enter Student Name” ForeColor=”Red”> </asp:RequiredFieldValidator> </td> </tr> <tr> <td> Date of Birth </td> <td> <asp:TextBox ID=”txtDOB” runat=”server”></asp:TextBox> <asp:RangeValidator ID=”Rvalid” runat=”server” ControlToValidate=”txtDOB” ErrorMessage=”Date of Birth should not be greater than current date” Type=”Date” ForeColor=”Red”></asp:RangeValidator> </td> </tr> <tr> <td> Age </td> <td> <asp:TextBox ID=”txtAge” runat=”server”></asp:TextBox> <asp:RequiredFieldValidator ID=”RqAge” runat=”server” ControlToValidate=”txtAge” ErrorMessage=”Please enter Student Age” ForeColor=”Red”> </asp:RequiredFieldValidator> <asp:RangeValidator ID=”RgAge” runat=”server” ControlToValidate=”txtAge” ErrorMessage=”Age should be greater than 18″ MinimumValue=”18″ ForeColor=”Red” MaximumValue=”2000″ Type=”Integer”></asp:RangeValidator> </td> </tr> <tr> <td> City </td> <td> <asp:DropDownList ID=”ddlCity” runat=”server”> <asp:ListItem Text=”–Select–” Value=”–Select–“></asp:ListItem> <asp:ListItem Text=”Chennai” Value=”Chennai”></asp:ListItem> <asp:ListItem Text=”Madurai” Value=”Madurai”></asp:ListItem> </asp:DropDownList> <asp:RequiredFieldValidator ID=”RqCity” runat=”server” InitialValue=”–Select–” ControlToValidate=”ddlCity” ErrorMessage=”Please enter Student City” ForeColor=”Red”> </asp:RequiredFieldValidator> </td> </tr> <tr> <td> Email Id </td> <td> <asp:TextBox ID=”txtEmailId” runat=”server”></asp:TextBox> <asp:RequiredFieldValidator ID=”RqEmailId” runat=”server” ControlToValidate=”txtEmailId” ErrorMessage=”Please enter Email ID” ForeColor=”Red”> </asp:RequiredFieldValidator> <asp:RegularExpressionValidator ID=”REVEmailId” runat=”server” ErrorMessage=”please enter correct email id” ControlToValidate=”txtEmailId” ValidationExpression=”\w+([-+.’]\w+)*@\w+([-.]\w+)*\.\w+([-.]\w+)*” ForeColor=”Red”></asp:RegularExpressionValidator> </td> </tr> <tr> <td> User Name </td> <td> <asp:TextBox ID=”txtUserName” runat=”server”></asp:TextBox> <asp:RequiredFieldValidator ID=”RequiredFieldValidator1″ runat=”server” ControlToValidate=”txtUserName” ErrorMessage=”Please enter UserName” ForeColor=”Red”> </asp:RequiredFieldValidator> <asp:CustomValidator ID=”CVUserName” runat=”server” ControlToValidate=”txtUserName” OnServerValidate=”CVUserName_ServerValidate” ErrorMessage=”UserName should not be greater than 15 digits” ForeColor=”Red”></asp:CustomValidator> </td> </tr> <tr> <td> Password </td> <td> <asp:TextBox ID=”txtPassword” runat=”server” TextMode=”Password”></asp:TextBox> <asp:RequiredFieldValidator ID=”RequiredFieldValidator2″ runat=”server” ControlToValidate=”txtPassword” ErrorMessage=”Please enter Password” ForeColor=”Red”> </asp:RequiredFieldValidator> </td> </tr> <tr> <td> Retype Password </td> <td> <asp:TextBox ID=”txtRetypePassword” runat=”server” TextMode=”Password”></asp:TextBox> <asp:RequiredFieldValidator ID=”RequiredFieldValidator3″ runat=”server” ControlToValidate=”txtRetypePassword” ErrorMessage=”Please enter Retype Password” ForeColor=”Red”> </asp:RequiredFieldValidator> <asp:CompareValidator ID=”cmpPasswordmatch” runat=”server” ControlToCompare=”txtPassword” ControlToValidate=”txtRetypePassword” ErrorMessage=”Password and Retype Password should not match” ForeColor=”Red”> </asp:CompareValidator> </td> </tr> <tr> <td></td> <td> <asp:Button ID=”btnSave” runat=”server” Text=”Save” CausesValidation=”true” OnClick=”btnSave_Click” /> </td> </tr> </table> </div> </form> </body> </html> |
Replace the AddStudentDetails.cs class with the below snippet,
| public partial class AddStudentDetails : System.Web.UI.Page { protected void Page_Load(object sender, EventArgs e) { Rvalid.MinimumValue = DateTime.MinValue.ToString(“dd-MM-yyyy”); Rvalid.MaximumValue = DateTime.Now.ToString(“dd-MM-yyyy”); } protected void CVUserName_ServerValidate(object source, ServerValidateEventArgs args) { args.IsValid = (args.Value.Length < 15); } protected void btnSave_Click(object sender, EventArgs e) { if (Page.IsValid) { Response.Write(“Saved”); } } } |
The Output as below,
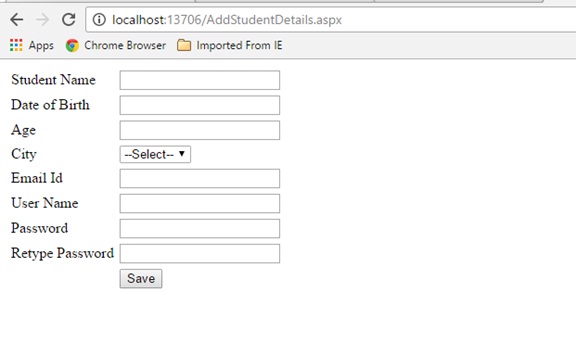
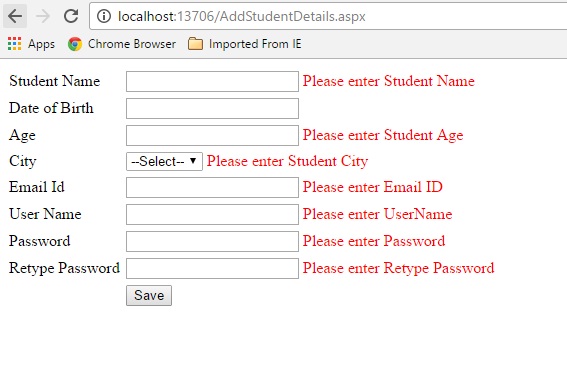
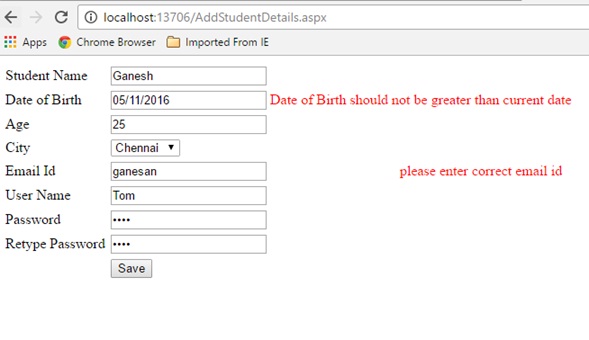
Custom Validation on server event,
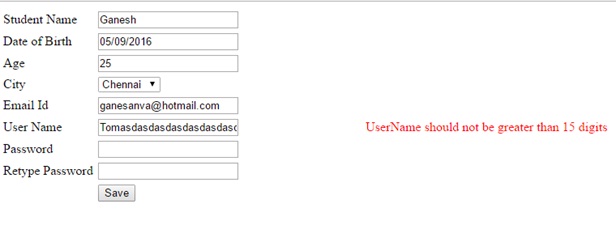
Click below to download the solution,
https://1drv.ms/u/s!ArddhCoxftkQg6kmic1tyrHNsIbXqA
Asp.net CRUD operation with Ado.net
Document by Ganesan – Ganesanva@hotmail.com – + 919600370429
– Create Database in SQL as “StudentDB”
– Create Table “StudentDetails” with the below snippet,
| CREATE TABLE [dbo].[StudentDetails] ( [Id] INT IDENTITY (1, 1) NOT NULL, [StudentName] VARCHAR (50) NULL, [Age] INT NULL, PRIMARY KEY CLUSTERED ([Id] ASC) ); |
You can see the DB created in local SQL express as below,
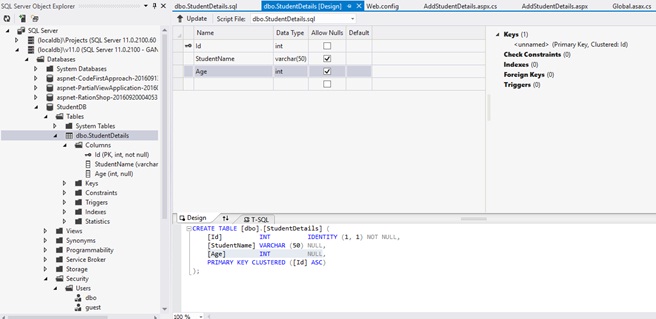
– Create a new Asp.net Web forms Application as below
File –> New Project
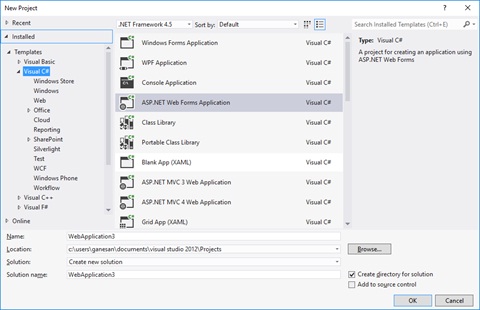
Add the Connection string in Web.config as below snippet,
| <connectionStrings> <add name=”DefaultConnection” providerName=”System.Data.SqlClient” connectionString=”Data Source=(localdb)\v11.0;Initial Catalog=StudentDB;Integrated Security=True;Connect Timeout=15;Encrypt=False;TrustServerCertificate=False” /> </connectionStrings> |
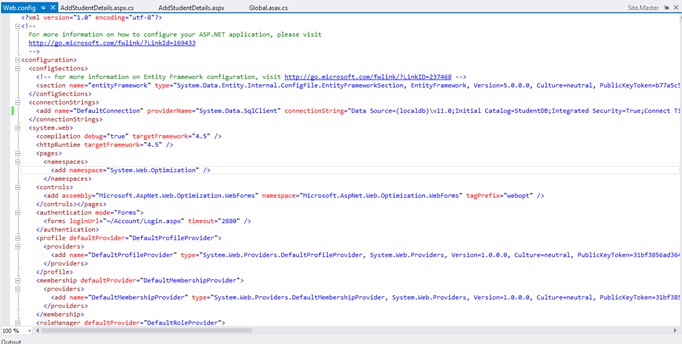
Add new Page as AddStudentDetails.aspx as below,
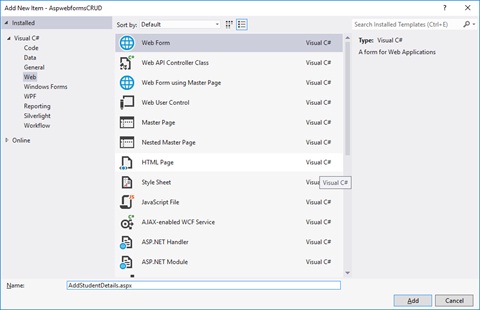
Replace the Below HTML code in AddStudentDetails.aspx file as below,
| <html xmlns=”http://www.w3.org/1999/xhtml”> <head runat=”server”> <title></title> </head> <body> <form id=”form1″ runat=”server”> <div> <table border=”0″ cellspacing=”2″ cellpadding=”2″> <tr> <td> <asp:Label ID=”lblStudentName” runat=”server” Text=”Student Name”></asp:Label> </td> <td> <asp:TextBox ID=”txtStudentName” runat=”server”></asp:TextBox> </td> </tr> <tr> <td> <asp:Label ID=”lblAge” runat=”server” Text=”Age”></asp:Label> </td> <td> <asp:TextBox ID=”txtAge” runat=”server”></asp:TextBox> </td> </tr> <tr> <td></td> <td> <asp:Button ID=”btnSubmit” runat=”server” Text=”Submit” OnClick=”btnSubmit_Click” /> <asp:Button ID=”btnUpdate” runat=”server” Text=”Update” OnClick=”btnUpdate_Click” /> <asp:Button ID=”btnClear” runat=”server” Text=”Clear” OnClick=”btnClear_Click” /> <asp:HiddenField ID=”hfId” runat=”server”></asp:HiddenField> </td> </tr> <tr> <td colspan=”2″> <asp:GridView ID=”grvStudentDetails” runat=”server” AutoGenerateColumns=”false”> <Columns> <asp:BoundField DataField=”Id” HeaderText=”Id” /> <asp:BoundField DataField=”StudentName” HeaderText=”StudentName” /> <asp:BoundField DataField=”Age” HeaderText=”Age” /> <asp:TemplateField> <ItemTemplate> <asp:Button ID=”btnEdit” runat=”server” Text=”Edit” OnClick=”btnEdit_Click” /> </ItemTemplate> </asp:TemplateField> </Columns> </asp:GridView> </td> </tr> </table> </div> </form> </body> </html> |
Replace the AddStudentDetails.aspx.cs file as below,
| public partial class AddStudentDetails : System.Web.UI.Page { SqlConnection con = new SqlConnection(ConfigurationManager.ConnectionStrings[“DefaultConnection”].ToString()); protected void Page_Load(object sender, EventArgs e) { if (!Page.IsPostBack) { BindGrid(); } } private void BindGrid() { btnSubmit.Visible = true; btnUpdate.Visible = false; SqlCommand cmd = new SqlCommand(“Select * from StudentDetails”, con); SqlDataAdapter ada = new SqlDataAdapter(cmd); DataSet ds = new DataSet(); ada.Fill(ds); grvStudentDetails.DataSource = ds.Tables[0]; grvStudentDetails.DataBind(); } protected void btnSubmit_Click(object sender, EventArgs e) { con.Open(); SqlCommand cmd = new SqlCommand(“insert into StudentDetails values(‘”+txtStudentName.Text+”‘,”+txtAge.Text+”)”, con); int result=cmd.ExecuteNonQuery(); if (result > 0) { Response.Write(“Inserted Successfully”); } con.Close(); BindGrid(); btnClear_Click(null, null); } protected void btnEdit_Click(object sender, EventArgs e) { Button btn = (Button)sender; //Get the row that contains this button GridViewRow gvr = (GridViewRow)btn.NamingContainer; hfId.Value = gvr.Cells[0].Text; txtStudentName.Text = gvr.Cells[1].Text; txtAge.Text = gvr.Cells[2].Text; btnSubmit.Visible = false; btnUpdate.Visible = true; } protected void btnUpdate_Click(object sender, EventArgs e) { con.Open(); SqlCommand cmd = new SqlCommand(“Update StudentDetails set StudentName='” + txtStudentName.Text + “‘,Age=” + txtAge.Text + ” where Id=”+hfId.Value, con); int result = cmd.ExecuteNonQuery(); if (result > 0) { Response.Write(“Updated Successfully”); } con.Close(); BindGrid(); btnClear_Click(null, null); } protected void btnClear_Click(object sender, EventArgs e) { txtStudentName.Text = string.Empty; txtAge.Text = string.Empty; hfId.Value = string.Empty; } } |
Run the solution.
The Output will be below,
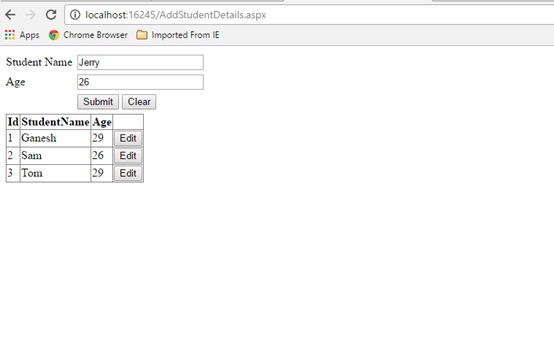
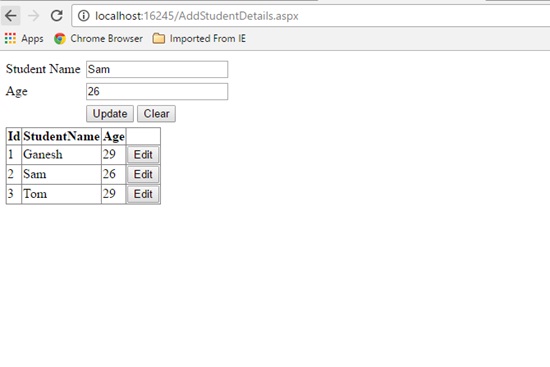
Click below to download the solution,
https://1drv.ms/u/s!ArddhCoxftkQg6h98mZAX_-Zv-6reQ
Recent Posts
Categories
- All
- Angularjs training in Chennai
- ASP.NET Core
- dot net training
- dot net training in chennai
- dotnet full stack developer
- Free dotnet training
- information on dotnet
- Learn Java in chennai
- Learn Python at Karaikudi
- learn python online
- learn python online from chennai
- Linq Queries in .net
- mutual funds
- MVC Training Tutorials
- PHP Training in Chennai
- pmp training online
- power apps online training
- Python Training Online
- share market
- Sharepoint framework online training
- SharePoint Freelancers in Chennai
- software testing
- spfx online training
- Stock market
- Uncategorized